How to Paint a Popcorn Ceiling with a Sprayer: Step-by-Step Guide
Learning how to paint a popcorn ceiling with a sprayer saves time, produces better coverage, and avoids the texture damage that rollers cause. An airless paint sprayer coats the bumpy surface in half the time of a roller and reaches into every crevice without pressing against the fragile popcorn material.
Rollers work on popcorn ceilings, but they drag across the bumps. Press too hard and the texture crumbles. Too much paint on the roller and the heavy coating pulls the popcorn off the drywall. A sprayer applies an even mist that settles into the texture without physical contact — which is why professional painters choose sprayers for textured ceilings almost every time.
This guide covers the full process: safety and asbestos testing, the right sprayer and spray tip, room preparation, step-by-step spraying technique, the roller alternative, cleanup, costs, and common problems with fixes.
Safety First: Asbestos Check and Protective Gear
Before you learn how to paint a popcorn ceiling with a sprayer, check one thing: asbestos. Homes built before 1974 (and as late as the early 1980s) may have asbestos in the popcorn texture. Painting does not disturb the material if done with a sprayer — no scraping or sanding involved. But if the ceiling is damaged, crumbling, or you plan any repairs before painting, test first.
- DIY asbestos test kit: $40–$150 from Home Depot or Amazon.
- Professional asbestos testing: $250–$850 depending on home size.
- If positive and the ceiling is intact: Painting with a sprayer is safe. The spray mist seals the surface without disturbing fibers.
Protective gear for spraying:
- Safety glasses or goggles — overspray falls into your eyes when painting overhead.
- Dust mask or respirator — fine paint mist fills the room during spraying.
- Spray sock or hat — covers your hair from overhead paint drift.
- Gloves and old clothes — overspray coats everything in the room, including you.
Open windows and set up fans for adequate ventilation. Turn off ceiling fans, light fixtures, and any appliances in the room.
Tools and Materials for Spraying a Popcorn Ceiling
Here is the full list of what you need to paint popcorn ceiling with sprayer equipment.
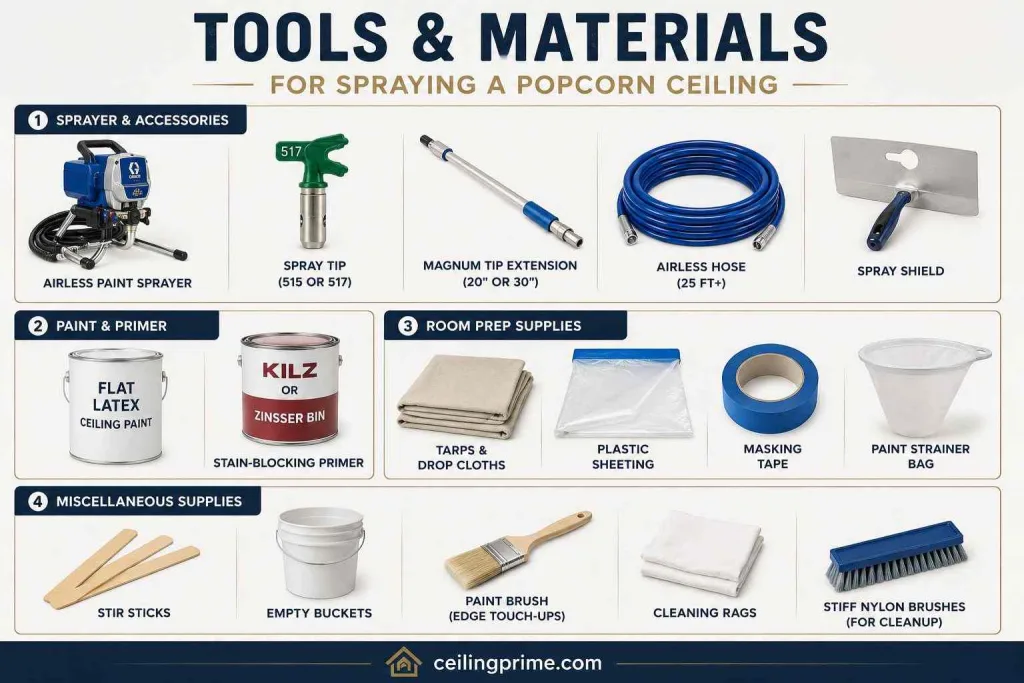
Sprayer and accessories:
- Airless paint sprayer — Graco Magnum X5 or X7, or Graco TrueCoat Paint Sprayer are the most recommended models for textured ceilings. Rent one for $50–$75 per day if you do not own one.
- Spray tip — a 515 or 517 tip produces a wide fan pattern that covers large ceiling areas with minimal overspray. The first number (5) is the fan width; the second (15 or 17) is the orifice size in thousandths of an inch.
- Magnum tip extension — a 20-inch or 30-inch extension pole attaches to the spray gun so you can paint the ceiling from the floor without a ladder. Your neck and shoulders will thank you.
- Airless hose — 25-foot hose comes standard with most rental sprayers. Add sections for larger rooms.
- Spray shield — a metal or plastic guard held at the wall-ceiling edge to create a clean line.
Paint and primer:
- Flat latex ceiling paint — flat sheen hides texture imperfections. One gallon covers 200 to 250 square feet on popcorn texture.
- Stain-blocking primer (oil-based or shellac) — Kilz or Zinsser BIN. Apply before paint if the ceiling has water stains, smoke discoloration, or has never been painted.
Room prep supplies:
- Tarps, drop cloths, and plastic sheeting for floors, walls, furniture, and trim.
- Masking tape (painter’s tape) for edges where the ceiling meets walls.
- Paint strainer bag — strain the paint into an empty bucket or 5-gallon container before loading the sprayer. Lumps clog the spray tip.
- Stir sticks, empty buckets, paint brush (for edge touch-ups), cleaning rags, and stiff nylon brushes (for sprayer cleanup).
Choose the Right Paint Sprayer for Ceilings
Not all sprayers work well on popcorn texture. Here is how to choose the best paint sprayer for ceilings.
| Sprayer Type | Best For | Popcorn Ceiling Rating |
| Airless sprayer (Graco Magnum, Wagner) | Large areas, heavy paints, textured surfaces | Best — fast, even coverage, reaches deep texture |
| HVLP sprayer | Cabinets, trim, small detail work | Fair — works but slower, more overspray control |
| Handheld electric sprayer | Small touch-ups, crafts | Poor — not enough pressure for thick ceiling paint |
An airless sprayer is the clear winner for popcorn ceilings. It handles thick latex paint and ceiling paint without thinning, delivers high volume in wide fan patterns, and reaches into every bump and valley of the texture. The Graco TrueCoat is a solid choice for homeowners doing one or two rooms. The Graco Magnum X7 handles whole-house projects.
Prepare the Room Before Spraying
Spraying a ceiling creates heavy overspray. Every surface in the room will get a fine mist of paint if not covered. This is the most time-consuming part of learning how to paint a popcorn ceiling with a sprayer — but skipping it means repainting walls and cleaning paint off furniture.
- Move all furniture out of the room. If you cannot move it, cover it completely with plastic sheeting and tape the edges.
- Cover the floor with tarps or drop cloths. Tape them to the baseboards so they do not shift.
- Tape plastic sheeting to the top of each wall where it meets the ceiling. This protects wall paint from overspray. Use masking tape for a clean line.
- Remove light fixtures, ceiling fan blades, and smoke detectors. Cover junction boxes with tape.
- Mask trim, door frames, and window frames with tape and plastic.
- Vacuum or dust the ceiling with a soft brush attachment to remove cobwebs and loose dust. Paint does not stick to dirty surfaces.
How to Spray Paint a Popcorn Ceiling: Step-by-Step
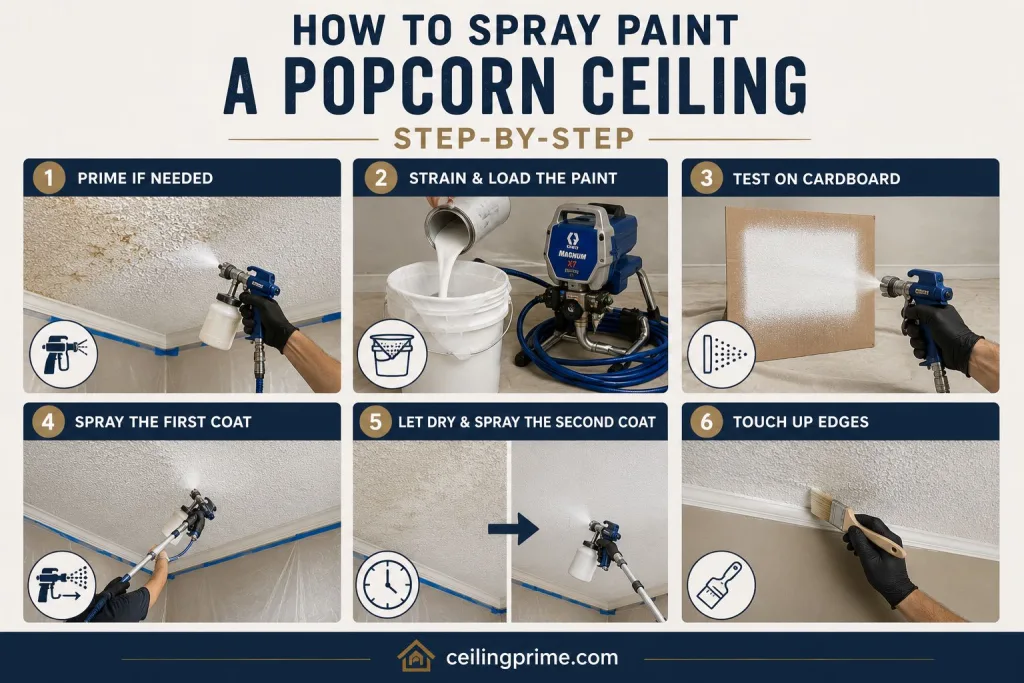
Step 1 — Prime If Needed
Apply stain-blocking primer if the ceiling has water stains, smoke yellowing, or has never been painted. Use the sprayer with the same technique described below. Let the primer dry 1 to 2 hours before applying paint. Primer adhesion is important — it seals stains and gives the topcoat a uniform base.
Step 2 — Strain and Load the Paint
Pour your ceiling paint through a paint strainer bag into an empty 5-gallon container. If you are using paint from multiple cans, mix them together to ensure consistent color. Load the sprayer according to the manufacturer’s directions. Prime the pump until paint flows from the spray tip.
Step 3 — Test on Cardboard
Before touching the ceiling, spray a test pattern on a piece of cardboard. Check the fan width, coverage, and atomization. Adjust the pressure until the spray is fine and even with no spitting or dripping. This test saves you from applying a bad pattern onto your ceiling.
Step 4 — Spray the First Coat
Start at one edge where the ceiling meets the wall. If using a spray shield, hold it at a 45-degree angle into the corner. Hold the sprayer 12 to 16 inches from the ceiling surface. Move at a steady, consistent speed.
Spray in one direction — left to right or front to back — across the room. Overlap each pass by 50% for uniform coverage. Work in small sections (a few square feet at a time) to maintain a consistent rhythm.
Do not stop in one spot. Keep the sprayer moving. Standing still creates heavy spots that drip and can saturate the popcorn texture enough to make it fall.
Step 5 — Let Dry and Spray the Second Coat
Let the first coat dry at least 1 to 2 hours. The first coat will look uneven as it dries — resist the urge to add more paint before it is dry. For the second coat, spray perpendicular to the first direction. If the first coat went left to right, the second coat goes front to back. This cross-hatch pattern covers all sides of the popcorn bumps and achieves uniform, complete coverage.
Two thin coats produce better results than one heavy coat. Multiple thin coats prevent texture saturation, dripping, and texture fallout.
Step 6 — Touch Up Edges
Use a paint brush to cut in a 2-inch strip along any edges where the sprayer could not reach cleanly. Dab gently — do not press the brush into the popcorn texture.
Techniques: How to Paint a Popcorn Ceiling with a Sprayer Without Damage
- Maintain consistent nozzle distance: 12–16 inches from the surface. Too close saturates the texture and causes fallout. Too far produces thin coverage and more overspray.
- Use repeated passes with light coats instead of one heavy pass. Light coats dry faster and do not weigh down the texture.
- Avoid excessive pressure: High pressure blasts the fragile texture off the drywall. Start at medium pressure and increase only if coverage is uneven.
- Backrolling option: After spraying a section, some painters follow with a thick-nap roller (3/4-inch) to press the paint into the deepest crevices. This achieves a stipple effect and ensures complete coverage on heavy texture.
- Pre-dampen the ceiling: Lightly misting the popcorn with water before painting can prevent the paint from ripping loose texture. This tip is useful on older, brittle ceilings.
Paint a Popcorn Ceiling Without a Sprayer (Roller Method)
Not everyone has access to an airless sprayer. You can paint popcorn ceiling with a roller if you follow these rules: use a thick-nap roller cover (3/4-inch minimum), load the roller with less paint than normal, and roll in one direction with very light pressure. Do not press the roller into the texture. Do not go back over wet areas.
A split foam roller or acoustic roller cover (available at Home Depot and paint supply stores) works better than a standard nap roller on popcorn. The foam design fits around the bumps without crushing them.
The downside: rolling takes 2 to 3 times longer than spraying and still risks pulling texture off the drywall. For a full room, the sprayer method described in how to paint a popcorn ceiling with a sprayer is faster and produces cleaner results.
Cleanup and Sprayer Maintenance
- Clean the sprayer immediately after use. Run water through the system until it sprays clear. Use Pump Armor storage fluid or TSL fluid for long-term storage.
- Remove the spray tip and soak it in warm water. Clean the nozzle with a stiff nylon brush.
- Let the ceiling paint dry completely before removing masking tape. Semi-dry tape removal (2–4 hours) prevents cracking at the paint line.
- Vacuum overspray dust from the floor after the drop cloths are removed.
Cost Breakdown: Sprayer vs Roller for Popcorn Ceiling Painting
| Item | Sprayer Method | Roller Method |
| Equipment | $50–$75/day rental (or $200–$400 to buy) | $15–$30 (roller, cover, tray) |
| Paint (12×12 room) | 2 gallons ($50–$80) | 2–3 gallons ($50–$120) |
| Prep supplies | $30–$60 (tape, plastic, tarps) | $15–$30 (less masking needed) |
| Time (one room) | 1–2 hours spraying + 2 hours prep | 3–5 hours rolling + 1 hour prep |
| Total DIY cost | $130–$215 | $80–$180 |
The sprayer method costs more in equipment but uses less paint (no roller absorption) and finishes faster. For a single room, the roller is cheaper. For multiple rooms or a full house, renting an airless sprayer pays for itself in time savings alone. Knowing how to paint a popcorn ceiling with a sprayer is the more efficient investment for larger projects.
Frequently Asked Questions
Q. Can you paint a popcorn ceiling with a sprayer without making a mess?
You can reduce the mess with thorough room prep — plastic sheeting on walls, tarps on floors, masking tape on all edges. Overspray is inevitable with any sprayer. But a 515 or 517 tip on an airless sprayer produces less overspray than smaller tips because the wider fan pattern operates at lower pressure.
Q. What is the best paint for popcorn ceiling texture?
Flat latex ceiling paint. Flat sheen hides texture imperfections and does not create glare from the bumpy surface. Apply a stain-blocking primer first if the ceiling has water stains or has never been painted.
Q. Do I need to thin paint for a sprayer?
Most airless sprayers handle unthinned latex ceiling paint. The Graco Magnum and TrueCoat lines spray thick paints without thinning. Check your sprayer’s manual — HVLP sprayers may require 10–15% water thinning for proper atomization.
Q. How many coats does a popcorn ceiling need?
Two thin coats. The first coat seals the surface. The second coat, applied perpendicular to the first, covers all sides of the texture bumps. Two thin coats prevent saturation, dripping, and texture fallout.
Q. Is it better to spray or roll a popcorn ceiling?
Spraying is better for coverage, speed, and texture preservation. Rolling is cheaper and requires less prep. If the popcorn texture is fragile or thick, a sprayer is the safer choice because it applies paint without physical contact.


One Comment