How to Clean Popcorn Ceiling Before Painting: Step-by-Step Guide
Knowing how to clean popcorn ceiling before painting is the difference between a paint job that sticks and one that peels within months. Dirt, dust, cobwebs, grease, and mildew sit on the bumpy surface and prevent paint from bonding to the texture. Skip the cleaning step and the new coat flakes, bubbles, or pulls the popcorn right off the drywall.
Popcorn ceilings — also called cottage cheese or acoustic ceilings — were standard in homes built from the 1950s through the 1980s. The rough texture traps particles that flat ceilings shed naturally. Cleaning requires a gentle approach: the texture is fragile, water-soluble in many cases, and in pre-1978 homes, may contain asbestos.
This guide covers the full cleaning and painting prep process in order: asbestos testing, room prep, dry dust removal, stain treatment, final drying, priming, and painting. Follow these steps and the new paint goes on clean, bonds tight, and lasts.
Safety First: Test for Asbestos Before You Touch the Ceiling
Before you learn how to clean popcorn ceiling before painting, test for asbestos. Homes built before 1978 in the U.S. used asbestos in popcorn texture spray. The ban took effect that year, but leftover stock was installed into the mid-1980s. Cleaning with a vacuum or damp cloth can disturb fibers if asbestos is present.
- DIY asbestos test kit: $40–$150 from Home Depot or Amazon. Wet a small section, scrape a sample, seal it, and mail to a certified lab.
- Professional asbestos testing: $250–$850 depending on home size.
- If positive: Do not vacuum, dust, or scrub the ceiling. Hire a licensed abatement contractor or use an oil-based primer that seals the surface without physical contact (sprayed, not rolled).
Protective gear for cleaning and painting: Wear a dust mask, safety glasses, and gloves. Popcorn texture releases fine particles when disturbed — they fall into your eyes, hair, and lungs. Cover your head with a hat or spray sock.
Tools and Materials Checklist
Gather everything before you start. Here is the best way to clean popcorn ceiling and prep it for paint.
Cleaning supplies:
- Vacuum cleaner with a soft bristle brush attachment (lowest suction setting).
- Feather duster or soft-bristled broom for light cobwebs.
- Lint roller or duct tape wrapped around a paint roller for stubborn particles.
- Spray bottle with warm water and a few drops of liquid dish soap.
- Sponges and microfiber cloths for stain blotting.
- Bleach (1 part to 10 parts water) or hydrogen peroxide for mold and mildew stains.
Painting prep supplies:
- Drop cloths and plastic tarps for floors and furniture.
- Painter’s tape for walls, trim, and fixture edges.
- Stain-blocking primer: Zinsser Guardz (strengthens fragile popcorn texture before topcoat), Kilz Original (oil-based, blocks water stains and smoke), or Zinsser BIN (shellac-based, blocks heavy stains).
- Flat acrylic ceiling paint — flat sheen hides texture imperfections.
- Thick-nap paint roller (3/4-inch) or airless sprayer.
- Stepladder and extension poles for high ceilings.
- Putty knife and joint compound for minor texture repair before painting.
Step 1: Prepare the Room and Test Your Ceiling
Cover all furniture and floors with drop cloths or plastic sheeting. Remove ceiling fan blades, light fixture covers, and smoke detectors. Tape the edges of plastic sheeting to the top of each wall with painter’s tape.
The finger rub test (do this before cleaning or painting): Rub your finger lightly across a small, inconspicuous area of the popcorn texture. If the texture crumbles, dissolves, or comes off easily, the ceiling has never been painted and is water-soluble.
This means: do not use water-based cleaning solutions on the surface, do not use a water-based primer, and do not roll — only spray. Use an oil-based stain-blocking primer (Kilz popcorn ceiling cleaner/sealer or Zinsser Cover Stain) applied with an airless sprayer for these ceilings.
If the texture holds firm and does not dissolve, the ceiling has been painted before. You can safely clean it with damp methods and apply acrylic paint with a roller or sprayer.
Step 2: Remove Dust and Cobwebs (Pre-Paint Vacuuming)
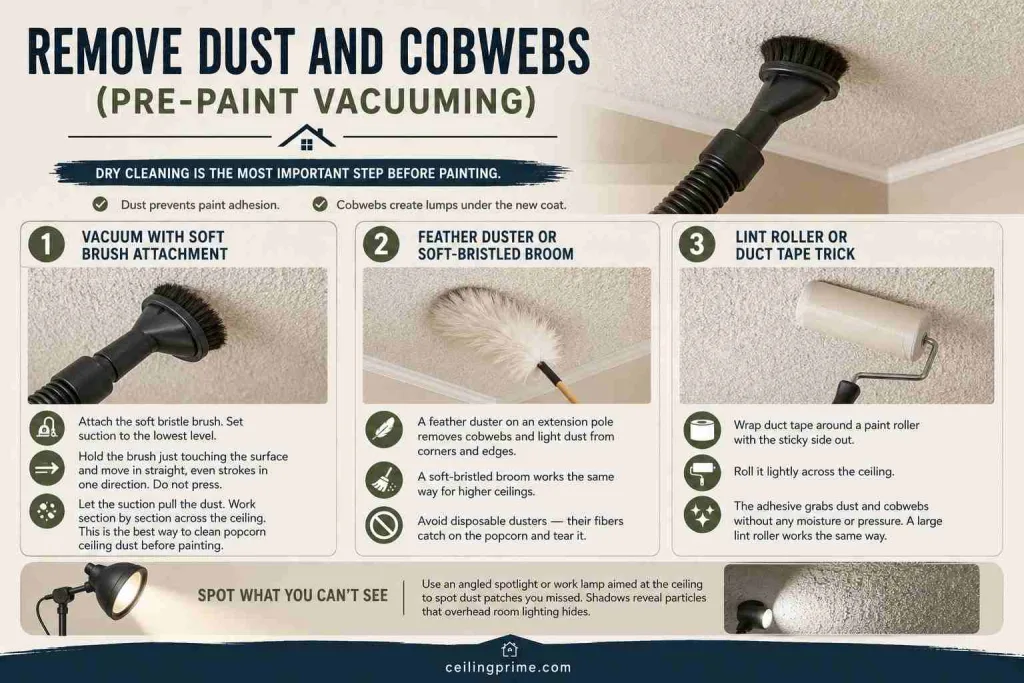
Dry cleaning is the most important step in how to clean popcorn ceiling before painting. Dust prevents paint adhesion. Cobwebs create lumps under the new coat. Three methods work.
Vacuum with Soft Brush Attachment
Attach the soft bristle brush to your vacuum cleaner hose. Set suction to the lowest level. Hold the brush just touching the surface and move in straight, even strokes in one direction. Do not press into the texture. Let the suction pull the dust. Work section by section across the ceiling. This is the best way to clean popcorn ceiling dust before painting.
Feather Duster or Soft-Bristled Broom
A feather duster on an extension pole removes cobwebs and light dust from corners and edges. A soft-bristled broom works the same way for higher ceilings. Avoid disposable dusters — their fibers catch on the popcorn and tear it.
Lint Roller or Duct Tape Trick
Wrap duct tape around a paint roller with the sticky side out. Roll it lightly across the ceiling. The adhesive grabs dust and cobwebs without any moisture or pressure. A large lint roller works the same way.
Use an angled spotlight or work lamp aimed at the ceiling to spot dust patches you missed. Shadows from the light reveal particles that overhead room lighting hides.
Step 3: Treat Stains — Water Marks, Grease, Smoke, and Mildew
After dry cleaning, treat any visible stains. This step in how to clean popcorn ceiling before painting determines whether the final result looks clean or shows ghost marks through the new paint.
Easier Stains (Light Dust Film, Minor Discoloration)
Mix warm water with a few drops of liquid dish soap in a spray bottle. Mist the stained area lightly — do not soak. Dab with a damp sponge using gentle, even strokes. Do not rub. Do not scrub. The texture crumbles under pressure. Test a small inconspicuous area first to confirm the texture tolerates moisture.
Challenging Stains (Cigarette Smoke, Kitchen Grease)
Smoke and grease stains need a stronger solution. Mix one tablespoon of liquid dish soap and one tablespoon of white vinegar into a quart of warm water. Apply with a misting spray bottle. Blot with a clean sponge. For heavy grease on kitchen ceilings, a diluted degreaser (50/50 with water) works — test a hidden spot first. Avoid moisture saturation at all costs.
Mold and Mildew
Mix one part bleach to ten parts water in a spray bottle. Mist the affected area. Let it sit 10 to 15 minutes. Blot with a damp cloth. Hydrogen peroxide (3% concentration) is a less harsh alternative — spray, wait, and blot. Both kill surface mildew. If mold covers more than 10 square feet, call a professional for mold remediation before painting.
Water Stains (Brown Rings)
Brown water stains do not respond to cleaning solutions. They bleed through regular paint. The fix is primer, not cleaning. Fix the water source first. Let the stain dry fully. Apply stain-blocking primer (Kilz Original or Zinsser BIN) directly over the stain during the priming step below.
Step 4: Dry the Ceiling Completely
After any wet cleaning, let the ceiling dry 100% before priming or painting. This drying step is often the most overlooked part of how to clean popcorn ceiling before painting. Run fans pointed at the ceiling.
Open windows for airflow. Wait at least overnight — 24 hours is safer. Painting over a damp popcorn surface traps moisture behind the primer and causes peeling, bubbling, and mold growth under the new paint.
Time estimate for the full cleaning process: 1 to 2 hours of active work per room, plus overnight drying.
Step 5: Prime and Paint Like a Pro
Priming (The Step That Makes or Breaks the Job)
Primer serves two jobs on a popcorn ceiling: it blocks stains from bleeding through and it strengthens the fragile texture so the topcoat does not pull it off the drywall.
- Zinsser Guardz: A thin, penetrating sealer that soaks into the popcorn texture and dries harder than the material itself. Professional painters on PaintTalk.com recommend spraying a coat of Zinsser Guardz on popcorn before top coating for added strength and stability. Apply by spraying — do not roll.
- Kilz Original (oil-based): Blocks water stains, smoke damage, and pet odor. Good for unpainted ceilings that failed the finger rub test. Spray application only on fragile popcorn.
- Zinsser BIN (shellac-based): The strongest stain blocker for heavy smoke damage or severe water staining. High odor — requires good ventilation.
Let the primer dry 1 to 2 hours before applying paint.
Painting
Apply flat acrylic ceiling paint. Flat sheen hides texture imperfections and does not create glare from the bumpy surface. Use a 3/4-inch thick-nap roller or an airless sprayer.
- Roller method: Load the roller with less paint than normal. Roll in one direction with very light pressure. Do not press into the texture. Do not go back over wet areas. Let the first coat dry 2 to 4 hours. Apply a second coat perpendicular to the first direction.
- Sprayer method: Use a 515 or 517 tip. Hold 12 to 16 inches from the ceiling. Spray in overlapping passes (50% overlap). Two light coats beat one heavy coat — heavy coats saturate the texture and cause fallout.
One gallon of ceiling paint covers 200 to 250 square feet on popcorn texture. A 12×12 room needs about 2 gallons for two coats.
Troubleshooting: How to Clean Popcorn Ceiling Before Painting Without Damage
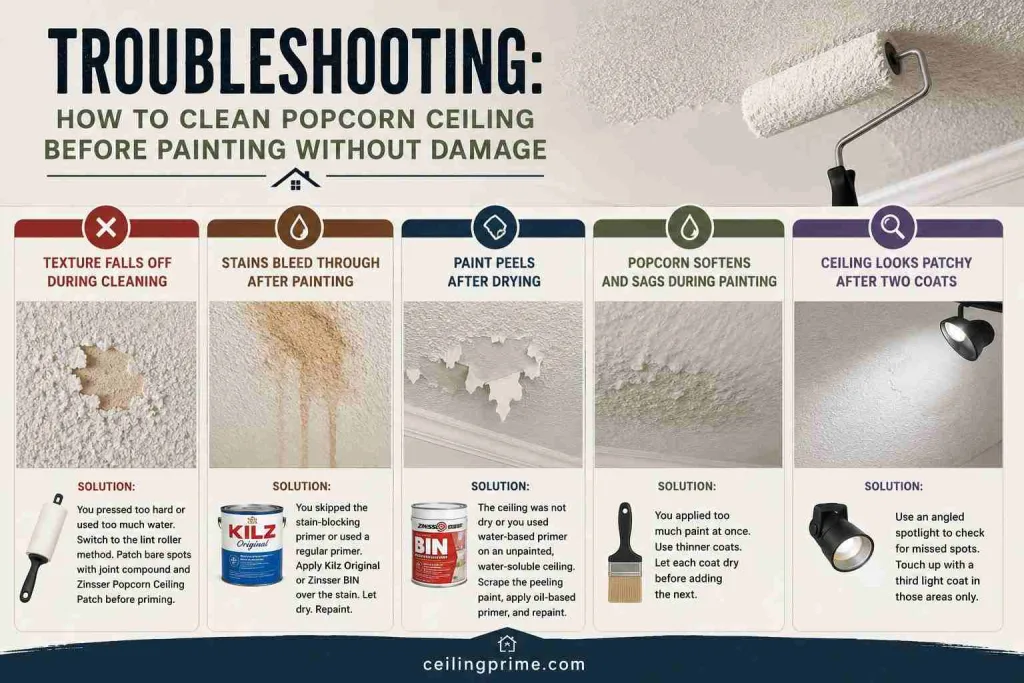
- Texture falls off during cleaning: You pressed too hard with the vacuum or used too much water. Switch to the lint roller method for the rest of the room. Patch bare spots with joint compound and Zinsser Popcorn Ceiling Patch before priming.
- Stains bleed through after painting: You skipped the stain-blocking primer or used a regular primer that does not block tannin stains. Apply Kilz Original or Zinsser BIN over the stain. Let dry. Repaint.
- Paint peels after drying: The ceiling was not dry when you painted, or you used water-based primer on an unpainted, water-soluble ceiling. Scrape the peeling paint, apply oil-based primer, and repaint.
- Popcorn softens and sags during painting: You applied too much paint at once. Use thinner coats. Let each coat dry before adding the next.
- Ceiling looks patchy after two coats: Use an angled spotlight to check for missed spots. Touch up with a third light coat in those areas only.
Frequently Asked Questions
Q. What is the best way to clean a popcorn ceiling before painting?
Vacuum with a soft brush attachment on the lowest suction. Treat stains with warm water and liquid dish soap. Use bleach for mold. Let the ceiling dry 24 hours. Prime with a stain-blocking primer (Zinsser Guardz or Kilz). Then paint with flat acrylic and a thick-nap roller or sprayer.
Q. Can you use water to clean a popcorn ceiling before painting?
Only if the ceiling has been previously painted (passes the finger rub test). Unpainted popcorn is water-soluble — water dissolves the texture. For unpainted ceilings, stick to dry methods (vacuum, feather duster, lint roller) and use an oil-based primer instead of water-based.
Q. What is Kilz popcorn ceiling cleaner?
Kilz is not a cleaner — it is a stain-blocking primer that seals stains and prepares the ceiling for paint. Kilz Original (oil-based) is the most common choice for popcorn ceilings because it blocks water stains, smoke, and odor without reactivating the texture. Apply it after cleaning and drying the ceiling.
Q. Does cleaning a popcorn ceiling make the texture fall off?
It can if you press too hard, use too much water, or scrub the surface. Use the lightest touch possible. Vacuum on the lowest suction. Dab stains — never rub. These precautions protect the texture during the ceiling cleaning process.
Q. How do you paint over a dirty popcorn ceiling?
You do not. Painting over dust, grease, or mildew causes adhesion failure. The paint peels, bubbles, or flakes within weeks. Clean the ceiling first using the steps in this guide, then prime and paint.
Q. Is it better to spray or roll paint on a popcorn ceiling?
Spraying is better for adhesion, speed, and texture preservation. Rolling works but risks pulling texture off the drywall if you press too hard. If you roll, use a thick-nap cover and apply very light pressure in one direction only.
Clean It Right and the Paint Lasts for Years
Now you know how to clean popcorn ceiling before painting from start to finish: test for asbestos, dry-clean with a vacuum, treat stains with the right solution for each type, let the surface dry 24 hours, prime with Zinsser Guardz or Kilz to strengthen the texture and block stains, and apply two thin coats of flat acrylic ceiling paint. Every step protects the texture and gives the paint a clean surface to grip.
If you live in Austin and want professional ceiling painting, popcorn ceiling removal, or a smooth-finish upgrade, CeilingPrime handles it all.






One Comment