Skim Coat Popcorn Ceiling: How to Do It and When It Makes Sense
Skim coat popcorn ceiling means applying two to three thin layers of joint compound (mud) directly over the existing texture to create a smooth, flat surface — without scraping the texture off first.
It is the right approach for painted popcorn ceilings that will not scrape cleanly, and it is what CeilingPrime applies after standard popcorn ceiling removal to achieve the Level 5-adjacent finish most Austin homeowners are after. This guide covers both uses: skim coating over existing texture and skim coating bare drywall after removal.
Asbestos Check Before Any Work on Pre-1980 Ceilings
If the ceiling was installed before 1980, have it tested for asbestos before touching it. Applying wet joint compound to a pre-1980 popcorn ceiling disturbs the texture surface — which is exactly the type of disturbance that releases asbestos fibers from asbestos-containing material (ACM). This applies whether you are scraping or skim coating.
A licensed asbestos inspector collects a sample from an inconspicuous area and sends it to an accredited lab. Results in 2–5 business days. If the test comes back positive at the Environmental Protection Agency (EPA) threshold of 1% or more, do not proceed with skim coating over the texture — licensed abatement is required first. If the test is negative, or the ceiling is post-1990, proceed.
Austin homes in Hyde Park, Allandale, Crestview, North Loop, and South Austin’s 78704 and 78745 zip codes were built heavily in the 1950s through 1970s — the peak asbestos era. Test first on any pre-1980 ceiling in these neighborhoods.
Should You Skim Coat Over the Popcorn or Remove It First?
This is the central decision. Skim coating over existing popcorn texture is viable in some situations but not all. Here is the decision framework:
| Unpainted popcorn, good adhesion, asbestos-free | Remove first, then skim coat | Easier to scrape when unpainted; skim coat over bare drywall produces a flatter result with less compound |
| Painted popcorn, asbestos-free, texture firmly bonded | Skim coat directly over texture | Painted texture will not scrape cleanly without damaging drywall paper; skim coat over the surface is faster and cleaner |
| Painted popcorn with multiple paint layers, asbestos-free | Skim coat over OR drywall overlay | Very heavy painted texture creates a thick mud build-up when skim coated; drywall overlay may be faster |
| Flaking or loosely bonded texture, any era | Remove loose texture, then skim | Skim coating over loose texture creates a surface that will delaminate — the mud only adheres as well as the weakest layer below it |
| Water-damaged areas with soft or sagging texture | Remove damaged section, then skim | Wet-compromised texture will not support skim coat weight; those sections must come down first |
| Confirmed asbestos-positive ceiling | Licensed abatement first | No skim coat or scraping until abatement is complete and clearance testing passes |
| Ceiling in good condition, no renovation planned, tight budget | Skim coat over (if asbestos-free) | Avoids the mess and cost of full removal while achieving a smooth finish |
What You Need to Skim Coat Popcorn Ceiling?
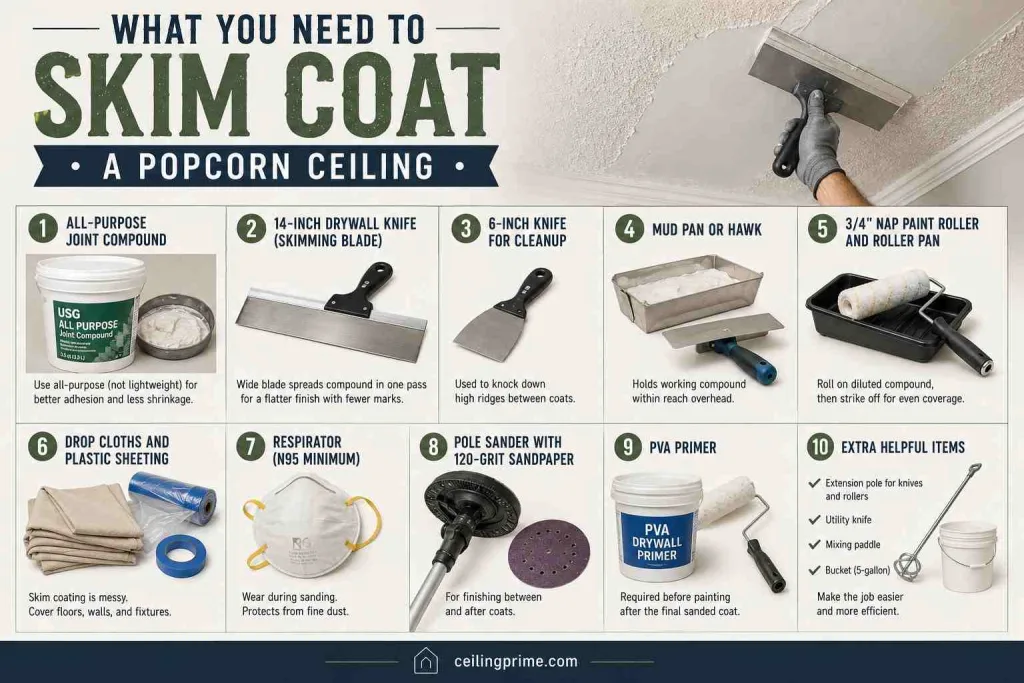
- All-purpose joint compound — Use all-purpose (not lightweight) compound when skim coating directly over popcorn texture. All-purpose has better adhesion and less shrinkage than lightweight. Brands like USG, National Gypsum, or similar from Home Depot and Lowe’s work well. Lightweight compound shrinks more as it dries, which creates a visible dip around every texture peak under raking light — especially noticeable under ceiling fixtures.
- 14-inch drywall knife (skimming blade) — A wide blade spreads the compound in a single pass across a broader area, creating a flatter surface with fewer tool marks. A 6-inch or 8-inch knife leaves too many lines for ceiling work. A 14-inch skimming blade or a 24-inch drywall knife (for large flat areas) is the right tool.
- 6-inch knife for cleanup — Used to knock down high ridges between coats, not to apply compound.
- Mud pan or hawk — Holds working compound within reach overhead. A hawk and trowel lets you work faster than repeatedly loading from a bucket.
- 3/4-inch nap paint roller and roller pan — Optional but useful: rolling diluted compound onto the ceiling first, then striking off with the skimming blade, is a technique experienced finishers use to get even coverage on textured surfaces quickly.
- Drop cloths and plastic sheeting — Skim coating is messy. Compound falls and splatters. Cover everything — floors, walls, furniture, light fixtures. Tape plastic to wall surfaces at ceiling height.
- Respirator (N95 minimum) — During sanding. Skim coat dust is a fine particle hazard even without asbestos.
- Pole sander with 120-grit sandpaper — For finishing between and after coats.
- PVA primer — Required before painting after the final sanded coat.
How to Skim Coat Popcorn Ceiling: Step by Step
This process assumes the ceiling is asbestos-free and either being skim coated over existing texture (painted ceiling) or over bare drywall after standard popcorn removal.
1. Prepare the room and surface
Remove or cover all furniture. Tape plastic sheeting to walls at ceiling height. Cover floors entirely. If skim coating over existing texture, check that all texture is firmly bonded — push gently in several spots. Any areas that flex, feel soft, or detach should be scraped away before proceeding. These spots cannot support skim coat weight.
2. Mix the joint compound to the right consistency
Straight from the bucket, all-purpose compound is too thick for ceiling skim work. Add water in small amounts and stir thoroughly until the compound has a thick, creamy consistency — similar to thick yogurt. It should hold its shape on the knife but spread smoothly without dragging. Do not thin too much; compound that is too liquid will sag off the ceiling before it tacks.
3. Apply the first coat heavily to cover the texture peaks
Load the 14-inch knife with compound and apply in long, overlapping passes. The goal of the first coat is coverage — getting compound over every texture peak without worrying about perfect flatness. You will work out ridges in the second coat.
Some finishers roll the compound on with a 3/4-inch nap roller first (which fills the texture valleys), then use the 14-inch blade to strike it off flat. This two-step first coat covers textured surfaces faster and more evenly than knife application alone.
4. Do not overwork the wet compound
Once a section starts to tack (feel stiff and begin to pull), stop working it. Overworking wet compound tears the surface and leaves tool marks that are very difficult to correct. Move to a new section and come back with a bigger blade later.
5. Let the first coat dry completely — 24 hours minimum
Joint compound must dry fully before the next coat. In Austin, summer humidity can extend drying time. Do not try to accelerate drying with a heat gun or dehumidifier — fast drying causes compound to crack, particularly over deep texture peaks where the coat is thicker.
6. Knock down ridges before the second coat
Once the first coat is fully dry, use the 6-inch knife to scrape off any high ridges or tool-mark lips. This step is dry — you are not sanding yet, just knocking off the high spots. If you go directly into the second coat over unchecked ridges, they compound under the new layer and create bumps that are very hard to sand flat.
7. Apply the second coat — thinner, larger blade
The second coat goes on thinner than the first. The goal is leveling — filling low spots and creating a consistent flat plane across the ceiling. Use the 14-inch knife at a lower angle to spread a thinner layer over the entire surface. Some finishers move up to a 24-inch drywall knife or a squeegee skimming blade for the second coat to get a longer, flatter stroke.
8. Third coat if needed
On a skim coat directly over popcorn texture (not over bare drywall), a third coat is almost always needed. The texture peaks create enough surface variation that two coats rarely produce a truly flat result. Each coat should be thinner than the previous. Let it dry 24 hours.
9. Sand the final dry coat
Use a pole sander with 120-grit sandpaper. Work in overlapping passes across the ceiling. The goal is to knock off ridges and tool marks without cutting through to the texture below. Sand lightly but evenly. Check progress by holding a work light parallel to the ceiling surface to reveal remaining imperfections.
10. Prime before painting
Fresh joint compound and sanded compound both absorb paint unevenly without primer. Apply a PVA (polyvinyl acetate) primer before any paint. Skipping this step produces a blotchy finish that shows every seam and screw dimple through the paint. Let the primer dry fully before applying ceiling paint.
Skim Coat Over Popcorn vs. Scrape + Skim Coat: Which Produces a Better Result?
Experienced drywall finishers generally prefer scraping the texture first, then skim coating bare drywall. Here is why — and when the skim-over approach is justified:
| Factor | Skim Coat Over Popcorn | Scrape + Skim Coat |
|---|---|---|
| Surface flatness | Harder to achieve — texture peaks create variation that takes 3+ coats to level | Easier — bare drywall requires 2 coats and produces a flatter result |
| Compound used | More — each coat must fill texture valleys before leveling | Less — thin coats over a flat substrate |
| Drying time total | Longer — 3 coats × 24 hrs = 72+ hours | Shorter — 2 coats × 24 hrs = 48 hours typically |
| Risk of delamination | Higher — if texture adhesion is weak, skim coat can pull it loose | Lower — compound bonds directly to drywall paper |
| Asbestos management | Does not remove ACM — asbestos remains in place | Removal eliminates ACM if present and properly abated |
| Best for painted ceilings | Yes — painted texture resists scraping; skim-over is the practical choice | Difficult — painted texture tears drywall paper during scraping |
| Final finish quality | Good but harder to get truly flat under raking light | Better — bare drywall produces a more consistent Level 5 surface |
| Cost (Austin, professional) | $1.50–$2.50/sq ft for skim coat alone (no removal) | $2.30–$4.05/sq ft combined (CeilingPrime, removal + skim coat) |
Skim Coat Popcorn Ceiling Cost in Austin
Cost depends on whether the popcorn texture is being removed first or skim coated in place:
- Skim coat over existing texture (professional, Austin) — $1.50–$2.50 per square foot for labor and materials, not including asbestos testing or any remediation of damaged sections. A 1,500 sq ft home runs $2,250–$3,750.
- Popcorn ceiling removal + skim coat (CeilingPrime, Austin) — $2.30–$4.05 per square foot combined. A 1,500 sq ft home runs $3,450–$6,075. This is the complete package: removal, surface repair, skim coat, and primer-ready finish.
- DIY skim coat over existing texture (materials only) — All-purpose compound runs $18–$25 per 4.5-gallon bucket. A 200 sq ft room typically uses 2–3 buckets for three coats. Add primer ($25–$40), sandpaper, and drop cloths. Total materials: $100–$150 per room. Labor is significant — count on 3–4 full days per room for a first-timer.
- Asbestos testing (if needed) — $25–$75 per lab sample plus inspector fee. Required on any pre-1980 ceiling before skim coating begins.
Common Skim Coat Mistakes — and How to Avoid Them
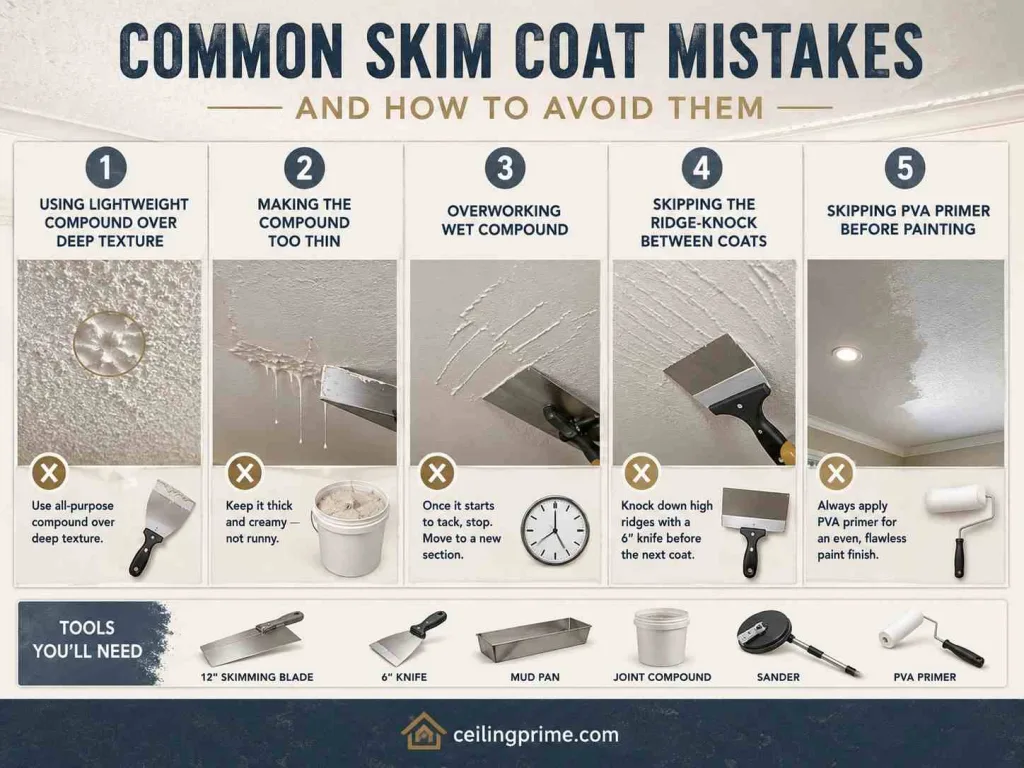
Using lightweight compound over deep texture
Lightweight joint compound shrinks more than all-purpose as it dries. Over deep popcorn texture peaks, the compound contracts into a visible dip around each peak under raking light. Use all-purpose compound when skim coating directly over texture.
Making the compound too thin
Heavily thinned compound sags off the ceiling before it tacks, creates drips, and dries with insufficient film thickness to cover texture peaks. Keep the consistency thick — creamy but not runny. Only thin enough to spread smoothly without dragging.
Overworking wet compound
Once compound starts to tack (stiffens and pulls), stop working it. Continuing to tool wet-tacking compound tears the surface and creates ridges that are hard to correct in subsequent coats. Move to a new section.
Skipping the ridge-knock between coats
High ridges from the first coat — usually where the skimming blade changed direction or lifted — must be knocked off with the 6-inch knife before the second coat goes on. If left in place, they amplify under subsequent coats and become harder to sand flat.
Skipping PVA primer before painting
Fresh joint compound is porous and absorbs paint unevenly. Without a PVA primer coat, the paint finish shows every seam, screw dimple, and tool mark — especially under oblique light from ceiling fixtures.
Frequently Asked Questions
Q. Can you skim coat a popcorn ceiling without removing the texture?
Yes — this is exactly what skim coat over popcorn ceiling means. You apply joint compound directly over the existing texture in 2–3 coats to create a smooth surface.
The texture remains underneath, permanently covered. The result is a smooth ceiling without the mess of scraping.
The limitations: it requires more compound, more coats, and is harder to get perfectly flat than skim coating bare drywall after removal.
Q. What joint compound is best for skim coating a popcorn ceiling?
All-purpose joint compound — not lightweight. All-purpose has better adhesion and shrinks less as it dries, which is important when coating over the variable thickness of a popcorn texture surface. Lightweight compound creates visible dips around texture peaks after drying.
Q. How many coats of skim coat does a popcorn ceiling need?
Skim coating directly over popcorn texture typically requires three coats — more than the two coats typically needed on bare drywall after removal. The first coat covers the texture peaks, the second levels the surface, and the third coat refines any remaining imperfections. Each coat needs 24 hours of drying time.
Q. Is skim coating popcorn ceiling a good DIY project?
It is achievable for an experienced DIYer who is comfortable with overhead work and drywall finishing. It is not a beginner project — getting a flat, mark-free surface requires good technique with the skimming blade and patience with the sanding step.
For rooms that will be selling the home or are in high-visibility areas, professional skim coat work produces a more consistent result.
Q. Does skim coating popcorn ceiling address asbestos?
No. Skim coating over asbestos-containing ceiling texture covers the material but does not remove or encapsulate it. The asbestos remains in place under the joint compound. Any future work that penetrates the skim coat — fixture installation, ceiling repair, demolition — will encounter the ACM again.
For pre-1980 ceilings, asbestos testing is required before skim coating, and abatement must be completed before any disturbance if the test is positive.