
How to Repair Ceiling Cracks: Complete Guide for Every Crack Type
Knowing how to repair ceiling cracks correctly means matching the repair method to the crack type. A hairline seam crack needs tape and compound. A plaster map crack needs a skim coat. A water damage crack needs the leak fixed first. Using the wrong method on the wrong crack wastes time and guarantees the crack returns.
This guide covers 4 repair methods for 4 crack types: drywall seam cracks, plaster cracks, water damage cracks, and old house cracks. Each method lists the exact tools, materials, steps, and drying times. No details are repeated between sections.
Tools and Materials for Ceiling Crack Repair
Tools:
- Putty knife (2-inch and 6-inch) — for scraping and applying compound.
- Taping knives (8-inch and 10-inch) — for feathering compound over wide areas.
- Utility knife or 5-in-1 tool — for cutting tape and scraping loose material.
- Sanding sponge (120-grit and 220-grit) — for smoothing between coats.
- Mud pan — for holding joint compound while working overhead.
- Step ladder — sturdy, rated for your weight plus materials.
- Safety glasses and dust mask — sanding drywall compound creates fine dust.
- Drop cloths — compound drips are hard to clean off floors and furniture.
Materials:
- Fiberglass mesh tape (self-adhesive) — for reinforcing crack repairs.
- Paper drywall tape — for seam cracks that need a smoother finish.
- Setting-type joint compound (45-minute or 90-minute bags) — for the first coat. It dries hard and does not shrink.
- Premixed all-purpose joint compound — for the second and third coats. Easier to sand than setting compound.
- Stain-blocking primer — for priming patched areas before painting.
- Flat ceiling paint — for the final finish.
- Texture spray (orange peel or knockdown) — for matching textured ceilings.
Ceiling crack repair starts with having every material ready before you climb the ladder. Missing one item means climbing down mid-repair.
How to Repair Ceiling Cracks in Drywall (Seam and Tape Cracks)
Drywall seam cracks run in a straight line along the joint between two panels. The original paper tape failed. The compound cracked along the seam. This is the most common ceiling crack type in homes built after the 1950s.
Step-by-Step Drywall Seam Crack Repair
- Step 1: Scrape the crack. Use a putty knife to remove all loose compound, paint chips, and old tape along the crack. Widen the crack slightly so new compound grips the edges.
- Step 2: Clean the surface. Brush away dust with a brush attachment. Wipe with a damp cloth. Let dry.
- Step 3: Apply fiberglass mesh tape. Press the self-adhesive tape directly over the crack. Extend the tape 2 inches past each end of the crack.
- Step 4: First coat — setting compound. Mix a batch of 45-minute setting compound to peanut butter consistency. Apply a thin coat over the tape with a 6-inch knife. Press the compound through the mesh into the crack. Scrape the surface as flat as possible. Let dry completely (45 to 90 minutes depending on humidity).
- Step 5: Second coat — premixed compound. Apply premixed all-purpose compound with an 8-inch knife. Feather the edges 3 to 4 inches past the first coat on each side. Let dry 24 hours.
- Step 6: Sand. Use a 120-grit sanding sponge. Feather the edges until the patch blends flush with the ceiling surface. Wipe dust with a damp cloth.
- Step 7: Third coat (if needed). Apply a thin final coat with a 10-inch knife. Feather 6 inches past the second coat. Let dry. Sand with 220-grit for a smooth finish.
- Step 8: Prime and paint. Apply stain-blocking primer over the repair. Let dry 1 to 2 hours. Paint with two coats of flat ceiling paint.
Setting compound for the first coat is the key to a crack that stays fixed. Premixed mud shrinks as it dries. Setting compound hardens by chemical reaction and does not shrink. That is why it goes on first.

How to Repair Ceiling Cracks with Tape: Paper vs Mesh
Knowing how to repair ceiling cracks with tape means choosing the right tape for the job. Two options exist.
| Feature | Fiberglass Mesh Tape | Paper Drywall Tape |
| Application | Self-adhesive — stick and go | Embed in wet compound bed |
| Strength | Strong in tension | Strongest at flat seams |
| Ease of use | Easier for DIY | Requires more skill |
| Crack resistance | Better for cracks that may move | Better for stable seams |
| Best for | Crack repairs, patches, corners | Long straight seams, new drywall |
For ceiling crack repair, fiberglass mesh tape is the better choice. It sticks to the surface on its own. It stretches slightly if the crack moves. And it is faster to apply overhead.
How to Repair Ceiling Cracks in Plaster?
Plaster ceilings crack differently than drywall. Plaster is rigid. It does not flex. Cracks follow the wood lath pattern behind the plaster in a grid or map-like pattern. Repairing plaster ceiling cracks requires a different approach than drywall.
For Hairline to Moderate Plaster Cracks
- Step 1: Widen the crack with a utility knife to a V shape. This gives the compound a groove to fill.
- Step 2: Brush out dust. Dampen the crack edges with a spray bottle — dry plaster absorbs moisture from the compound too fast and weakens the bond.
- Step 3: Apply fiberglass mesh tape over the crack.
- Step 4: Apply setting compound over the tape. Press firmly into the V groove. Scrape flat.
- Step 5: Second coat with premixed compound. Feather wider. Let dry. Sand. Prime. Paint.
For Map Cracks Across Large Areas
When cracks cover the entire ceiling in a grid pattern, individual crack repair is impractical. Skim coats the whole ceiling. Apply a thin layer of premixed compound over the entire surface with a 10 or 12-inch taping knife. Let dry. Sand. Apply a second skim coat. Sand. Prime and paint. The skim coat fills every crack and creates a uniform surface.
For Loose or Falling Plaster
Tap the ceiling around the cracks. Hollow sound means the plaster detached from the lath. Inject construction adhesive through drilled holes. Secure with plaster washers and screws into the lath. Let adhesive cure 24 hours. Remove washers. Patch screw holes. If the plaster crumbles when touched, remove the damaged section and replace with drywall.
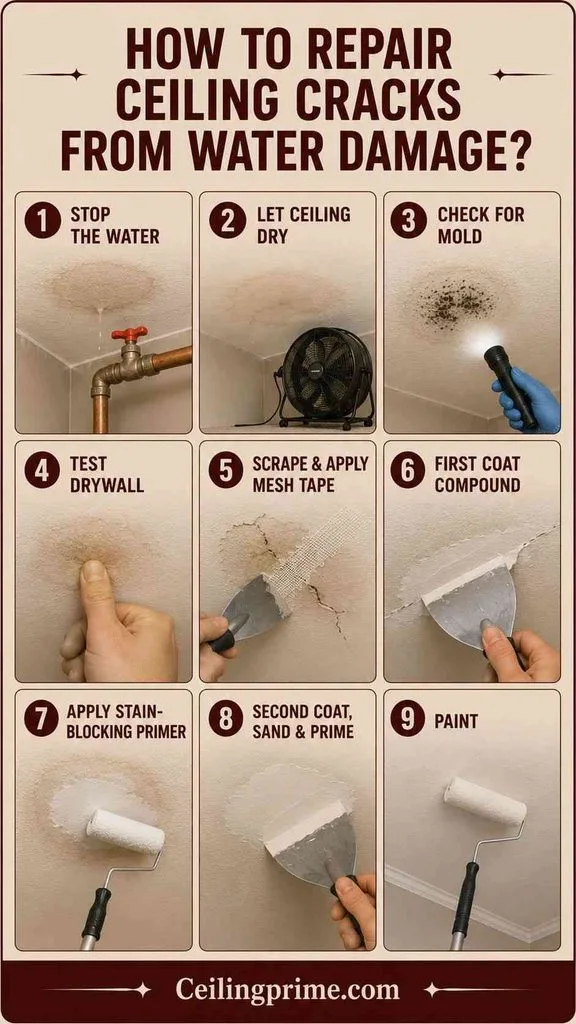
How to Repair Ceiling Cracks from Water Damage?
Water damage cracks have brown or yellow discoloration around them. The drywall weakened where water soaked through. Water damage crack repair means fixing the leak before touching the ceiling.
- Step 1: Find and stop the water source. Plumber for pipes. Roofer for the roof. HVAC tech for condensate lines.
- Step 2: Let the ceiling dry completely. Run fans for 24 to 48 hours. Use a moisture meter if available.
- Step 3: Check for mold. Look for black, green, or gray spots. Smell for musty odor. If mold exceeds 10 square feet, call a remediation professional.
- Step 4: Test the drywall. Press the stained area. If it feels firm, you can patch it. If it is soft, spongy, or crumbles, cut it out and replace the section.
- Step 5: Scrape loose material. Apply fiberglass mesh tape over the crack.
- Step 6: First coat with setting compound. Let it dry.
- Step 7: Apply stain-blocking primer directly over the patched area AND the water stain. Regular primer does not block tannin stains — the brown ring bleeds through.
- Step 8: Second coat of compound if needed. Sand. Prime entire patched area again. Paint.
The stain-blocking primer step is what separates a water damage repair from a standard crack repair. Skip it and the brown stain reappears through the new paint within days.
How to Repair Ceiling Cracks in Old Houses?
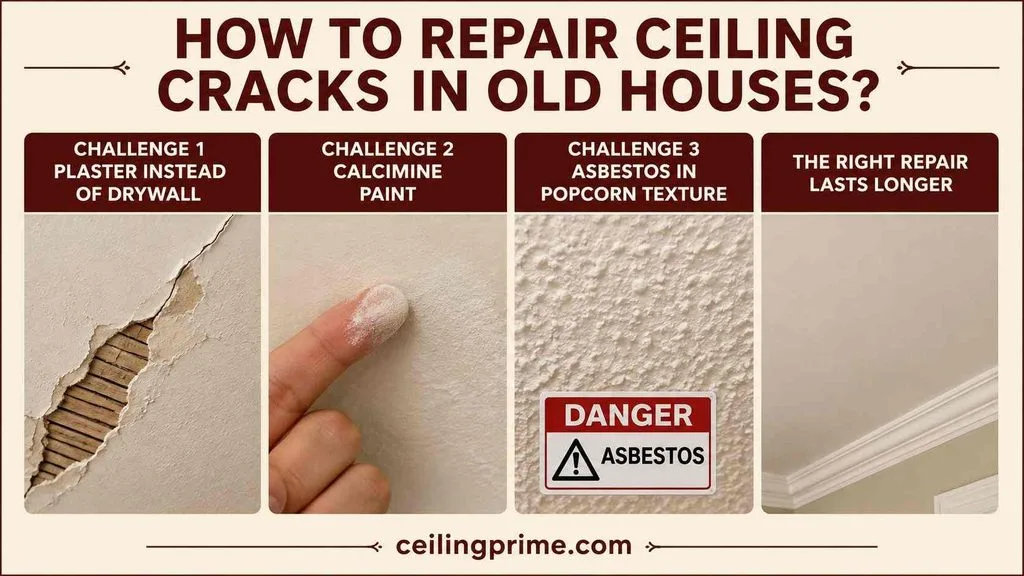
Old houses (pre-1960s) present 3 unique challenges that newer homes do not have. Old house crack repair requires addressing all three.
- Challenge 1 — Plaster instead of drywall: Most homes built before the 1950s have plaster ceilings over wood lath. Plaster repairs use different techniques than drywall. V-groove the crack. Dampen the edges. Use setting compounds. Skim coats large areas.
- Challenge 2 — Calcimine paint: Homes built before the 1940s may have calcimine paint under later layers. Calcimine is a chalky coating that modern paint does not stick to. Rub the ceiling with a damp finger. If white chalk comes off, calcimine is present. Wash with TSP (trisodium phosphate). Apply shellac-based primer before any repair compound or paint.
- Challenge 3 — Asbestos in popcorn texture: Acoustic popcorn ceilings installed before 1986 may contain asbestos. Do not sand, scrape, or disturb the texture without testing first. A DIY test kit costs $40 to $150. If asbestos is present, hire a licensed abatement contractor.
Old house ceiling cracks are fixable. The repairs take longer. The materials are different. But the results last when the right primer, compound, and technique are used.
How to Patch Ceiling Cracks: Quick Reference by Crack Type
| Crack Type | Method | Key Material |
| Hairline (under 1/16”) | Fill + sand + paint | Spackling compound |
| Drywall seam crack | Tape + 3-coat compound | Mesh tape + setting compound |
| Plaster crack | V-groove + tape + compound | Setting compound + mesh tape |
| Plaster map cracks | Full skim coat | Premixed compound, 10” knife |
| Water damage crack | Tape + compound + stain primer | Stain-blocking primer |
| Ceiling-wall gap (truss uplift) | Crown molding (wall-mount only) | Crown molding, adhesive |
| Textured ceiling crack | Patch + texture spray match | Texture spray (orange peel/knockdown) |
| Diagonal from corner (structural) | Do not DIY — call engineer | Foundation inspection first |
This table is a quick reference for patching ceiling cracks by type. Match the crack to the row. Follow the method. Use the key material listed.
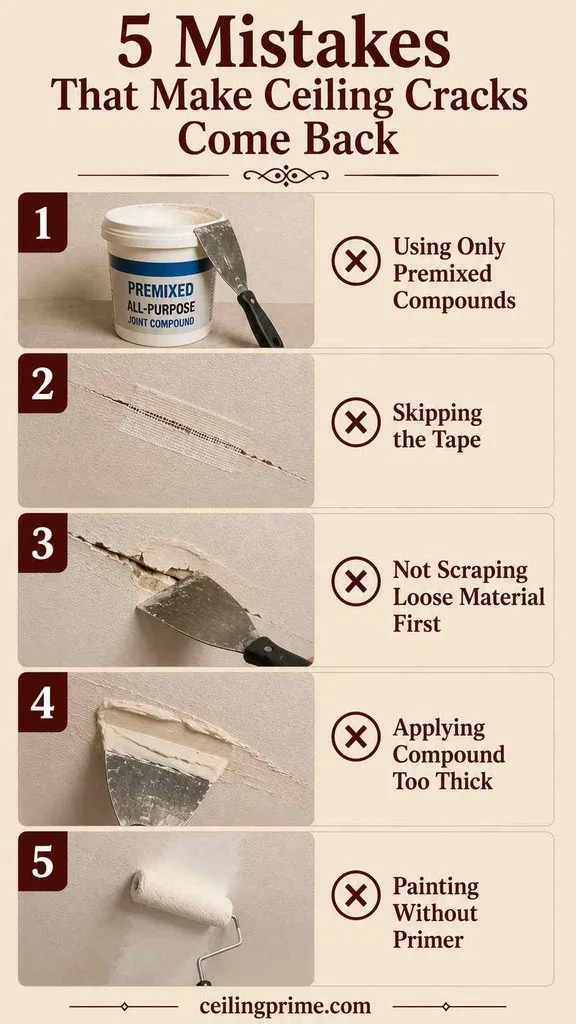
5 Mistakes That Make Ceiling Cracks Come Back
- Using only premixed compounds without setting compounds for the first coat. Premixed mud shrinks. The crack reopens. Use setting compounds first. It hardens without shrinking.
- Skipping the tape. Compounds alone does not bridge a crack. The crack moves. The compound cracks again. Fiberglass mesh tape reinforces the joint and absorbs future movement.
- Not scraping loose material first. New compound over loose old compound has no bond. The patch lifts off within months. Scrape to a solid surface before applying anything.
- Applying compound too thick. One heavy coat traps moisture and shrinks as it dries. The surface cracks. Apply 2 to 3 thin coats. Let each one dry fully.
- Painting without primer. Joint compound absorbs paint differently than the surrounding ceiling. Without primer, the patched area shows as a dull spot. Primer equalizes the surface.
Ceiling Crack Repair Costs
| Repair | 2026 Cost |
| DIY hairline crack (spackle + paint) | $10–$30 |
| DIY seam crack (tape + compound + paint) | $20–$50 |
| DIY plaster skim coat (full ceiling) | $50–$150 |
| DIY water damage repair | $30–$80 |
| Professional crack repair (per room) | $100–$400 |
| Professional plaster skim coat | $200–$800 per room |
| Structural inspection (if needed) | $300–$800 |
Fix the Cause, Then Fix the Crack
Now you know how to repair ceiling cracks in drywall, plaster, water-damaged surfaces, and old houses. Use a setting compound for the first coat. Reinforce with fiberglass mesh tape. Feather with premixed compound for the finish coats. Sand between every coat. Prime before painting. And fix the root cause — water, settling, or truss uplift — so the crack does not come back.
Frequently Asked Questions
Can I use caulk instead of joint compound for ceiling cracks?
Caulk works for flexible gaps like ceiling-to-wall joints where truss uplift causes seasonal movement. It does not work for drywall seam cracks. Caulk stays flexible. It does not sand flat. It cannot be painted to match the surrounding surface. Use joint compound for crack repairs.
Why does my ceiling crack keep coming back after repair?
3 reasons: (1) you used only premixed compound without setting compound — it shrank and cracked, (2) you skipped the tape — compound alone cannot bridge a moving crack, (3) the root cause was not fixed — water damage, truss uplift, or foundation movement continues to stress the ceiling.
How do I match textured ceiling after crack repair?
After the compound is sanded and primed, apply texture spray that matches the existing pattern. Orange peel and knockdown textures are available in aerosol cans. Test the spray pattern on cardboard first. Apply to the primed patch. Let dry. Paint.
Is it better to repair or replace a cracked ceiling?
Repair if: the cracks are along seams, hairline, or isolated water damage spots. Replace if: the entire ceiling is sagging, plaster is falling, mold is inside the drywall, or cracks cover more than 50% of the surface. Replacement costs 3 to 5 times more than repair.
Do I need to prime the ceiling after crack repair?
Yes. Joint compound absorbs paint at a different rate than the surrounding drywall. Without primer, the patch shows as a visible dull spot. Primer equalizes the surface absorption. Use stain-blocking primer for water damage areas.
How long does ceiling crack repair take?
A single seam crack takes 2 to 3 days total: 1 hour of active work per coat, with 24-hour drying between coats. A full plaster skim coat takes 3 to 4 days. Water damage repair depends on drying time — add 1 to 2 days for the ceiling to dry before patching begins.