
Circular Cracks in Ceiling: What They Mean, Why They Form & How to Fix
Circular cracks in ceiling drywall or plaster form a ring, arc, or bullseye pattern on the surface. Unlike straight cracks that follow drywall seams or diagonal cracks that signal foundation problems, circular cracks radiate outward from a central point. That center point is the key to diagnosis. A nail head. A screw pop. A light fixture. A water drip. The shape of the crack tells you what failed underneath.
This guide covers the 7 causes of circular ceiling cracks, explains what each pattern means, walks through step-by-step repair for each type, and answers the most common questions: are ceiling cracks normal? What causes them? And when should you worry?
What Circular Cracks in Ceiling Look Like?
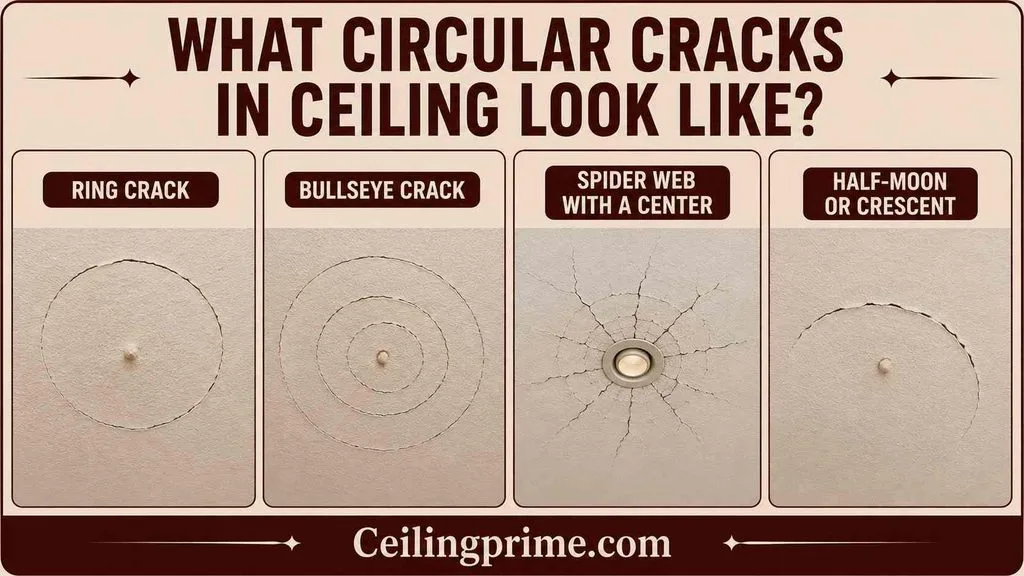
Circular ceiling cracks take 4 common shapes. Each one points to a different cause.
- Ring crack: A single circle or arc, typically 2 to 6 inches in diameter. The crack line follows a curved path around a central point. The center may show a small bump (nail pop) or a depression (screw hole).
- Bullseye crack: Concentric rings radiating outward from a center point. Each ring represents a cycle of stress or moisture. The innermost ring is the oldest.
- Spider web with a center: Multiple lines branching outward from one spot. The center is the stress origin. The branches follow random paths. Common around light fixtures and in plaster ceilings.
- Half-moon or crescent: An arc crack that does not form a complete circle. One side of the circle cracked. The other side held. Common at nail pops where stress was uneven.
7 Causes of Circular Cracks in Ceiling
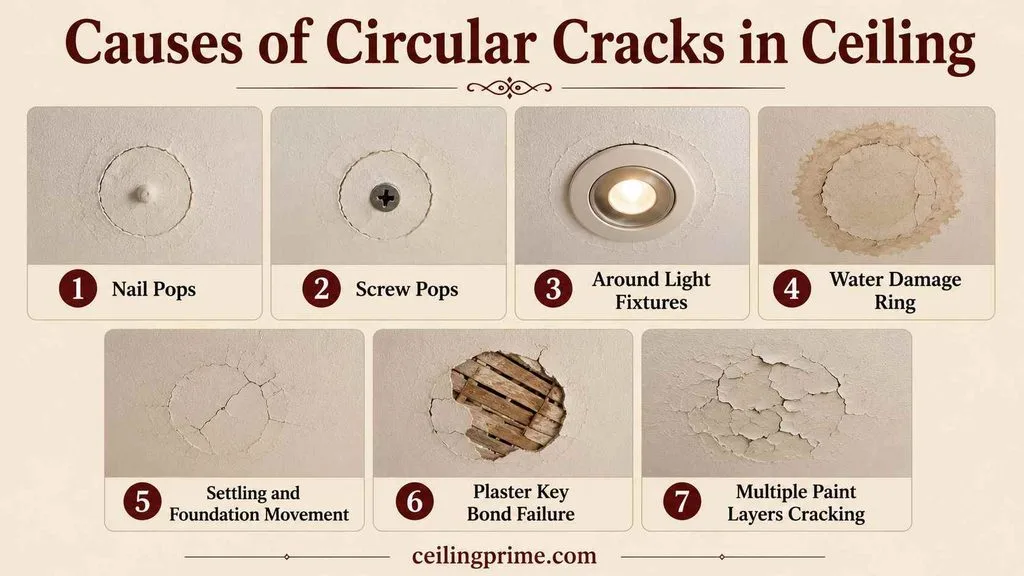
1. Nail Pops
The most common cause. The original builder used nails instead of drywall screws. Over years, the wood joist dries and shrinks. The nail slides out slightly. The nail head pushes the drywall compound outward. A small circular crack forms around the raised bump. Small circular cracks in ceiling drywall with a visible bump at the center are almost always nail pops. They are cosmetic. They are not structural.
2. Screw Pops
Same mechanism as nail pops but with screws. The joist shrinks. The screw head pushes through the compound. A ring crack forms around the screw dimple. Screw pops are less common than nail pops because screws grip wood more securely.
3. Cracks Around Light Fixtures and Recessed Lights
The drywall was cut to fit around a ceiling light box or recessed can. The cut edge weakens the drywall at that point. Vibration, temperature changes, and the weight of the fixture create stress cracks that radiate outward from the fixture opening. These cracks follow the shape of the fixture cutout.
4. Water Damage Ring
A single drip from a roof leak or plumbing leak hits the same spot repeatedly. The drywall weakens at the center. Moisture expands and contracts the drywall paper. A ring crack forms around the wet area. Brown discoloration accompanies the crack. The crack is a symptom of the leak, not just a cosmetic issue.
5. Settling and Foundation Movement
Foundation settlement shifts the building frame. The stress sometimes concentrates at a single point on the ceiling. A circular or radiating crack pattern forms at that stress point. If the crack is wider than 1/8 inch or growing, schedule a foundation inspection.
6. Plaster Key Bond Failure
In homes built before the 1950s, plaster ceilings bond to wood lath strips. Over decades, the plaster keys break. A section of plaster detaches from the lath at a single point. Cracks radiate outward from the detachment center. The plaster may feel hollow when tapped. Large ring cracks in plaster ceilings indicate sections that may fall.
7. Multiple Paint Layers Cracking
5 to 10 coats of paint built up over decades. The combined weight and thickness cracks in a random circular or web pattern at the weakest point. The cracks are surface-level only. The drywall underneath is intact. Sand and repaint.
Are Cracks in Ceiling Normal?
Yes, many ceiling cracks are normal. Hairline cracks, nail pops, and tape seam cracks are cosmetic defects that appear in nearly every home. Here is what is normal and what is not.
| Normal (Cosmetic) | Not Normal (Call a Pro) |
| Nail pop rings under 1/16 inch wide | Circular cracks wider than 1/8 inch |
| Hairline rings around recessed lights | Cracks growing larger over weeks |
| Small spider web patterns from paint buildup | Ring cracks with brown water stains |
| Cracks in new homes (first 1–3 years of settling) | Cracks with sagging drywall |
| Stable cracks that have not changed in months | Cracks with musty odor or visible mold |
Most circular ceiling cracks fall into the normal category. Nail pops and hairline fixture cracks cost $10 to $30 to fix. Water damage rings and growing cracks need professional attention.
What Causes Cracks in Ceiling? The Short Answer
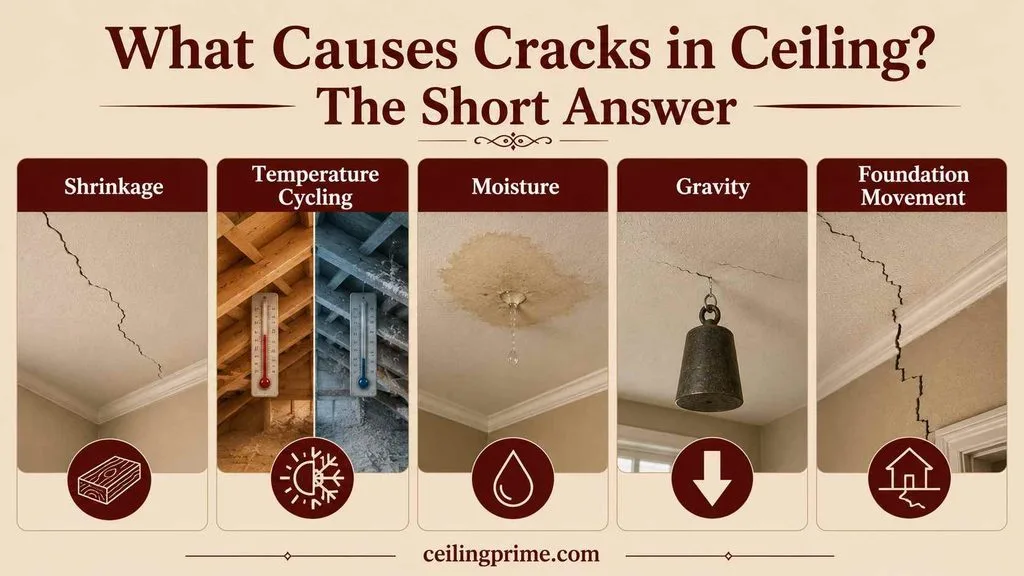
Every ceiling crack has a mechanical cause. Nothing cracks without a physical force acting on the material. Here are the 5 forces that cause ceiling cracks.
- Shrinkage: Wood framing dries and shrinks after construction. The movement pushes fasteners outward and separates drywall joints. This produces nail pops and seam cracks.
- Temperature cycling: Attics reach extreme temperatures. Hot summers and cold winters expand and contract the framing. This loosens fasteners and stresses joints.
- Moisture: Water weakens drywall. Wet drywall expands. Dry drywall contracts. The cycle cracks the surface around the wettest point.
- Gravity: Drywall weighs 57 pounds per 4×8 sheet. Gravity pulls on every fastener and joint every day. Over 30 to 50 years, the constant load opens hairline cracks.
- Foundation movement: Uneven settling shifts the building frame. The movement distributes unevenly across the ceiling. Stress concentrates at the weakest points and cracks form.
What Does It Mean If My Ceiling Is Cracking?
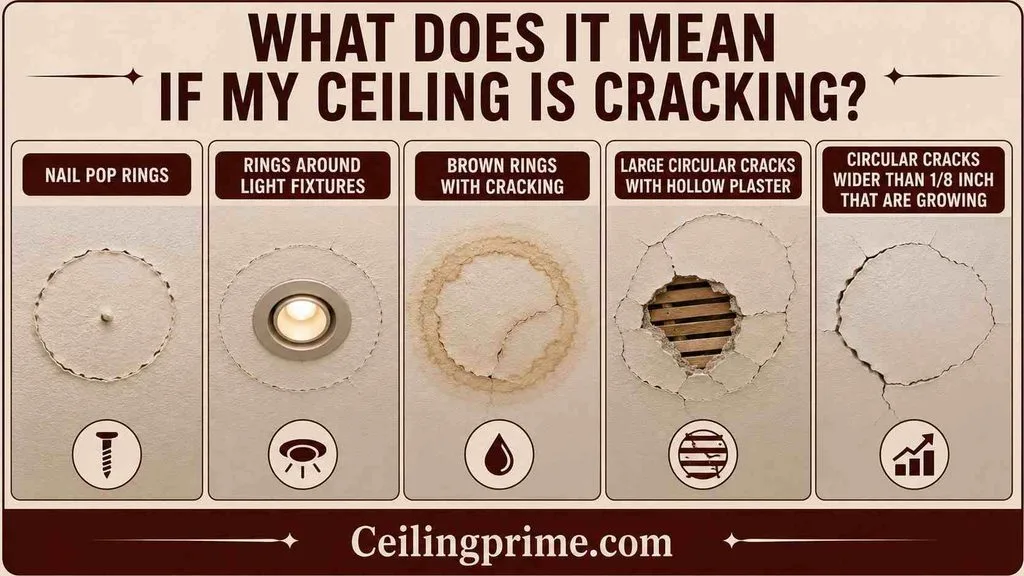
A cracking ceiling tells you something about the house. The type and location of the crack tells you what.
- Nail pop rings: The house is settling normally. Wood framing dried out. Nails pushed through. Fix is cosmetic: drive a screw next to the nail, fill, sand, paint.
- Rings around light fixtures: Vibration or thermal stress at the fixture cutout. Fix: apply mesh tape and compound around the fixture opening.
- Brown rings with cracking: Water reached the drywall from above. The leak may be active or old. Fix: find and stop the source. Let dry. Repair the ceiling.
- Large circular cracks with hollow plaster: The plaster ceiling is losing its bond. Sections may fall. Fix: screw plaster buttons into the lath, inject adhesive, or replace with drywall.
- Circular cracks wider than 1/8 inch that are growing: Possible structural movement. Check for companion signs: sticking doors, uneven floors, wall cracks. Call a foundation repair contractor.
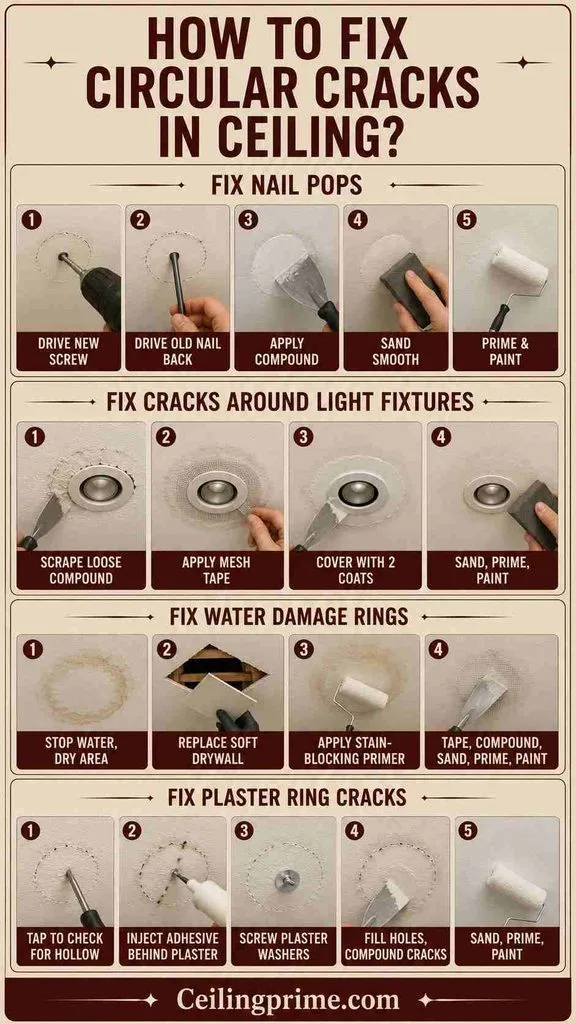
How to Fix Circular Cracks in Ceiling?
Fix Nail Pops (Most Common)
- Step 1: Drive a new drywall screw 2 inches above or below the popped nail. Set the screw just below the surface.
- Step 2: Drive the old nail back into the joist with a nail set and hammer. Do not pull it out — pulling enlarges the hole.
- Step 3: Apply joint compound over both the old nail and new screw. Let dry.
- Step 4: Sand smooth. Apply a second coat. Sand again.
- Step 5: Prime and paint. Total cost: under $10. Time: 30 minutes plus drying.
Fix Cracks Around Light Fixtures
- Step 1: Scrape loose compound from around the fixture ring.
- Step 2: Apply self-adhesive mesh tape around the crack, following the curve.
- Step 3: Cover with 2 coats of joint compound. Feather 3 inches past the crack on each side.
- Step 4: Sand between coats. Prime. Paint.
Fix Water Damage Rings
- Step 1: Stop the water source. Dry the area 24 to 48 hours with fans.
- Step 2: If the drywall is soft, cut the damaged section back to the nearest joists. Replace with new drywall.
- Step 3: If the drywall is firm, scrape the cracked area. Apply stain-blocking primer to seal the water stain.
- Step 4: Apply mesh tape over cracks. Cover with compound. Sand. Prime. Paint.
Fix Plaster Ring Cracks
- Step 1: Tap the area around the crack. Hollow sound means the plaster has detached from the lath.
- Step 2: Drill small holes through the loose plaster. Inject construction adhesive behind the plaster to rebond it to the lath.
- Step 3: Screw plaster washers through the plaster into the lath to hold it tight while the adhesive cures (24 hours).
- Step 4: Remove washers. Fill screw holes. Apply compound over the cracks. Sand. Prime. Paint.
- Step 5: If the plaster is crumbling, remove the damaged section and replace with a drywall patch.
Circular Cracks in Ceiling vs Other Crack Types
| Crack Type | Pattern | Usual Cause |
| Circular / ring | Curved ring around center point | Nail pop, fixture, water drip |
| Straight line | Runs along drywall seam | Tape joint failure |
| Hairline random | Thin scattered lines | Normal settling |
| Diagonal from corner | 45° from door/window | Foundation movement |
| Spider web | Radiating branches | Paint buildup or plaster aging |
| Ceiling-to-wall | Crosses from ceiling to wall | Structural stress |
Circular cracks are the least concerning pattern in most cases. Nail pops and fixture stress cracks are cosmetic. Diagonal and ceiling-to-wall cracks are the most serious.
Repair Costs for Circular Ceiling Cracks in 2026
| Repair Type | 2026 Cost |
| DIY nail pop fix (per pop) | $5–$10 |
| DIY fixture crack repair | $10–$25 |
| DIY water ring repair (patch + paint) | $20–$60 |
| Professional crack repair (per room) | $100–$400 |
| Plaster adhesive injection + washers | $200–$600 |
| Plaster removal + drywall replacement | $500–$2,000 per room |
| Foundation inspection (if needed) | $300–$800 |
Identify the Center, Then Fix the Cause
Circular cracks in ceiling surfaces point to a single origin. Find the center of the ring. If it is a nail head, drive a screw and fill. If it is a light fixture, tape and compound the edge. If it is a brown water ring, fix the leak and repair the drywall. If the plaster sounds hollow when tapped, rebond or replace it. The shape of the crack tells you the fix.
Frequently Asked Questions
Are small circular cracks in ceiling dangerous?
No in most cases. Small ring cracks under 1/16 inch wide are almost always nail pops or screw pops. They are cosmetic. Drive a new screw, fill, sand, and paint. Cracks wider than 1/8 inch, growing cracks, or cracks with water stains need professional inspection.
Why do nail pops create circular cracks?
The nail head pushes through the joint compound from behind. The compound fractures in a ring pattern around the raised nail head. The force is concentrated at a single point, so the crack radiates outward in a circle.
Can I just paint over a circular ceiling crack?
Only if the crack is in the paint layer only. If the crack is in the compound or drywall, painting over it without taping and filling means the crack shows through within weeks. Scrape, fill, sand, prime, then paint.
Why do cracks form around recessed lights?
The drywall was cut to fit the recessed can. The circular cutout weakens the drywall at that point. Heat from the light, vibration, and temperature changes create stress that cracks the weakened edge. Mesh tape and compound reinforce the junction.
Should I worry about circular cracks in a new home?
Nail pops and hairline cracks are normal in new homes during the first 1 to 3 years. The framing dries and settles. Report them to the builder at the 1-year warranty mark. Cracks wider than 1/8 inch or growing cracks are not normal and warrant immediate inspection.
How do I prevent nail pops from coming back?
Drive a drywall screw 2 inches from the popped nail. Screws hold better than nails in shrinking wood. Set the old nail flush. Fill, sand, and paint. The screw prevents the joist from pushing the nail out again.





One Comment