Drywall Ceiling or Walls First? The Correct Order & Why It Matters
The answer to drywall ceiling or walls first is simple: ceiling first. Every professional drywall installer hangs the ceiling panels before the wall panels. The wall sheets then butt up against the underside of the ceiling panels, supporting the ceiling edges and creating tighter seams at the wall-ceiling joint.
This is not a preference. It is the standard installation sequence in residential and commercial construction. Hanging the walls first creates a gap at the ceiling line that is harder to tape, harder to finish, and more likely to crack over time. This guide explains the 5 reasons, the step-by-step order, and the specific considerations for garages, basements, bathrooms, and mudding sequence.
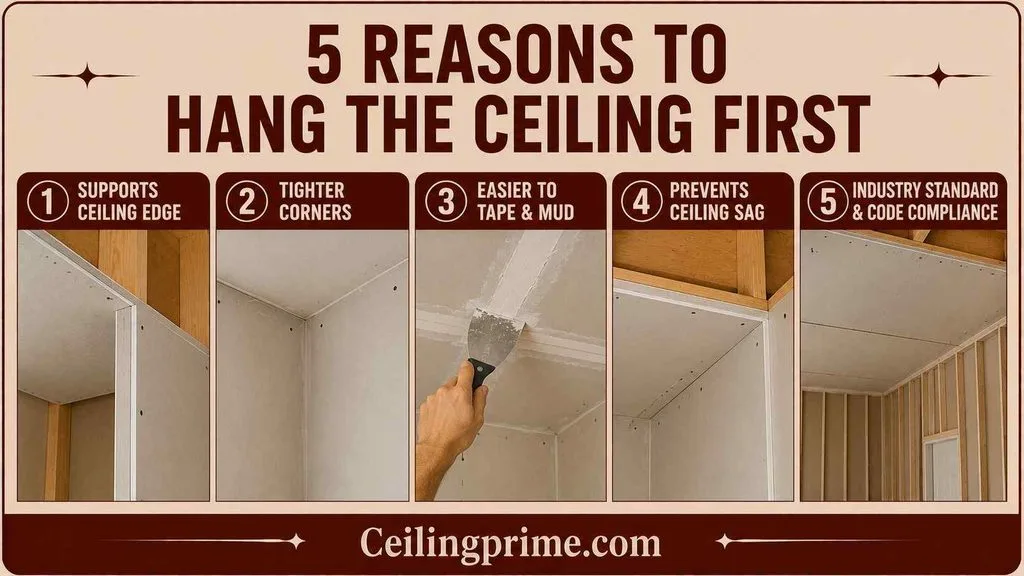
5 Reasons to Hang the Ceiling First
Wall panels support the ceiling edge
When you hang the ceiling first, the wall panels push upward against the bottom of the ceiling panel. The top edge of the wall panel holds the ceiling panel tight to the joists at the perimeter. This creates a stronger joint with less compound needed. If you hang walls first and then try to slide ceiling panels on top, you cannot push the ceiling panel edges down onto the wall panels without a gap.
Tighter inside corners
The wall-to-ceiling corner is the most visible joint in any room. Ceiling first creates a clean, tight inside corner because the wall panel presses directly against the ceiling panel face. Walls first creates a gap that requires more compound and is harder to finish flat.
Easier to tape and mud
A tight ceiling-to-wall joint needs only one layer of tape and compound. A gapped joint needs multiple heavy coats. Heavy compound coats shrink, crack, and sag on overhead surfaces. Less compound at the joint means faster finishing and a cleaner result.
Prevents ceiling sag at the edges
Ceiling panels are heavy. A 4×8 sheet of 1/2-inch drywall weighs 57 pounds. The wall panel pressing upward at the edge acts like a shelf. It prevents the ceiling panel from sagging or pulling away from the last joist. Without that support, the ceiling edge droops over time.
Industry standard and code compliance
Professional drywall installers, building inspectors, and construction manuals all specify ceiling first. Fire code in garages requires the ceiling drywall to extend to the wall framing. The wall panel covers the ceiling edge and creates a continuous fire barrier.
Step-by-Step Drywall Installation Order
Here is the correct sequence for hanging drywall ceiling or walls first in any room.
Phase 1: Hang the Ceiling
- Step 1: Measure the ceiling. Calculate how many panels you need. Use 4×8 or 4×12 sheets. Longer sheets mean fewer butt joints.
- Step 2: Mark all joist locations on the top plate of the walls. Snap chalk lines across the ceiling so you know where to drive screws.
- Step 3: Lift the first panel into position. Use a drywall lift (hoist) for solo work. A helper and a T-brace work for two-person crews.
- Step 4: Start in one corner. Position the panel perpendicular to the ceiling joists. Press the long edge tight against the wall framing.
- Step 5: Drive 1-5/8 inch drywall screws every 8 inches along each joist. Set each screw just below the paper surface without tearing through.
- Step 6: Hang the next panel. Butt the factory tapered edge against the previous panel. Stagger the end joints by at least 4 feet between rows.
- Step 7: Continue until the entire ceiling is covered. Cut around light boxes, fans, and vents with a drywall saw or rotary tool.
Phase 2: Hang the Walls
- Step 8: Start with the upper row of wall panels. Push each panel up until it presses firmly against the underside of the ceiling panel. The top edge of the wall panel should touch the ceiling with no gap.
- Step 9: Drive screws into the wall studs every 12 inches for walls (ceiling screw spacing is tighter at 8 inches because of gravity).
- Step 10: Hang the lower row of wall panels. Leave a 1/2-inch gap at the floor. The baseboard covers this gap later.
- Step 11: Hang wall panels horizontally, not vertically. Horizontal panels create fewer joints to tape and the long factory edge runs across the middle of the wall where it is most visible.
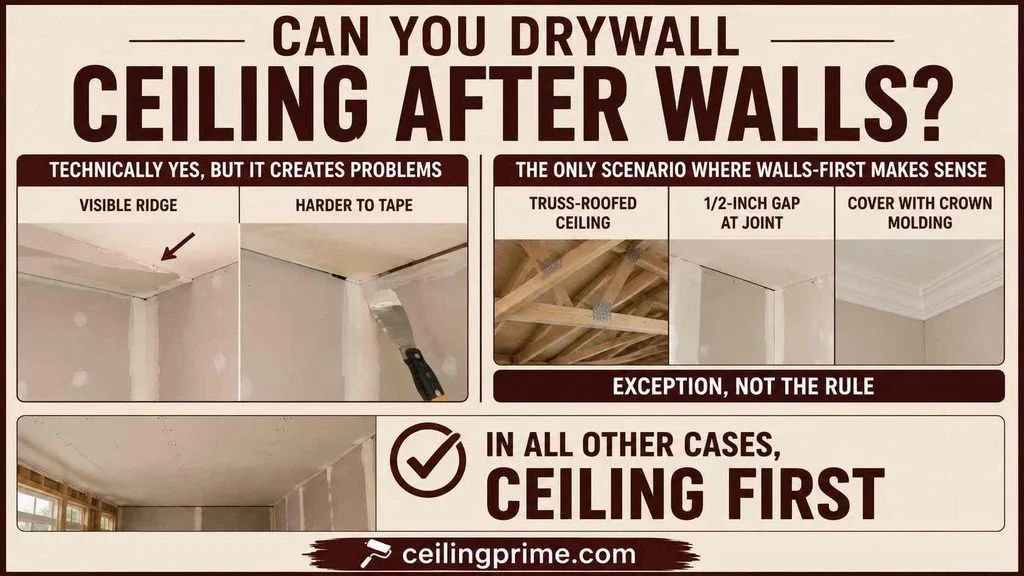
Can You Drywall Ceiling After Walls?
Technically yes. But it creates problems. If you hang the walls first, the ceiling panels sit on top of the wall panel edges. The ceiling-to-wall joint has a visible ridge. The inside corner is harder to tape because the ceiling panel overhangs the wall panel instead of sitting behind it.
The only scenario where walls-first makes sense is a single-story addition with a truss-roofed ceiling that needs to float independently from the walls (truss uplift). In that case, the ceiling clips attach to the trusses and the ceiling panel hangs freely without touching the wall panels. A 1/2-inch gap is left at the wall-ceiling joint and covered with crown molding attached to the wall only. This is the exception, not the rule. In all other cases, the answer to drywall ceiling or walls first is ceiling first.
Drywall Garage Ceiling or Walls First
Garages follow the same rule: ceiling first, walls second. But garages have 2 specific requirements that differ from interior rooms.
- Fire-rated drywall: Building codes require 5/8-inch Type X drywall on any garage ceiling or wall that shares a boundary with living space. This is the fire separation between the garage and the rooms above or beside it. Standard 1/2-inch drywall does not meet fire code in these locations.
- Full coverage: The ceiling drywall must extend fully to the top plate of every wall. No gaps. No missing sections. The wall drywall must then butt tightly against the ceiling drywall to complete the fire barrier. Hanging the ceiling first ensures this overlap. Hanging walls first leaves the ceiling edge unsupported and creates a potential gap in the fire barrier.
The sequence for a garage is the same: ceiling first with 5/8-inch Type X, walls second with 5/8-inch Type X on any shared wall, and 1/2-inch standard on non-shared walls.
Drywall Basement Ceiling or Walls First
Basements follow the ceiling-first rule. But basements add 3 considerations.
- Low ceiling height: Basement joists often sit at 7 to 7.5 feet above the floor. Every inch matters. Use 1/2-inch drywall instead of 5/8-inch to save 1/8-inch of headroom.
- Pipes and ducts: HVAC ductwork, plumbing pipes, and electrical conduit run across basement ceilings. Build soffits (framed boxes) around these obstacles before hanging the ceiling panels. Hang the soffit drywall as part of the ceiling phase.
- Moisture: Basements are damp. Consider moisture-resistant drywall (green board) for the lower 4 feet of walls. Standard drywall is fine for the ceiling if the basement is properly waterproofed and dehumidified.
Drywall Bathroom Ceiling or Walls First
Bathrooms follow the same ceiling-first sequence. Use moisture-resistant drywall on all bathroom surfaces. In shower and tub surrounds, use cement board instead of drywall behind the tile. The ceiling gets standard or moisture-resistant drywall. Hang it first. Then hang the wall panels, pushing them up against the ceiling panel. Plasterboard ceiling or walls first follows the same logic in any room — the answer is always ceiling.
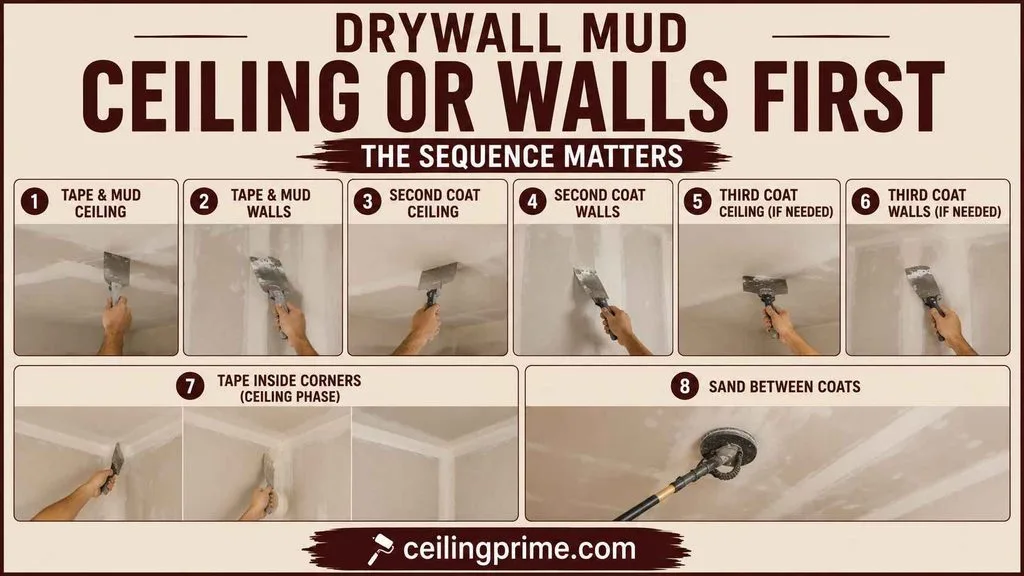
Drywall Mud Ceiling or Walls First
After hanging, the taping and mudding sequence is: ceiling first, walls second. The reason is the same as hanging — work from the top down.
- Tape and mud all ceiling joints first. Apply the first coat of compound. Let dry.
- Tape and mud all wall joints second. Apply the first coat. Let dry.
- Apply the second coat to the ceiling. Feather wider. Let dry.
- Apply the second coat to the walls. Feather wider. Let dry.
- Apply the third coat to the ceiling (if needed). Sand between coats.
- Apply the third coat to the walls. Sand between coats.
- Tape the inside corners (ceiling-to-wall joints) during the ceiling phase. Press paper tape into the corner with compound on both the ceiling side and the wall side.
Working top-down prevents sanding dust and compound drips from landing on freshly finished lower surfaces. The question of drywall ceiling or walls first applies to every phase of the job: hanging, taping, mudding, sanding, priming, and painting.
Ceiling First vs Walls First: Full Comparison
| Factor | Ceiling First (Correct) | Walls First (Not Recommended) |
| Wall-ceiling joint | Tight — wall panel presses against ceiling | Gap — ceiling sits on top of wall edge |
| Inside corner taping | Easy — one layer of tape and compound | Hard — needs heavy compound to fill gap |
| Ceiling edge support | Yes — wall panel acts as a shelf | No — ceiling edge can sag over time |
| Fire code compliance | Yes — continuous coverage at joint | May leave gap in fire barrier |
| Industry standard | Yes — every professional does this | No — only used in truss uplift situations |
| Finishing quality | Cleaner corners, fewer coats | More compound, more sanding, more cracking |
The comparison makes the answer clear. Whether you ask should you drywall ceiling or walls first, do you drywall ceiling or walls first, or do you start drywall ceiling or walls first, the answer is always ceiling.
Tools Needed for Ceiling-First Drywall Installation
- Drywall lift (hoist): Raises panels to the ceiling and holds them while you drive screws. Rent for $40–$60 per day. This is the single most useful tool for solo ceiling work.
- Screw gun or impact driver: Drives drywall screws to the correct depth. A screw gun with an adjustable depth clutch prevents overdriving.
- T-brace (deadman): A T-shaped support made from 2x4s. Press it under the panel to hold it against the joists while you screw. A backup for the drywall lift or a second-person substitute.
- Tape measure, utility knife, drywall saw, chalk line, pencil.
- Rotary cut-out tool: Cuts holes for electrical boxes, recessed lights, and vents.
- Taping knives (6-inch and 10-inch), joint compound, paper tape, sandpaper (120 and 220 grit).

5 Mistakes to Avoid
- Hanging walls first: The entire point of this article. Ceiling first creates tighter joints, better corners, and prevents ceiling edge sag. Reversing the order creates problems that take hours of extra mudding and sanding to fix.
- Skipping the drywall lift: Ceiling panels are heavy and awkward overhead. A 4×8 sheet of 1/2-inch drywall weighs 57 pounds. Trying to hold it up with one hand while screwing with the other damages the panel and your shoulders. Use a lift.
- Overdriving screws: A screw that tears through the paper face has no holding strength. Set the screw just below the surface — a small dimple in the paper. If you blow through, move 2 inches to the side and drive a new screw.
- Not staggering end joints: Butt joints in a straight line across the ceiling crack within months. Offset each row by at least 4 feet. This distributes stress across different joist bays.
- Leaving a gap at the ceiling-wall joint: The wall panel must press firmly against the underside of the ceiling panel. A 1/4-inch gap requires heavy compound fills that shrink and crack. If this is your first drywall project, remember: push the wall panel up tight.
Ceiling First. Always.
The correct answer to drywall ceiling or walls first is ceiling. Every time. In every room. In every building type. The ceiling goes up first. The wall panels push up against the ceiling edges. The joints are tighter. The corners are cleaner. The fire barrier is continuous. And the finishing takes less compound, less sanding, and less time.
Frequently Asked Questions
Why do you drywall the ceiling before the walls?
The wall panels support the ceiling panel edges from below. The top edge of the wall panel presses upward against the ceiling, creating a tight joint. This joint is easier to tape, less likely to crack, and meets fire code at the wall-ceiling boundary.
Can one person hang ceiling drywall alone?
Yes, with a drywall lift. The lift raises the panel to the ceiling and holds it in place while you drive screws. Without a lift, you need at least one helper. Overhead solo work without a lift risks injury and damages panels.
What size drywall screws for ceiling?
1-5/8 inch coarse-thread drywall screws for 1/2-inch panels. 2-inch screws for 5/8-inch panels. Space them every 8 inches along each joist. Walls use 12-inch spacing. Ceilings need tighter spacing because gravity pulls the panel downward.
Do you tape the ceiling or walls first?
Ceiling first. Tape and mud all ceiling seams before starting the walls. Work top down for every phase: hanging, taping, mudding, sanding, priming, and painting. This prevents drips and dust from contaminating finished lower surfaces.
What about truss uplift situations?
In truss-roofed homes prone to uplift, the ceiling floats independently. Clips attach the ceiling drywall to the trusses. A 1/2-inch gap is left at the wall-ceiling joint. Crown molding attached to the wall covers the gap. The ceiling still goes up first. The gap is intentional for seasonal truss movement.
Is the order different for plasterboard?
No. Plasterboard (gyprock, sheetrock) is the same material as drywall. The order is the same: ceiling first, walls second. The term changes by country — the installation sequence does not.