Before and After Painted Popcorn Ceiling vs. Removal: What Actually Changes
Two things happen to popcorn ceilings in Austin renovation projects: homeowners paint over the texture, or they remove it entirely and smooth the ceiling. The before and after results look very different, and the difference matters — for how the room feels, how buyers respond, and what the ceiling will look like in ten years. This guide describes both outcomes honestly, room by room, so you can make the right call before spending money.
Before and After Painted Popcorn Ceiling
Painting over a popcorn ceiling is the lower-cost option. Here is what changes and what does not.
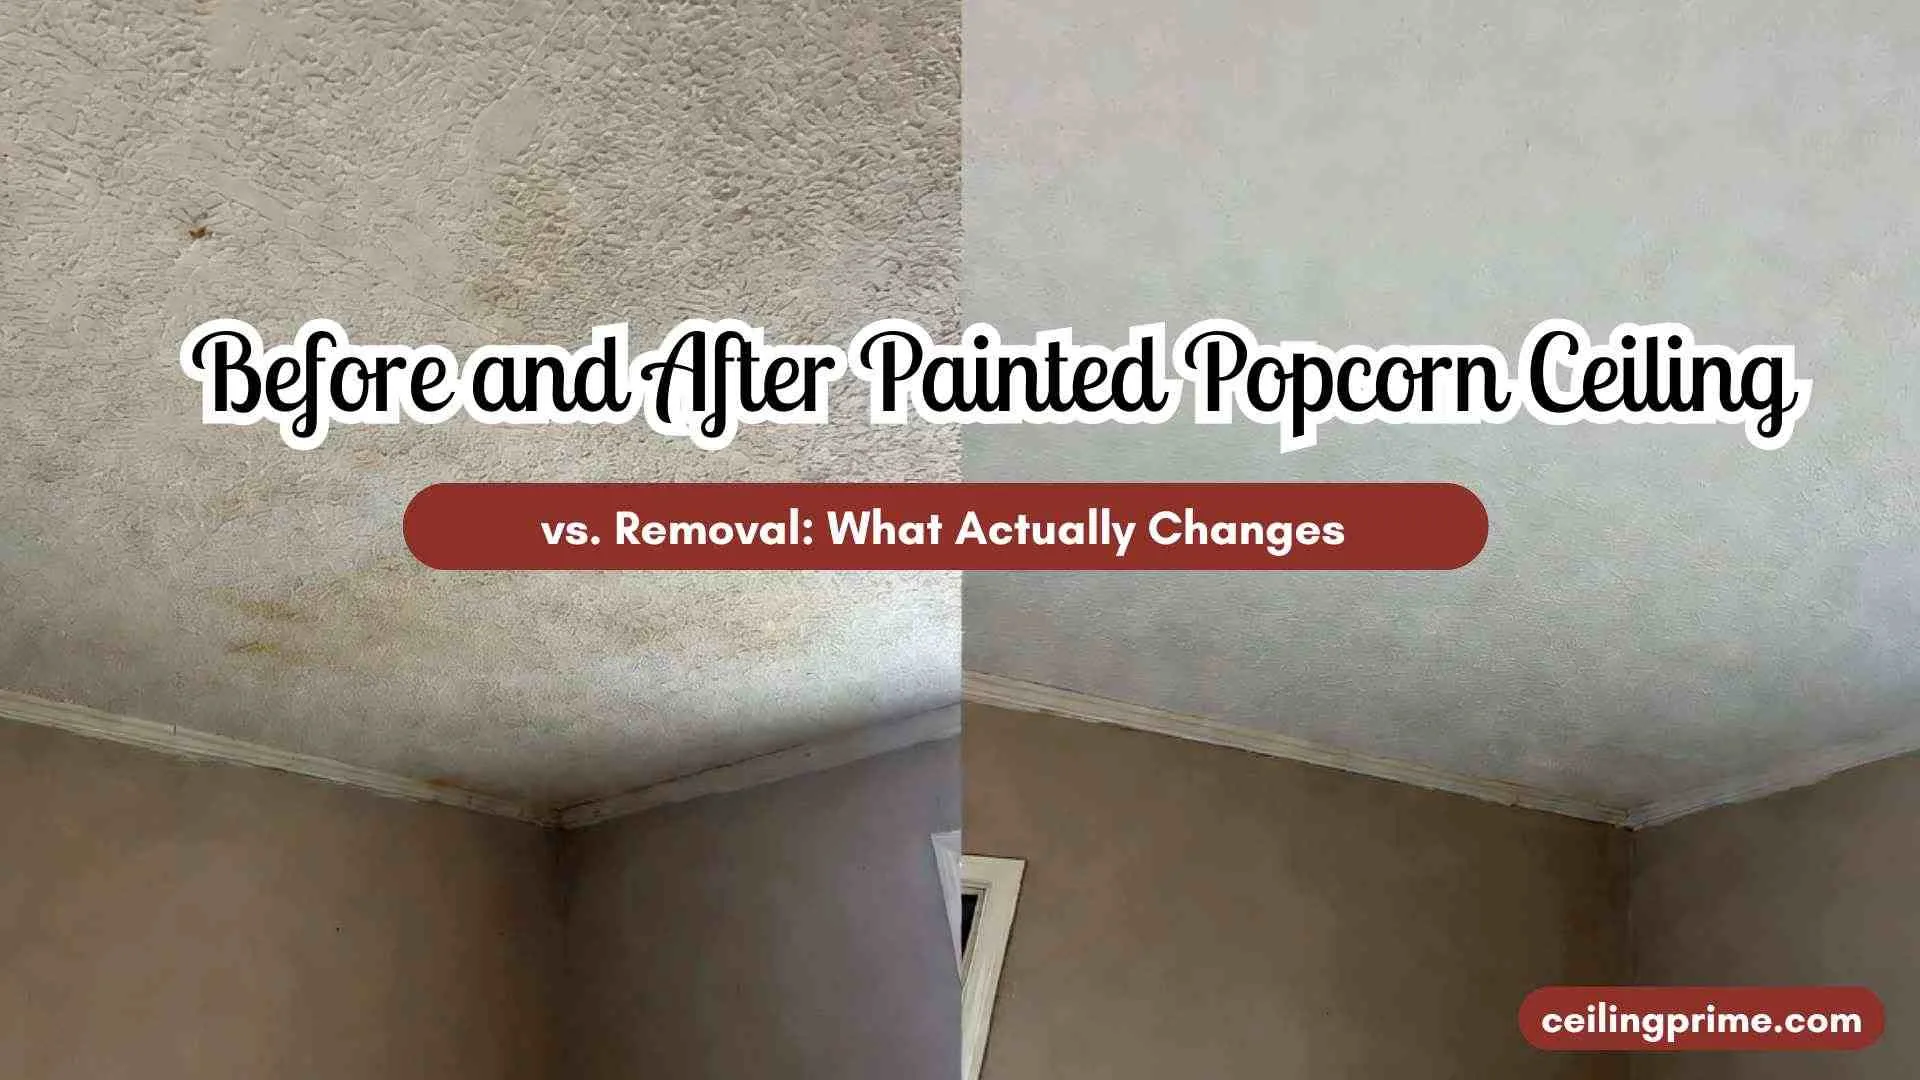
What a painted popcorn ceiling looks like — before
Most unpainted or aged popcorn ceilings in Austin homes show yellowing — a warm cream or ivory tint from decades of light exposure, cooking vapors, and oxidation. The texture itself may look dusty or have visible cobwebs settled into the bumps.
Water stains, if present, appear as brownish rings or patches. Under overhead or natural light, the three-dimensional texture creates visible micro-shadows across the ceiling, making the surface look busy and uneven.
What a painted popcorn ceiling looks like — after
A freshly painted popcorn ceiling reads as uniformly white or off-white. The yellowing disappears. Water stains are covered — temporarily, if they were not primed first. The texture remains fully intact; you have changed the color but not the surface.
Under the same raking light that showed the micro-shadows before, the shadows are still there — paint does not eliminate the three-dimensional profile, it just changes its color. The ceiling looks fresher but structurally identical to what it was.
The lighting effect — before vs. after painting
Before painting, a yellowed popcorn ceiling absorbs light unevenly. The aged surface has varying reflectivity across the texture profile. After painting with flat ceiling white, the reflectivity is more uniform.
The room often feels noticeably brighter because the fresh white paint returns more light into the space than the yellowed surface did. This is the most significant perceptual change from painting alone, and it is genuinely noticeable in living rooms and bedrooms with limited natural light.
What painting does not fix?
Paint does not change the texture profile. A buyer or home inspector standing in the room still sees a popcorn ceiling — they just see a white one. Paint does not encapsulate asbestos reliably; a stain-blocking primer followed by paint is not an asbestos management strategy, and the ceiling remains regulated asbestos-containing material (ACM) if the base texture tested positive.
And paint over a water stain that was not properly primed with a shellac-based stain blocker will show through in weeks or months as the moisture reactivates the stain.
Before and After: Popcorn Ceiling Removal + Smooth Finish
Full removal produces a fundamentally different ceiling. Here is what the before and after actually looks like across different rooms.
Living room — before and after
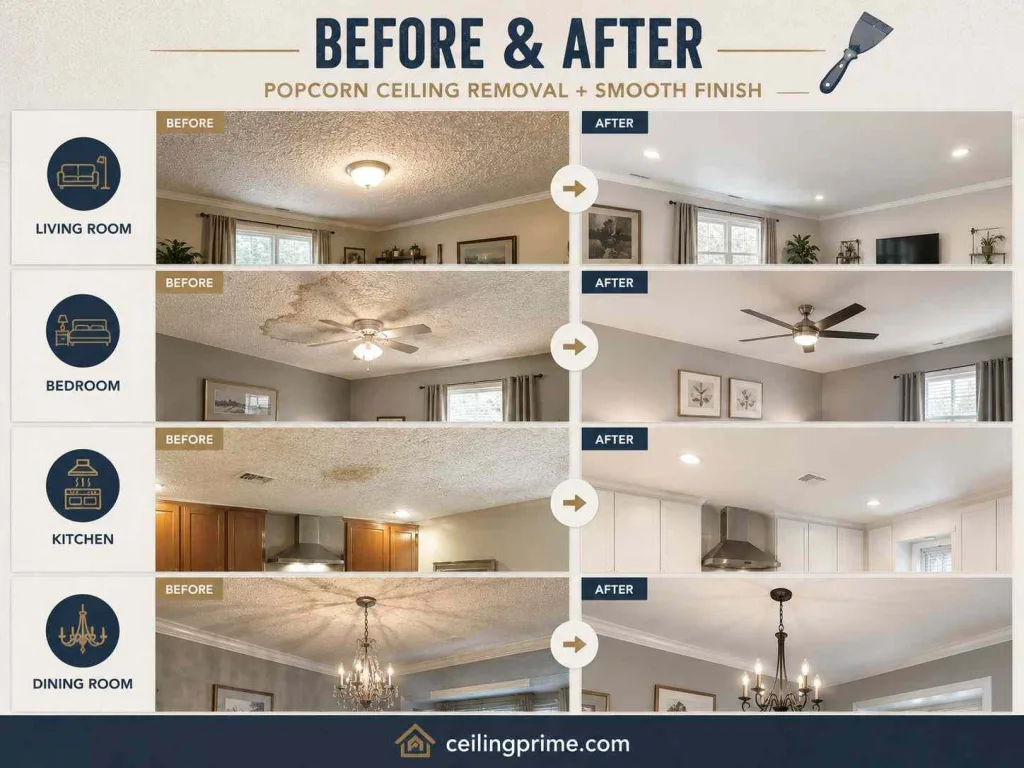
Before: A 1970s Austin living room with original popcorn ceiling typically has a warm-ivory texture covering the full ceiling, often with minor staining near light fixtures from heat exposure.
The ceiling reads as busy — the texture creates visual noise that competes with wall art, furniture, and any accent lighting. Light from a single overhead fixture scatters off the uneven surface, creating a diffuse glow rather than clean downlighting.
After removal and skim coat: The ceiling is flat, smooth, and uniform. Under the same light fixture, the room looks taller. This is not an illusion — a smooth ceiling reflects light differently, sending it downward and outward more cleanly than textured surface.
The room appears less cluttered overhead. Recessed lighting installed in the smooth ceiling produces clean pools of light rather than the scattered, shadow-heavy effect of the same fixtures in a popcorn ceiling.
Bedroom — before and after
Before: Bedroom popcorn ceilings in older Austin homes often show water ring stains from past roof leaks or condensation — rings that are impossible to permanently cover by painting alone. The texture collects fine dust particles that settle into the bumps over years, which can be a concern for allergy sufferers.
After: A smooth bedroom ceiling is cleaner — no texture catches dust. The water stains and any underlying damage are revealed and repaired during the skim coat process. The finished surface accepts any ceiling paint or treatment, including tinted paint and decorative finishes. Bedrooms with smooth ceilings consistently photograph better, which matters for short-term rental platforms and sale listings.
Kitchen — before and after
Before: Kitchen popcorn ceilings are the most deteriorated in most Austin homes because cooking vapor, grease, and moisture have been attacking the texture for decades. The surface often shows a combination of yellowing, grease shadow around the range hood area, and texture that has begun to detach in patches where moisture has compromised the adhesion.
After: Kitchen ceiling removal reveals drywall that often shows moderate water and grease staining beneath the texture. The skim coat covers this and the repainted smooth ceiling is flat, wipeable, and resistant to the moisture and grease that destroyed the popcorn texture over time.
Dining room — before and after
Before: Dining rooms in 1960s and 1970s Austin homes frequently had the most decorative ceiling treatment — sometimes glitter popcorn texture, sometimes heavier-than-average acoustic texture to provide sound dampening. A chandelier in a dining room with textured ceiling creates complicated shadow patterns across the bumpy surface that read as chaotic rather than atmospheric.
After: A smooth dining room ceiling with a chandelier is visually cleaner. The light distributes evenly across the flat surface rather than creating texture-shadow patterns. Crown molding, if added after the skim coat, sits cleanly against the smooth surface and looks intentional rather than patched-on.
Side-by-Side: What Each Approach Actually Delivers
| Color and freshness | Eliminates yellowing; returns to clean white | Eliminates yellowing; surface is smooth and uniform white |
| Texture profile | Unchanged — bumpy surface remains | Completely removed — flat, smooth ceiling |
| Light distribution | Improved over yellowed surface; still diffused by texture | Significantly improved; clean, even reflection |
| Room height perception | Minimal change | Room appears taller — smooth ceilings create more visual height |
| Water stain coverage | Temporary if not primed; stains return without shellac primer | Permanent — damage repaired under skim coat |
| Asbestos management | Does not encapsulate or address asbestos | Abatement required if positive; ceiling fully removed |
| Buyer perception | Buyer still sees a popcorn ceiling | Buyer sees a smooth, updated ceiling — no negotiating point |
| DIY feasibility | Possible with proper prep and primer | Not recommended without professional training |
| Cost in Austin | $0.50–$1.50/sq ft for paint and materials | $2.30–$4.05/sq ft with CeilingPrime |
| Longevity | 2–5 years before yellowing returns or paint chips | Permanent — smooth ceiling does not require re-treatment |
Can You Paint Over a Popcorn Ceiling — And Should You?
Yes, you can paint over a popcorn ceiling. Whether you should depends on what you are trying to achieve:
- Paint if: the ceiling is asbestos-free, you are not planning to sell in the next 2 years, the texture is intact with no water damage, and you want a fresher appearance without the disruption and cost of removal.
- Remove if: the ceiling is pre-1980 (test first), you are renovating, listing the home, adding recessed lighting, or if the texture is deteriorating, peeling, or has repeated water staining that paint alone has not resolved.
For Austin homeowners who painted their popcorn ceiling in the past and are now selling, buyers still recognize a painted popcorn ceiling for what it is. The texture profile is visible regardless of paint color. In Austin’s active real estate market, a painted popcorn ceiling in a pre-1980 home still triggers the asbestos question in buyers’ minds — and the negotiation that follows.
How to Paint a Popcorn Ceiling — If You Are Going That Route
If the ceiling is asbestos-free and you are choosing to paint rather than remove, here is the correct process:
| 1 | Test for asbestos — do not skip on pre-1980 ceilings | Coordinate asbestos testing; abatement if positive before any work |
| 2 | Apply shellac-based stain-blocking primer to any stained areas first | Wet the ceiling surface for scraping; remove all texture |
| 3 | Apply PVA primer to the full ceiling to seal the texture and prevent paint absorption | Skim coat the bare drywall with joint compound |
| 4 | Apply flat ceiling paint with a thick-nap roller (3/4″ to 1″ nap) | Sand the skim coat smooth; apply PVA primer |
| 5 | Apply a second coat after the first dries fully | Apply flat ceiling paint in two coats |
| 6 | Do not saturate the texture — multiple thin coats work better than one heavy coat | Install any recessed lighting and crown molding before final paint |
After Removing Popcorn Ceiling — What Comes Next
After professional removal, the bare drywall underneath is almost never paint-ready. Here is what typically follows:
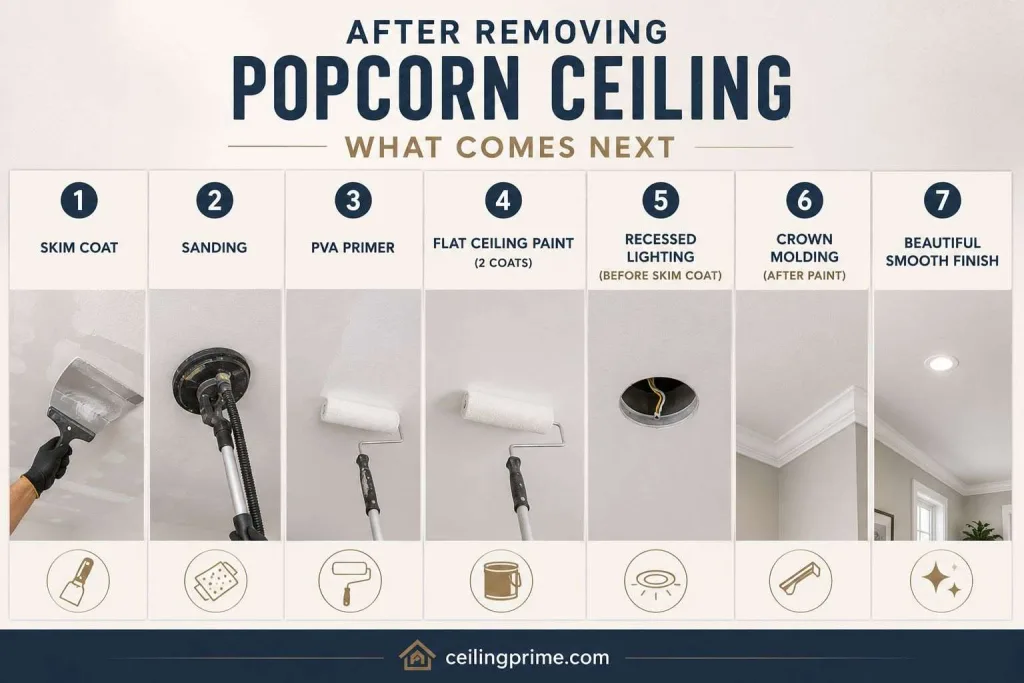
- Skim coat — Joint compound is applied in a thin layer across the entire ceiling surface, filling tool marks, seam lines, and any minor damage exposed during removal. This is the step that creates the smooth, flat ceiling appearance.
- Sanding — The dried skim coat is lightly sanded to eliminate any ridges or tool lines. Light passes with 120-grit sandpaper on a pole sander are typical.
- PVA primer — The sanded skim coat requires a PVA (polyvinyl acetate) primer before painting. Skim coat is porous and will absorb paint unevenly without primer — the result is a blotchy, flat surface that shows lap marks. One coat of PVA primer eliminates this.
- Flat ceiling paint — Two coats of flat ceiling paint complete the process. CeilingPrime leaves the ceiling primed and paint-ready; painting is a separate step typically done by the homeowner or a painter.
- Recessed lighting and crown molding — If these are part of the renovation, recessed lighting rough-in happens before the skim coat, and crown molding goes in after the ceiling paint is dry.
Frequently Asked Questions
Q. What does a painted popcorn ceiling look like vs. a removed one?
A painted popcorn ceiling looks fresh and white but retains the bumpy texture profile — the surface is still three-dimensional, still creates micro-shadows under raking light, and is still recognizable as a popcorn ceiling by buyers and inspectors. A removed and skim-coated ceiling is flat and smooth — the texture is completely gone, the room looks taller, and light distributes more evenly.
Q. Is it worth painting a popcorn ceiling before selling?
Only if the alternative is listing with a visibly yellowed or stained ceiling that makes a worse first impression. A freshly painted popcorn ceiling looks better than an aged one, but buyers and their agents can still identify a painted popcorn ceiling. In Austin’s market, removal before listing produces better buyer perception and a stronger negotiating position than painting alone.
Q. Can I paint a popcorn ceiling myself?
Yes — painting a popcorn ceiling is a DIY-feasible project for an asbestos-negative ceiling. Use a thick-nap roller to reach into the texture bumps, apply shellac-based primer over any water stains first, and use two coats of flat ceiling paint. The main risks are saturating the texture (which causes it to separate from the drywall) and missing water stains that will bleed through without proper primer.
Q. After removing the popcorn ceiling, can I just paint the bare drywall?
Technically yes, but the result will not look good. Bare drywall after popcorn ceiling removal has visible seam tape lines, screw dimples, minor gouges from the scraper, and drywall paper that has been partially dampened during the wetting process. Without a skim coat, all of these are visible through paint — especially under raking light. A skim coat is the step that makes the ceiling actually look smooth.
Q. How long does it take to see results after popcorn ceiling removal?
Most CeilingPrime jobs in Austin take 1–3 days for a full home, depending on ceiling area and complexity. The skim coat needs 24 hours to dry before sanding and primer. From start to paint-ready, plan on 3–5 days for a typical single-story Austin home. The room is usable again once the skim coat is dry — furniture can be moved back in after the primer coat.