Wallpaper Over Popcorn Ceiling: Can You Do It and How to Prepare
Putting wallpaper over popcorn ceiling is possible under specific conditions — but it requires more preparation than most people expect, and the texture of the ceiling determines how much work comes first. This guide covers exactly when wallpaper works over popcorn ceiling, what types of wallpaper are viable, how to prepare the surface, and when removing or smoothing the ceiling first is the smarter path.
The Asbestos Warning — Start Here on Pre-1980 Ceilings
If the ceiling was installed before 1980, have it tested for asbestos before any surface work begins. Sanding, priming, or mechanically disturbing a pre-1980 popcorn ceiling can release asbestos fibers. Even applying adhesive wallpaper to an already-loose texture can pull ceiling material free, creating an exposure event.
A licensed asbestos inspector collects a small sample and sends it to an accredited lab — results in 2–5 business days. If the Environmental Protection Agency (EPA) threshold of 1% asbestos by weight is exceeded, the material is regulated asbestos-containing material (ACM) and must be addressed by licensed abatement before any decorative work. For pre-1980 ceilings that test negative, wallpaper or other treatments can proceed normally.
One upside: covering an intact, asbestos-negative pre-1980 ceiling with wallpaper rather than disturbing it is often the safest approach when the homeowner wants to update the appearance without dealing with the ceiling’s underlying age.
Can You Put Wallpaper on Popcorn Ceiling?
Yes — with conditions. The ceiling texture is the determining factor. Here is the realistic breakdown:
| Very light, fine popcorn texture (barely raised) | Peel-and-stick or heavy wallpaper with liner | Light sanding or primer for adhesion; test a small area first |
| Standard acoustic texture (moderate bumps) | Wallpaper liner + heavy wallpaper | Wallpaper liner bridges minor texture; surface prep with wallpaper primer required |
| Heavy or dense popcorn texture | Not workable directly | Must skim coat, skip trowel, or overlay with 1/4″ drywall to create flat substrate |
| Painted popcorn ceiling | Liner + heavy wallpaper may work | Test adhesion on a small area; painted surfaces may resist wallpaper glue |
| Flaking, peeling, or water-damaged texture | Not workable | Loose texture must be removed before any application; wallpaper will pull it down |
| Confirmed asbestos-positive ceiling | Cover without disturbing — wallpaper liner or drywall overlay possible | No sanding or scraping; licensed abatement professional should assess the covering approach |
What Types of Wallpaper Work Best on Popcorn Ceilings?
| Heavy vinyl or fabric-backed wallpaper | On light to medium texture with liner | Skim coat or liner required on moderate texture | Good — weight and rigidity help bridge minor surface variation |
| Peel-and-stick wallpaper | Only on very light texture | Surface must be clean, primed, and as flat as possible | Fair — adhesive loses bond on uneven surfaces over time; edges lift |
| Grasscloth or natural fiber | No — too thin and porous | Not viable over any popcorn texture | Poor — thin material conforms to texture and tears at bumps |
| Wallpaper liner (lining paper) | Yes — bridges texture; base layer | Primer required; applied as first layer under decorative wallpaper | Good as a bridging layer; doubles the application work |
| Thick textured or embossed wallpaper | On light to medium texture with prep | Primer and liner help; skim coat better for heavier texture | Good — embossed pattern disguises minor surface imperfection |
The most reliable approach for wallpaper on a popcorn ceiling is a two-layer system: a wallpaper liner as the base coat (which bridges the texture and provides a consistent surface for adhesion), followed by the decorative wallpaper.
This adds cost and time but significantly improves long-term adhesion and reduces the risk of the wallpaper sagging or peeling in sections where the texture was uneven.
How to Prepare a Popcorn Ceiling for Wallpaper?
Preparation determines whether the wallpaper stays up or falls down six months later. Do not skip any of these steps:
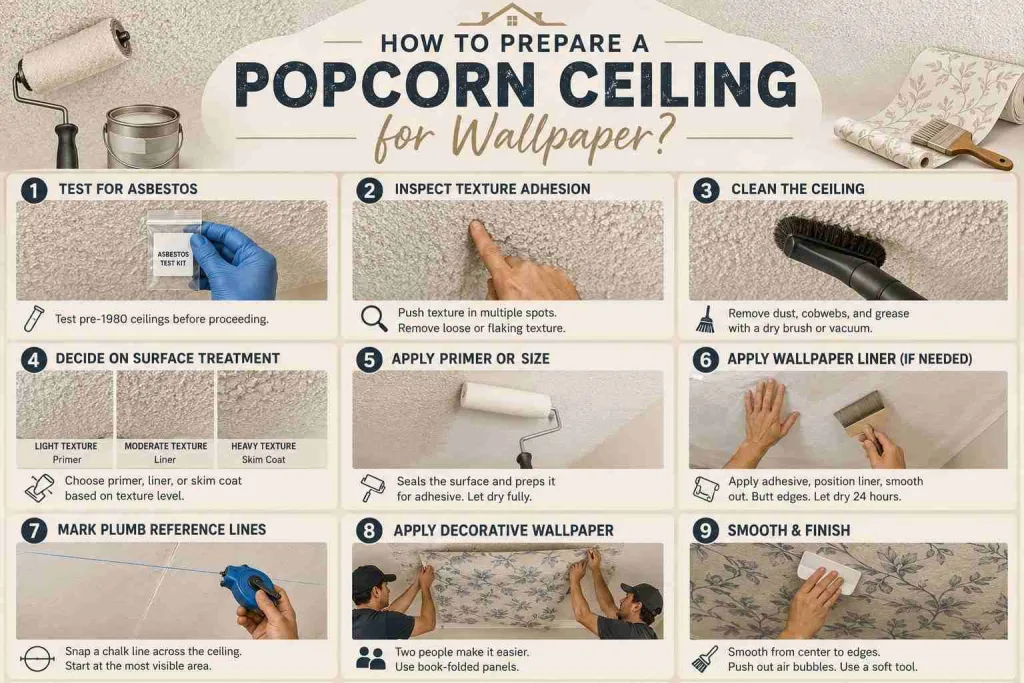
- Test for asbestos on pre-1980 ceilings — as described above. Do not proceed on untested pre-1980 ceilings.
- Inspect texture adhesion — Push gently on the texture in multiple spots. If the texture flexes, feels soft, or pulls away from the drywall, it is not suitable for wallpapering over. Loose or flaking texture must be removed before any application; wallpaper weight and adhesive will pull it down over time.
- Clean the ceiling — Remove dust, cobwebs, and any grease from cooking vapors (especially in kitchen-adjacent areas). Use a dry soft brush or vacuum attachment. Do not wet the ceiling during cleaning — moisture loosens popcorn texture.
- Decide on surface treatment — For light texture: a wallpaper primer coat may be sufficient. For moderate texture: apply a wallpaper liner first. For heavy texture: skim coat the ceiling to smooth it before any wallpaper application. This is the step most people skip, and it is why wallpaper fails on ceilings.
- Apply wallpaper primer or size — A wallpaper primer (sometimes called sizing) prepares the surface for adhesive. It seals the porous popcorn texture and creates a consistent bonding surface. Apply with a paint roller. Let dry fully before proceeding.
- Apply wallpaper liner if texture is moderate — Cut liner strips to the width of the room. Apply wallpaper adhesive generously to the ceiling with a roller. Press liner into position and smooth from center to edges using a soft scraper or your hands. Butt edges — do not overlap. Let the liner dry fully (24 hours) before applying decorative wallpaper.
- Mark plumb reference lines — Ceiling geometry is rarely perfectly square. Use a chalk line to snap a straight reference line across the ceiling before applying the decorative wallpaper. Start at the most visible area of the room and work outward.
- Apply decorative wallpaper — Two people make ceiling wallpaper installation manageable. One holds the folded (book-folded) panel; the other positions and smooths. Apply a generous, even coat of wallpaper adhesive to the ceiling section with a roller immediately before each panel goes up. Press the panel into position, smooth from center to edges, and push air bubbles toward the sides. Use a soft scraper or wallpaper brush — not a hard-edge tool that might dig into the textured surface under the liner.
The Honest Problem With Wallpaper on Popcorn Ceilings
Even with proper preparation, ceilings are harder to wallpaper than walls for two reasons gravity does not apply to walls, and ceiling joints move slightly with temperature and humidity changes in a way wall joints typically do not. These forces act on the wallpaper edges over time, particularly in Austin’s climate where summer heat and winter temperature swings put real stress on adhesive bonds.
The practical experience from painters and ceiling contractors is consistent: wallpaper applied directly to a popcorn ceiling — even with a liner — has a higher failure rate than wallpaper applied to a properly prepared flat surface. Bubbles, lifting edges, and partial falls are more common than on wall installations.
If the goal is to cover an ugly popcorn ceiling permanently and reliably, the alternatives below produce better long-term outcomes.
Better Alternatives to Wallpaper on a Popcorn Ceiling
In most Austin homes, one of these approaches produces a more durable and better-looking result than wallpaper directly over popcorn texture:
Option 1: Remove the popcorn ceiling and skim coat
The standard CeilingPrime approach — scrape the texture, skim coat the bare drywall, prime, and paint. This creates a perfectly flat ceiling that can accept any decorative treatment, including wallpaper applied to a smooth surface where adhesion is reliable.
Cost in Austin: $2.30–$4.05 per square foot. The clean flat result is also the most valuable for resale.
Option 2: Skim coat over the existing texture
For painted popcorn ceilings that will not scrape cleanly, or for asbestos-positive ceilings where abatement is not in the immediate budget, skim coating joint compound directly over the texture creates a smooth substrate for wallpaper without scraping.
Two to three coats of all-purpose joint compound, sanded and primed. Once the skim coat is flat and primed, wallpaper adheres the same as it would to new drywall.
Option 3: Install 1/4″ drywall over the existing ceiling
For heavily painted or heavily damaged ceilings, a layer of 1/4-inch drywall screwed into the ceiling joists creates a new flat substrate. This is faster than skim coating over heavy texture and produces a clean surface for wallpaper. It reduces ceiling height by approximately 1/4 inch plus tape and finish. Electrical boxes must be extended or lowered accordingly.
Option 4: Ceiling panels or beadboard
In some Austin homes — particularly those with a farmhouse, craftsman, or period-revival aesthetic — tongue-and-groove beadboard or paintable ceiling panels are a practical alternative to both wallpaper and drywall overlay.
They cover the popcorn texture entirely, add visual interest, and are relatively forgiving of minor ceiling irregularities. They do require furring strips to create a flat nailing surface over uneven popcorn texture.
Wallpaper Over Popcorn Ceiling: Cost Considerations
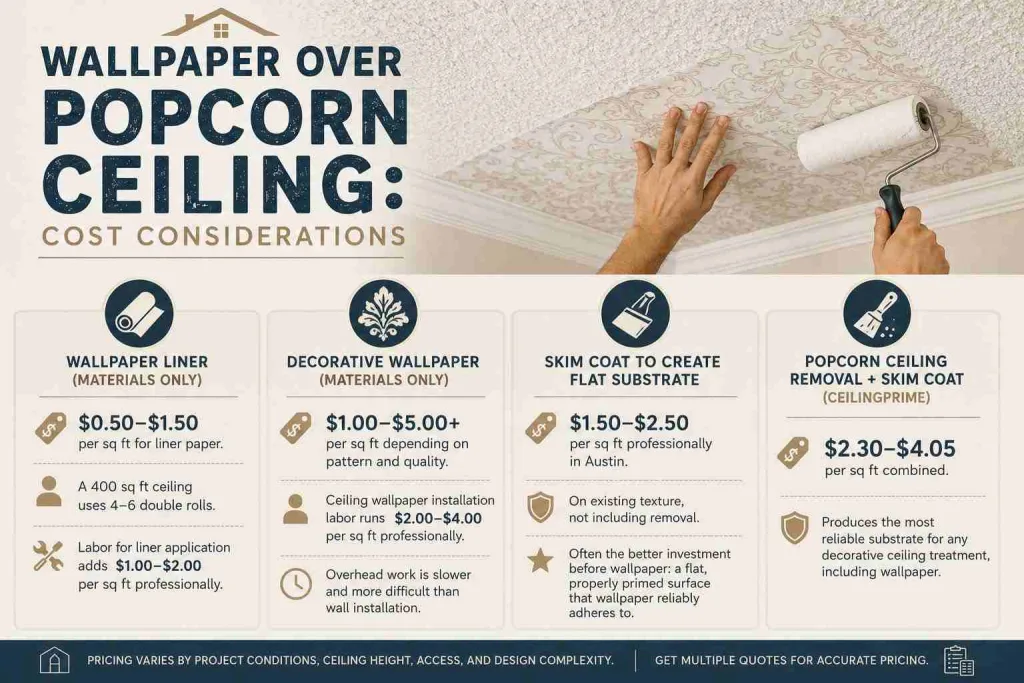
- Wallpaper liner (materials only) — $0.50–$1.50 per sq ft for liner paper. A 400 sq ft ceiling uses 4–6 double rolls. Labor for liner application adds $1.00–$2.00 per sq ft professionally.
- Decorative wallpaper (materials only) — $1.00–$5.00+ per sq ft depending on pattern and quality. Ceiling wallpaper installation labor runs $2.00–$4.00 per sq ft professionally — more than wall installation because overhead work is slower and more difficult.
- Skim coat to create flat substrate — $1.50–$2.50 per sq ft professionally in Austin (on existing texture, not including removal). This is often the better investment before wallpaper: a flat, properly primed surface that wallpaper reliably adheres to.
- Popcorn ceiling removal + skim coat (CeilingPrime) — $2.30–$4.05 per sq ft combined. Produces the most reliable substrate for any decorative ceiling treatment, including wallpaper.
Frequently Asked Questions
Q. Can you put wallpaper on a popcorn ceiling?
Yes — on light to moderate texture with proper preparation. The ceiling must be clean, firmly bonded, primed with wallpaper sizing, and ideally covered with a wallpaper liner before the decorative paper goes up. Heavy or uneven texture is not suitable for direct wallpaper application and must be skim coated or covered with drywall first.
Q. Can you put peel-and-stick wallpaper on a popcorn ceiling?
Only on very light popcorn texture where the surface is nearly smooth. Peel-and-stick wallpaper requires a flat, clean surface for reliable adhesion. On standard or heavy popcorn texture, the peel-and-stick adhesive contacts only the texture peaks, not the full surface — resulting in partial adhesion that fails over time, particularly on a ceiling where gravity is working against the bond.
Q. Does wallpaper stay on a popcorn ceiling?
It depends entirely on the preparation. Wallpaper applied directly to unsanded, unprimed popcorn texture without a liner rarely holds long-term. Wallpaper applied over a skim-coated and primed ceiling — or over a properly applied wallpaper liner — has a much better long-term bond. Ceiling installations always have higher failure rates than wall installations regardless of surface quality.
Q. Is it better to remove the popcorn ceiling before wallpapering?
For most Austin homeowners: yes. Removing the popcorn ceiling and skim coating the bare drywall creates the most reliable substrate for wallpaper adhesion. It also eliminates any asbestos risk if the ceiling is pre-1980. The combined cost of removal and skim coat ($2.30–$4.05 per sq ft) is comparable to the cost of a professional wallpaper liner installation on a textured ceiling, with a better long-term result.
Q. What if my popcorn ceiling has asbestos — can I wallpaper over it?
Covering an intact asbestos-containing popcorn ceiling with wallpaper without scraping or sanding is a management approach that does not require licensed abatement — but it does require that the application not disturb the existing texture.
Have an asbestos professional assess the ceiling before proceeding. If the texture is in good condition, a wallpaper liner or a thin drywall overlay may be viable. If the texture is flaking or soft, it must be addressed first.



One Comment