Drywall Over Popcorn Ceiling: When It Makes Sense and How to Cover It
Yes, you can drywall over popcorn ceiling. It is a legitimate approach to getting a smooth ceiling without scraping, and in specific situations — particularly when asbestos is confirmed or the ceiling is too damaged to scrape cleanly — it is the right call.
But it comes with trade-offs, and it is not always the best option. This guide covers the decision framework, the full installation process, cost in Austin, and how drywalling over compares to standard removal and skim coat.
The Asbestos Question Comes First
Before choosing drywall-over as an approach, you need to know whether the existing ceiling contains asbestos. This matters because:
- Drywalling over asbestos-containing ceiling texture does not remove or encapsulate the asbestos — it simply covers it. The material remains in place, and any future disturbance (ceiling repair, recessed lighting, fixture installation, or future renovation) will encounter it again.
- Texas disclosure requirements — the Texas Property Code requires disclosure of known material defects on sale. A confirmed asbestos popcorn ceiling that has been drywalled over is still a known asbestos-containing ceiling. Future buyers may be entitled to this information.
- The asbestos does not go away — for pre-1980 ceilings in Austin, professional asbestos testing by a licensed inspector is the first step regardless of which approach you choose. If the test comes back positive at the Environmental Protection Agency (EPA) threshold of 1% or more, the material is regulated asbestos-containing material (ACM). Drywalling over it is a management option, not an elimination.
If asbestos is present and encapsulation (covering rather than removing) is the chosen approach, confirm with a licensed asbestos professional that the drywall-over method is compliant with Texas Commission on Environmental Quality (TCEQ) regulations for your specific situation.
When Drywall Over Popcorn Ceiling Makes Sense?
Here is a decision framework for when drywall-over is the right option vs. standard scrape-and-skim removal:
| Confirmed asbestos, no full renovation planned | Drywall over | Avoids disturbing ACM; covers ceiling without asbestos abatement cost |
| Painted popcorn ceiling that will not scrape cleanly | Drywall over | Painted texture bonds to drywall and tears paper during scraping; drywall-over avoids this entirely |
| Multiple layers of paint on old texture | Drywall over | Heavy painted texture is difficult and time-consuming to wet down and remove; fresh drywall is faster |
| Ceiling with significant damage, cracks, or patches | Drywall over OR abatement + new drywall | Drywalling over conceals the damage but does not repair what is underneath |
| No asbestos, unpainted ceiling, good condition | Standard removal + skim coat | Easier, cheaper, does not reduce ceiling height |
| Recessed lighting planned as part of the project | Standard removal + skim coat | Running wire through fresh drywall after drywall-over requires cutting new holes; easier to remove and rough-in first |
| Pre-sale renovation | Standard removal + skim coat | Buyers and inspectors can identify drywalled-over ceilings; removal delivers a cleaner result |
| Very low ceiling (under 8 feet) | Standard removal + skim coat | Losing 1/2″ to 5/8″ of ceiling height is more noticeable in low-ceiling rooms |
How to Drywall Over Popcorn Ceiling: Step by Step
This is a physically demanding overhead project. A drywall lift is required — holding 4×8 or 4×12 sheets of drywall overhead while fastening them is not a one-person job without one, and attempting it without a lift leads to misaligned sheets and injury risk.
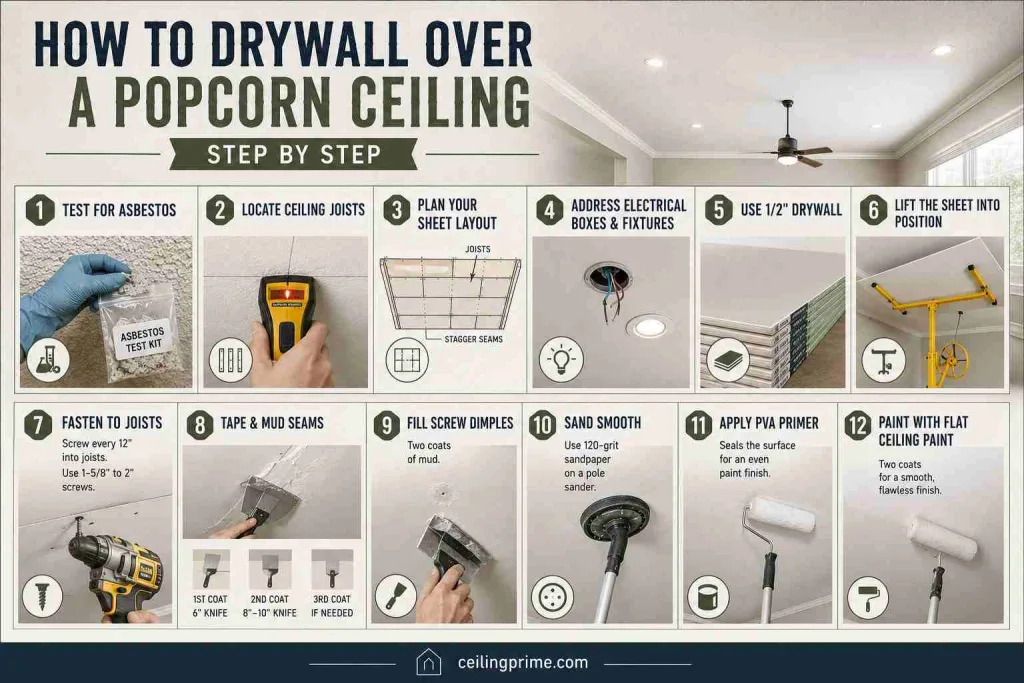
- Test for asbestos — On pre-1980 ceilings, a licensed asbestos inspector collects a sample before any work begins. If asbestos is confirmed, consult a licensed abatement professional to determine whether drywall-over is compliant with applicable regulations in your jurisdiction.
- Locate ceiling joists with a stud finder — Mark joist locations on the walls using a pencil line all the way across. Ceiling joists are typically 16 inches (in.) or 24 in. on center. These marks are your fastening targets — every sheet must be screwed into joists, not into the existing drywall or texture alone.
- Plan your sheet layout — Measure the room and plan sheet placement to minimize cuts and keep seams off high-traffic visual areas. Run sheets perpendicular to the joists. Stagger seams between rows — do not align butt joints from one row to the next.
- Address electrical boxes and fixtures first — Light fixture boxes, fan boxes, and any recessed lighting must be either lowered to account for the new drywall thickness, or the fixture trim must be extended. Identify all ceiling penetrations before hanging drywall. Unmarked boxes buried under new drywall are a code violation and a future problem.
- Use 1/2″ drywall for ceiling application — Half-inch (1/2″) drywall is the standard for ceiling overlay work. It is lighter than 5/8″ and easier to handle overhead while maintaining adequate rigidity. For rooms wider than 8 feet where sag between joists is a concern, 5/8″ provides more stiffness. Products from manufacturers like USG Boral, CertainTeed, or National Gypsum are available at Home Depot and Lowe’s.
- Lift the sheet into position with a drywall lift — A rented drywall lift cranks the sheet up to ceiling height and holds it while you fasten. Do not skip the lift — it is a $40–$60/day rental that prevents injury and misaligned panels. Drive drywall screws into ceiling joists at 12″ intervals along each joist the sheet crosses. Use coarse-thread drywall screws long enough to penetrate the existing drywall and reach the joist — 1-5/8″ to 2″ screws typically work for a 1/2″ overlay.
- Tape and mud all seams — Apply paper drywall tape over all seams and press into a thin bed of joint compound (mud) with a 6″ taping knife. After the first coat dries (24 hours), apply a second coat with an 8″ or 10″ knife, feathering the edges wider. A third coat may be needed on butt-end seams. Fill all screw dimples with two coats of mud.
- Sand all seams and dimples smooth — When the final mud coat is fully dry, sand with 120-grit sandpaper on a pole sander. Work carefully — over-sanding cuts into the drywall paper. The goal is a surface smooth enough that seams are invisible under raking light after painting.
- Apply PVA primer before painting — Fresh drywall and sanded joint compound absorb paint unevenly. A coat of PVA (polyvinyl acetate) primer seals the surface and ensures the finish paint coat goes on uniformly. Skip this step and the seams and screw dimples will read through the paint.
- Paint with flat ceiling paint — Two coats of flat ceiling paint finish the job. A smooth ceiling like this one shows every imperfection under raking light — the quality of the taping, mudding, and sanding determines the final appearance.
How Much Does It Cost to Drywall Over Popcorn Ceiling in Austin?
The cost of drywall over popcorn ceiling depends on ceiling area, room complexity, number of fixtures and penetrations, and whether the asbestos question adds a testing or abatement step. Here are realistic Austin estimates:
- Materials only (DIY) — 1/2″ drywall runs $12–$18 per 4×8 sheet at Home Depot or Lowe’s. A 200 sq ft room needs approximately 8 sheets, plus joint compound ($15–$25 per bucket), paper tape, and screws. Total materials: $150–$250 for a single room.
- Drywall lift rental — $40–$60 per day at most Austin equipment rental locations.
- Professional installation (labor only) — Drywall hanging and finishing labor in Austin runs $1.50–$2.50 per square foot for ceiling work. Finishing (taping, mudding, sanding) adds another $1.00–$1.50 per square foot.
- Full professional drywall overlay (materials + labor) — Expect $3.00–$5.00 per square foot for a complete overlay project with professional installation in Austin. A 1,500 sq ft home runs $4,500–$7,500.
- Standard popcorn ceiling removal + skim coat (CeilingPrime) — $2.30–$4.05 per square foot. For most Austin homes where the ceiling is unpainted and not asbestos-positive, removal and skim coat is comparable in cost and produces a better result.
Drywall Over vs. Removal + Skim Coat: Direct Comparison
| Factor | Drywall Over | Removal + Skim Coat |
|---|---|---|
| Cost in Austin | $3.00–$5.00/sq ft (overlay) | $2.30–$4.05/sq ft (removal + skim coat) |
| Ceiling height loss | Loses 1/2″ to 5/8″ | No height change |
| Asbestos management | Covers ACM; asbestos remains in place | Licensed abatement removes ACM if positive |
| Best for painted texture | Yes — avoids difficult scraping | Painted texture is harder to remove; drywall-over may be faster |
| Fixture adjustment | Required — all boxes must be extended or lowered | Not required — no height change |
| Crown molding impact | Must be removed and reinstalled at new height | No change needed |
| Future renovation impact | Asbestos still present for future work | Asbestos removed; future work unrestricted |
| Buyer perception | Identifiable by home inspectors | Clean removal is preferred in Austin listings |
| DIY feasibility | Possible with drywall lift; physically demanding | Possible on asbestos-free ceilings; same physical demands |
| Long-term outcome | Drywall permanently covers but does not fix | Ceiling is fully restored to original condition |
Issues to Watch For When Drywalling Over a Popcorn Ceiling
Ceiling height reduction
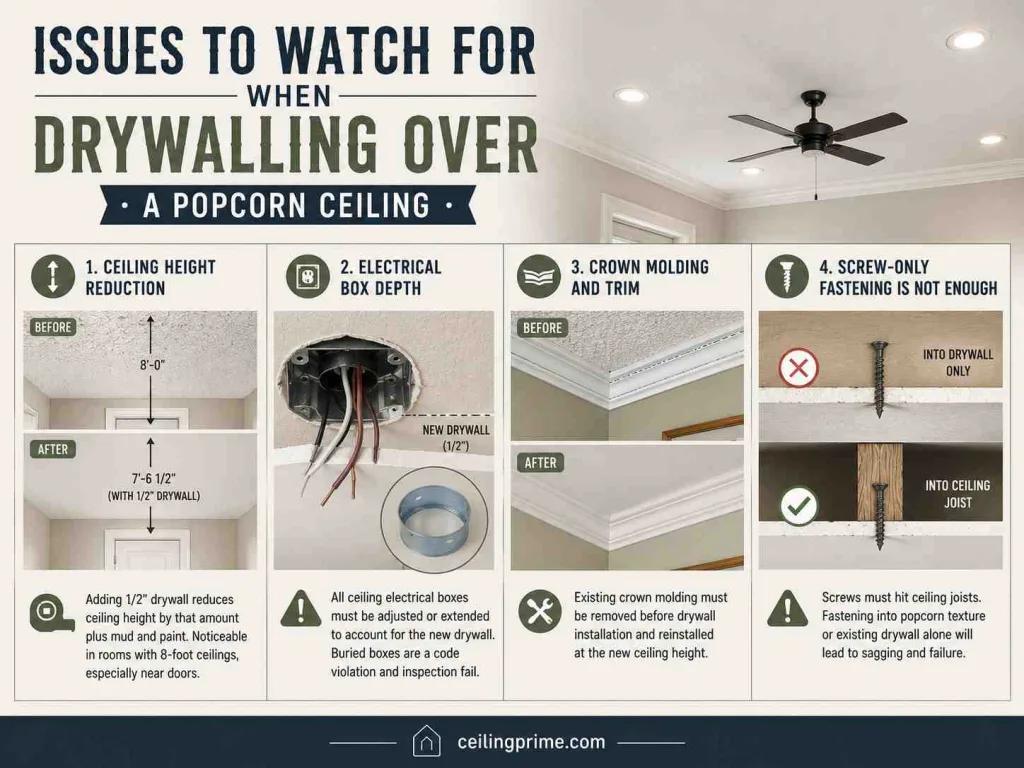
Adding 1/2″ drywall reduces ceiling height by exactly that amount — plus the thickness of the joint compound and paint. In rooms with 8-foot ceilings, this is noticeable, particularly near doors where the door height relative to ceiling height changes visibly. Measure actual ceiling height before committing to drywall-over on low ceilings.
Electrical box depth
Every ceiling electrical box — light fixtures, fans, smoke detectors, recessed lighting — must be adjusted to account for the new drywall layer. Standard electrical boxes have a maximum flush depth; adding 1/2″ of drywall means the box either needs to be repositioned deeper into the ceiling framing, or an extension ring needs to be added. Buried or improperly extended electrical boxes are a code violation and a home inspection failure point.
Crown molding and trim
Existing crown molding that was installed against the original ceiling will no longer align after drywall overlay. The molding must be removed before hanging new drywall, and reinstalled at the new ceiling height afterward. Factor this into the project timeline and cost.
Screw-only fastening is not enough
Drywall overlay screwed only into the existing popcorn texture and drywall — without hitting ceiling joists — will sag and eventually fail. Every screw must reach a ceiling joist. This is why joist location is the first step, not an afterthought.
Frequently Asked Questions
Q. Can you drywall over a popcorn ceiling with asbestos?
Technically yes — drywalling over is one asbestos management option. However, the asbestos remains in place and must still be disclosed when the property is sold. In Texas, confirm with a licensed asbestos professional whether drywall-over is compliant with TCEQ regulations for your specific situation before proceeding. Future renovations will still encounter the asbestos.
Q. Is it better to drywall over or remove a popcorn ceiling?
For unpainted, asbestos-free ceilings in decent condition: removal and skim coat is almost always better. It costs comparably, does not reduce ceiling height, leaves no asbestos concerns for the future, and produces a cleaner result for resale. Drywall-over makes more sense for painted ceilings that will not scrape cleanly, or when asbestos is confirmed and the owner wants to avoid abatement cost in the near term.
Q. How much does it cost to drywall over a popcorn ceiling?
Professional installation in Austin runs $3.00–$5.00 per square foot for ceiling overlay work including materials, labor, taping, and finishing. A 1,500 sq ft home runs $4,500–$7,500. DIY material costs run $150–$250 per room, not including tool rental.
Q. Will drywalling over a popcorn ceiling reduce ceiling height?
Yes — by approximately 1/2″ to 5/8″ plus the thickness of tape, mud, and paint. In standard 9-foot ceiling rooms, this is typically not noticeable. In 8-foot or lower rooms, the reduction is more perceptible, particularly near doors and windows.
Q. Can I install recessed lighting after drywalling over my popcorn ceiling?
Yes — you can cut new holes through the overlay drywall for recessed lighting after the fact. However, running the wiring for those fixtures requires getting wire through the new drywall layer into the ceiling cavity, which typically means cutting additional access holes. It is significantly easier to rough in recessed lighting before the drywall overlay, not after.





2 Comments