
Crown Molding on Sloped Ceiling: Angles, Installation & Design Ideas
Installing crown molding on sloped ceiling surfaces is one of the most challenging trim projects in residential carpentry. On a flat ceiling, crown sits at the same angle everywhere. On a sloped ceiling, the angles change at every transition. Where the slope meets a flat wall, the crown must twist from one plane to another. Where two slopes meet at a ridge, the crown forms an unusual compound angle that standard miter charts do not cover.
This guide explains the geometry behind sloped ceiling crown, covers every transition type (slope-to-wall, slope-to-flat, ridge peak, valley), teaches you how to find and cut the correct angles, and offers flat trim alternatives for homeowners who want the finished look without the compound cuts.
Where Crown Molding on Sloped Ceiling Is Used
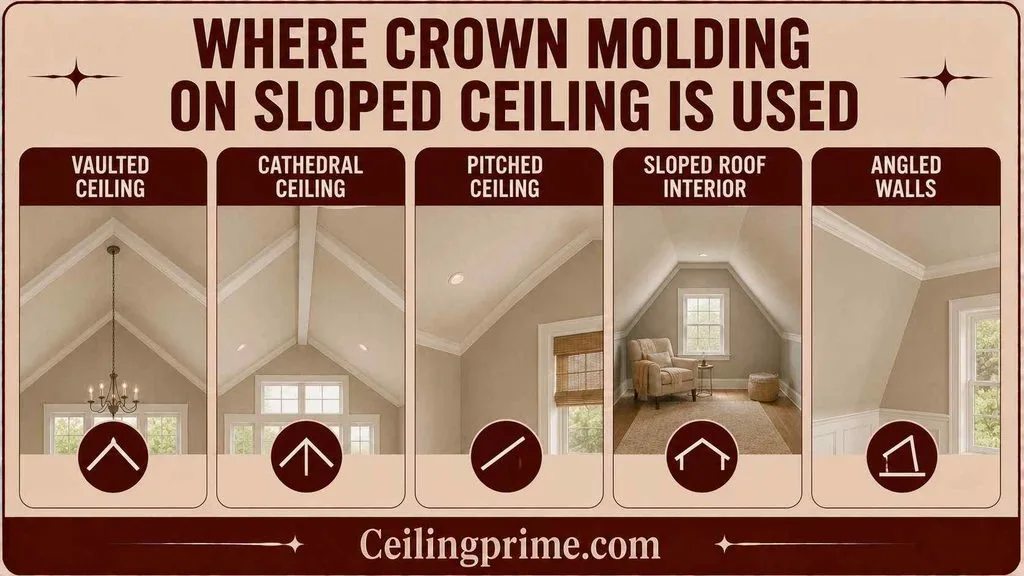
- Vaulted ceiling: Two slopes meet at a center ridge. Crown runs along the wall-to-slope transition on both sides and meets at the peak. Crown molding on a vaulted ceiling adds a finished frame to the dramatic angles.
- Cathedral ceiling: Two equal slopes meeting at a ridge beam. Crown molding on a cathedral ceiling follows the same geometry as vaulted but the slope matches the roof pitch exactly. The angles are steeper.
- Pitched ceiling (one slope): One side of the ceiling angles while the other walls are vertical. Crown molding on a pitched ceiling requires transition pieces where the angled surface meets flat walls.
- Sloped roof interior (bonus rooms, attics): Finished attic rooms and bonus rooms above garages have knee walls and angled ceilings. Crown molding on a sloped roof interior softens the angular transitions.
- Angled walls: Some rooms have angled walls where the wall leans inward following the roof pitch. Crown molding on an angled wall uses the same compound angle calculations as sloped ceilings.
Understanding the Angles: Why Crown Molding on Sloped Ceiling Is Hard
Crown molding sits at a spring angle between the wall and the ceiling. On flat ceilings, the spring angle is constant: 38 degrees for 38/52 crown or 45 degrees for 45/45 crown. The miter saw settings stay the same for every joint.
On a sloped ceiling, the spring angle changes at every transition. The wall-to-slope angle is no longer 90 degrees. It could be 100, 110, 120, or any angle depending on the roof pitch. Every degree of slope change alters the miter and bevel settings on your saw.
Crown Molding Vaulted Ceiling Angles
A vaulted ceiling with a 6/12 pitch creates a wall-to-ceiling angle of approximately 116 degrees (instead of the standard 90). A 12/12 pitch creates a 135-degree angle. The steeper the pitch, the wider the angle, and the more extreme the compound cuts become.
The two numbers you need for every cut are the miter angle (rotation of the saw blade left or right) and the bevel angle (tilt of the saw blade). These two settings together produce the compound cut. Online crown molding angle calculators generate both numbers when you input the ceiling pitch and the crown spring angle.
Every Joint Type on a Sloped Ceiling
| Joint Location | What Meets | Difficulty |
| Wall-to-slope (inside corner) | Vertical wall meets angled ceiling | Moderate — compound miter |
| Slope-to-flat (transition) | Angled ceiling meets flat ceiling | Hard — twist + compound |
| Ridge peak (outside corner) | Two slopes meet at the top | Hard — acute compound miter |
| Valley (inside corner) | Two slopes meet at a valley | Hardest — obtuse compound miter |
| Flat wall corner on slope | Two flat walls under a slope | Moderate — standard inside corner |
| End cap / return | Crown terminates at a wall or opening | Easy — 45-degree return |
Cutting Crown Molding on Sloped Ceiling: Step by Step
Step 1: Measure the Ceiling Pitch
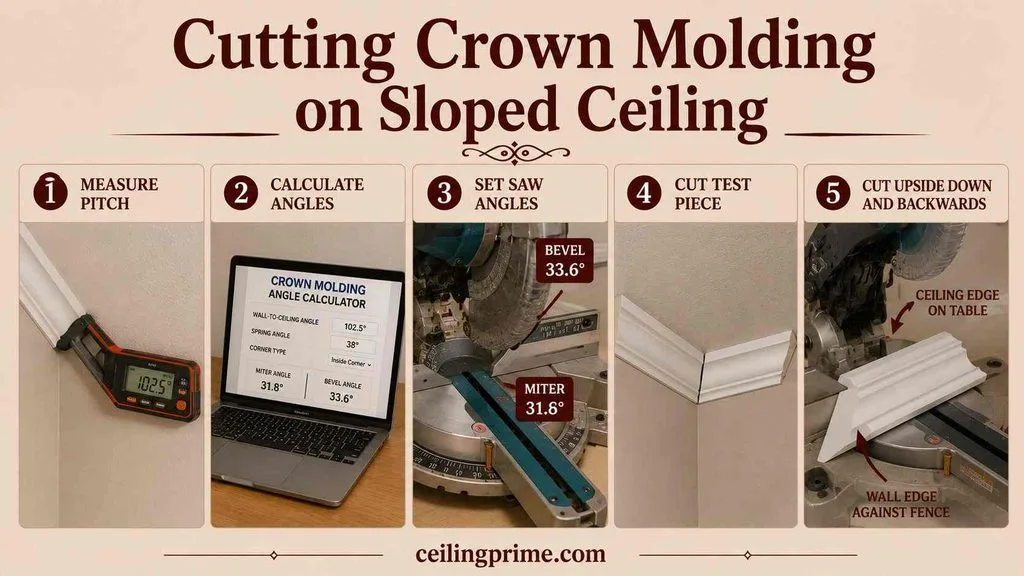
Hold a digital angle finder or a T-bevel against the wall-to-ceiling joint. Read the angle. A standard flat ceiling reads 90 degrees. A sloped ceiling reads more than 90. Record this number. You need it for every compound cut.
Step 2: Calculate the Compound Angles
Use an online crown molding angle calculator. Input three values: the wall-to-ceiling angle (from step 1), the crown spring angle (printed on the molding packaging or measured with a protractor — typically 38 or 45 degrees), and the corner type (inside or outside). The calculator outputs the miter angle and the bevel angle for your saw.
Step 3: Set Up the Miter Saw
Set the miter angle (left-right rotation). Set the bevel angle (blade tilt). A compound miter saw handles both adjustments. A standard miter saw without bevel cannot make these cuts. A 10-inch or 12-inch compound miter saw is the minimum tool for compound crown cuts.
Step 4: Cut a Test Piece First
Cut two short scrap pieces using the calculated angles. Hold them against the wall-ceiling joint. If the joint is tight, the angles are correct. If there is a gap, adjust by 0.5 to 1 degree and recut. Test cuts save expensive molding from mistakes. Cutting compound joints always requires test fitting before committing to full-length pieces.
Step 5: Cut the Crown Upside Down and Backwards
Crown molding is cut on the miter saw upside down and backwards. The ceiling edge rests on the saw table. The wall edge rests against the saw fence. This positions the molding at its installed spring angle. Mark left and right on each piece before cutting. Reversing a piece wastes material.
Flat Trim on Vaulted Ceiling (Alternative to Crown)
Crown molding on sloped ceiling surfaces requires compound cuts that intimidate many DIYers. Flat trim is the easier alternative. Flat boards (1×3, 1×4, or 1×6) nailed along the wall-to-ceiling joint create a clean transition without any compound angles.
How to Put Flat Trim on Vaulted Ceiling?
- Step 1: Measure the wall-to-ceiling angle with a T-bevel or digital angle finder.
- Step 2: Rip a 1×4 or 1×6 board at that angle on a table saw. The angled edge sits against the ceiling slope. The flat face is visible.
- Step 3: At inside corners, cope or miter the flat board at a simple miter angle (half the wall corner angle). No bevel needed.
- Step 4: At outside corners (ridge peak), miter the two pieces to meet at the peak angle.
- Step 5: Nail the flat trim into the wall top plate and the ceiling framing. Fill nail holes. Caulk the edges. Prime and paint.
Flat trim produces a modern, clean-line look. It does not have the curved profile of crown molding. But it eliminates compound cuts entirely and installs in half the time.
Sloped Ceiling Trim Ideas Beyond Crown Molding
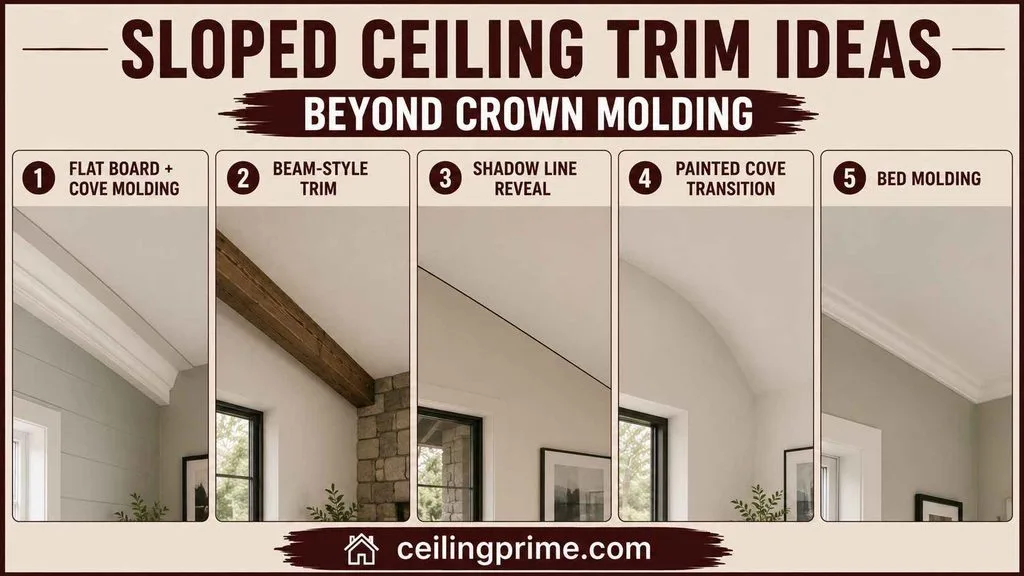
1. Flat board + cove molding: Nail a flat 1×4 at the wall-ceiling joint. Add a small cove molding below the flat board. The cove adds a curved profile without the complexity of full crown.
2. Beam-style trim: Install a 2×6 or 2×8 stained beam along the wall-ceiling joint. The chunky beam hides the transition and adds rustic character to vaulted and cathedral ceilings.
3. Shadow line reveal: Leave a 1/2-inch gap between the wall surface and the ceiling surface. The intentional gap creates a thin shadow line. No trim at all. Common in modern and minimalist interiors.
4. Painted cove transition: Build a curved plaster cove at the wall-ceiling corner using corner bead and compound. The result looks like built-in crown without any wood molding.
5. Bed molding: Smaller than crown, simpler profile. Bed molding sits flat against the ceiling and the wall without a spring angle. Easier to cut at compound angles because the pieces are smaller and lighter.
Installing Crown Molding on Sloped Ceiling: Full Process
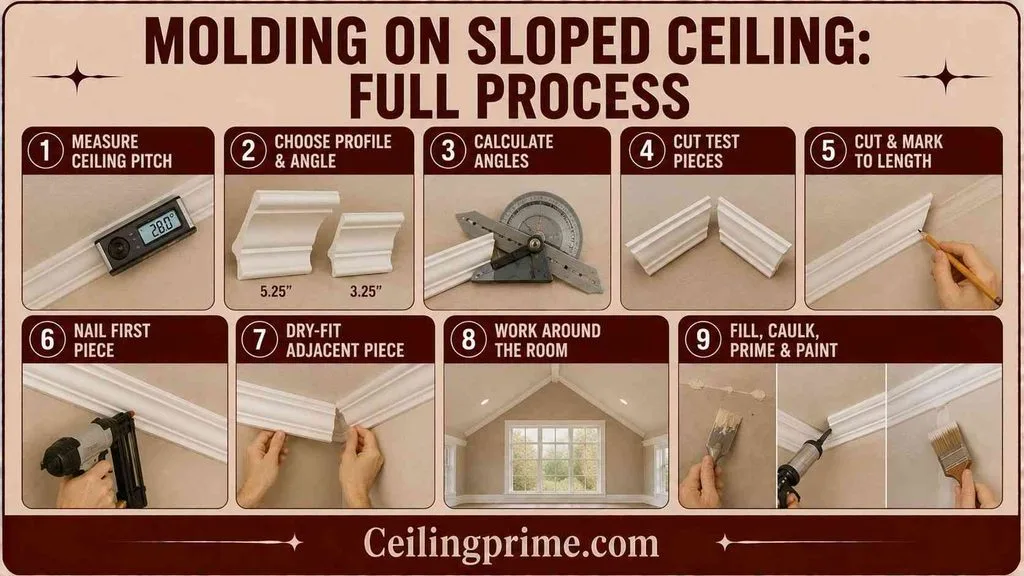
- Step 1: Measure the ceiling pitch at every wall-to-ceiling joint. Record each angle. Opposite walls should match, but verify — construction tolerances vary.
- Step 2: Choose your crown profile and spring angle. Larger profiles (5.25-inch, 6-inch) look proportional on tall vaulted ceilings. Smaller profiles (3.25-inch, 3.5-inch) suit low-slope bonus rooms.
- Step 3: Calculate compound miter and bevel angles for every joint type using an angle calculator.
- Step 4: Cut test pieces for every unique angle. Fit-test at the joint. Adjust as needed.
- Step 5: Start with the longest wall. Cut one end to length. Hold the molding in position and mark the opposite end where it meets the corner. Cut the marked end at the calculated compound angle.
- Step 6: Nail the first piece into the wall top plate using a brad nailer. Nails go into the bottom edge (wall side). Add a few nails into the ceiling framing on the top edge.
- Step 7: Cut and fit the adjacent piece. Dry-fit against the installed piece. If the joint is tight, nail it. If there is a small gap, caulk fills gaps up to 1/16 inch. Wider gaps mean the angle needs adjustment.
- Step 8: Work around the room in order. Save the hardest joints (ridge peaks, valleys) for last when you have the most experience with the angles.
- Step 9: Fill all nail holes with wood filler. Caulk every joint and every edge where the molding meets the wall and ceiling. Prime and paint.
Sloped ceiling crown installation takes 2 to 3 times longer than flat ceiling crown. Budget a full day per room for vaulted or cathedral ceilings.
Tools Needed
- 10-inch or 12-inch compound miter saw (must have bevel adjustment).
- Digital angle finder or adjustable T-bevel.
- Brad nailer with 1.5-to-2 inch nails.
- Coping saw (for coped inside joints on flat sections).
- Tape measure, pencil, combination square.
- Caulk gun, paintable caulk, wood filler, sandpaper.
- Stepladder or scaffolding for high vaulted ceilings.
Crown Molding on Sloped Ceiling Costs
| Item | Cost |
| Crown molding (per linear foot) | $1–$8 (MDF to hardwood) |
| Flat trim boards (1×4, per linear foot) | $0.50–$2 |
| Nails, caulk, wood filler, paint | $20–$50 per room |
| DIY total (average room, 60 linear feet) | $80–$530 |
| Professional installation (per linear foot) | $4–$12 |
| Professional total (average room) | $300–$800 |
Professional installers charge 30 to 50% more for sloped ceiling crown than flat ceiling crown. The compound cuts take longer. The waste from mis-cuts is higher. Budget extra material — order 15 to 20% more than the measured linear footage.
The Hardest Trim Job Done Right
Crown molding on sloped ceiling surfaces demands accurate angle measurement, compound miter calculations, and patient test-cutting. It is the most challenging trim installation in residential construction. If the angles intimidate you, flat trim boards produce a clean, modern alternative with none of the compound geometry. Either way, the finished result adds a professional, architectural frame to every vaulted, cathedral, or pitched ceiling in your home.
Frequently Asked Questions
Does crown molding work on vaulted ceilings?
Yes. It requires compound miter and bevel cuts at every joint where the slope meets a wall. The geometry is more complex than flat ceiling crown. But the finished result adds a polished, architectural frame to the vaulted space.
What is the easiest trim for a sloped ceiling?
Flat boards (1×3 or 1×4) ripped at the ceiling angle. No compound cuts. No spring angle. A table saw rip and simple miters at the corners. This is the best option for DIYers who want the finished look without the compound geometry.
Can I use flexible crown molding on a sloped ceiling?
Flexible polyurethane crown bends around gentle curves but does not twist from one plane to another. It works on curved walls, arches, and barrel vaults. It does not solve the compound angle problem at wall-to-slope transitions on vaulted ceilings.
How do I find the miter and bevel angles for my ceiling?
Measure the wall-to-ceiling angle with a digital angle finder. Enter the angle and your crown spring angle into an online compound miter calculator. The tool generates the exact miter and bevel settings for your saw.
Should I cope or miter inside corners on a sloped ceiling?
Coping produces tighter inside joints on flat walls. On sloped surfaces, coping the compound profile is extremely difficult. Most professionals miter inside corners on sloped ceilings and use caulk to close any small gaps.
Can I install crown molding on a sloped ceiling by myself?
Yes for rooms with moderate slopes and standard-size crown. Steep vaulted ceilings with large-profile crown are a two-person job. The pieces are long, heavy, and must be held at precise angles overhead while nailing.





One Comment