
How to Patch a Hole in the Ceiling: Small, Medium & Large Fixes
Knowing how to patch a hole in the ceiling saves you from staring at an ugly gap every time you walk into the room. Holes come from removed light fixtures. Doorknobs punching through drywall. Feet stepping between joists in the attic. Water damage. Or a bad drywall anchor that ripped out.
The fix depends on the hole size. Small holes (under 2 inches) need filler and sandpaper. Medium holes (2–6 inches) need the California patch technique. Large holes (6 inches and up) need a joist-to-joist drywall replacement. This guide covers all three sizes step by step.
Ceiling Hole Repair Safety
- Wear safety glasses.
- Wear a dust mask/respirator appropriate for drywall dust.
- Use a stable ladder.
- Don’t overreach.
- Turn off power before working around electrical wiring.
- Check for pipes and wiring before cutting.
- Protect furniture and flooring.
- Have someone stabilize the ladder when needed.
- Don’t work beneath loose or sagging drywall.
Tools and Materials for Ceiling Hole Repair
- Putty knife (2-inch and 6-inch) — for applying filler and joint compound.
- Utility knife — for scoring and cutting drywall.
- Keyhole saw (jab saw) — for cutting larger holes to clean edges.
- Stud finder — for locating ceiling joists on large patches.
- Drill with drywall screws — for securing patch pieces to joists or backing.
- Sandpaper (120-grit and 220-grit) — for smoothing compound between coats.
- Lightweight spackling compound — for small holes under 2 inches.
- Premixed joint compound (mud) — for medium and large patches.
- Paper drywall tape or self-adhesive mesh tape — for seaming patch edges.
- Drywall scrap (same thickness as ceiling, typically 1/2 inch) — for patch material.
- Stain-blocking primer and flat ceiling paint.
Knowing how to patch a hole in the ceiling starts with having the right materials before you climb the ladder. Missing one item means climbing down mid-repair.
Can You Patch the Hole Yourself?
Yes, you can repair most small wall holes yourself with a few basic tools. For holes smaller than 1/2 inch, spackle is usually enough. Start by removing loose pieces and dust from the area. Use a putty knife to press spackle firmly into the hole.
Allow it to dry completely before smoothing the surface with 120–150 grit sandpaper. Once the patch feels level with the wall, wipe away the dust. You can then apply primer and paint to finish the repair.
What Causes Holes in Ceilings?
Ceiling holes can happen for several reasons. Water leaks from a roof, bathroom, or plumbing can weaken drywall and cause it to break or sag. Pests such as rodents and insects may also damage the ceiling by chewing or tunneling through the material.
As a home settles, moving framing can push out nails or screws and create small holes or cracks. Accidents, falling objects, or removing old fixtures and hardware can also leave punctures in the ceiling.
Assess the Hole Before You Patch
Before you learn how to patch a hole in the ceiling, figure out why the hole is there. The cause determines the repair method.
- Removed fixture (light, fan, smoke detector, vent): Clean hole with defined edges. Patch with filler or a California patch.
- Doorknob impact: Small to medium hole with cracked edges. Cut back to clean edges, then patch.
- Foot through the ceiling: Medium to large hole from someone stepping between joists in the attic. Check the surrounding drywall for cracks. Patch or replace the section.
- Water damage: The drywall is soft, stained, or crumbling. Do not just patch the hole. Fix the water source first. Let the area dry. Then cut back to solid material and replace.
- Sagging or collapsed section: Large area of drywall has detached from the joists. This is not a patch job. The entire section needs replacement.
Test for asbestos in pre-1986 homes with popcorn texture before cutting or sanding any ceiling material.

How to Patch a Small Hole in the Ceiling (Under 2 Inches)
Small holes from screws, nails, hooks, and small anchors fill with spackling compound and disappear under paint.
- Step 1: Scrape away any loose material around the hole edges with a putty knife.
- Step 2: Press lightweight spackling compound into the hole with a 2-inch putty knife. Overfill slightly — compound shrinks as it dries.
- Step 3: Let dry 24 hours for deep fills. Shallow fills dry in 2 to 4 hours.
- Step 4: Sand smooth with 120-grit, then 220-grit sandpaper. Feather the edges so the patch blends flush with the ceiling surface.
- Step 5: Apply stain-blocking primer over the patch. Let dry 1 hour.
- Step 6: Paint with two coats of flat ceiling paint. For a perfect color match, paint the entire ceiling — spot painting often shows a visible patch line.
Total time: 30 minutes of active work plus drying. Cost: under $15 in materials.
How to Patch a Medium Hole in the Ceiling (2–6 Inches): The California Patch
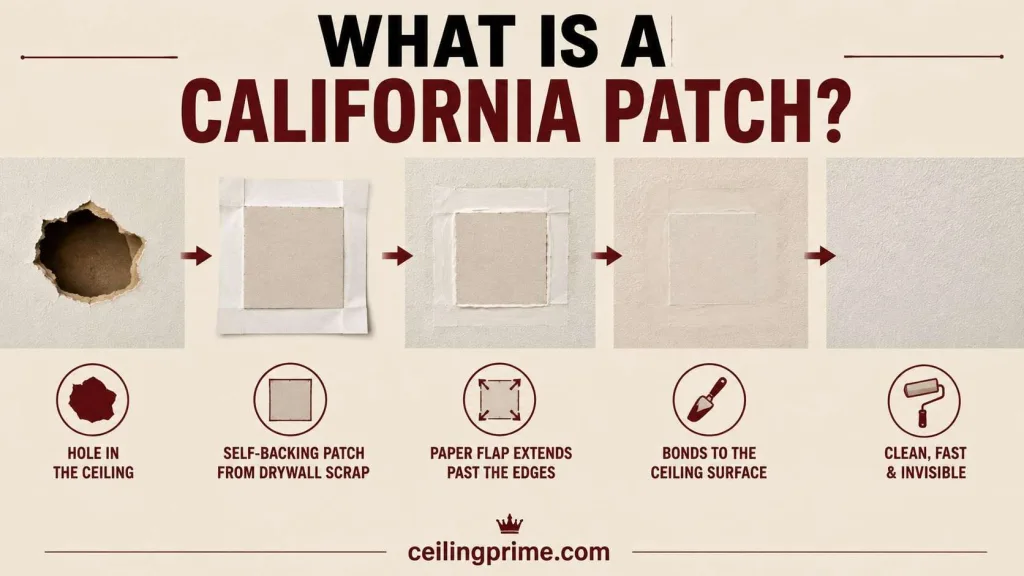
Medium holes are too large for filler alone. Compound sags out and cracks within months. The California patch (also called a butterfly patch or hot patch) is the best DIY technique for how to patch a hole in the ceiling at this size.
What Is a California Patch?
A self-backing patch made from a drywall scrap. The gypsum core fills the hole. A paper flap extends past the edges and bonds to the existing ceiling surface. No backing boards needed. No screws into joists. Clean, fast, and invisible under paint.
Step-by-Step California Patch
- Step 1: Clean the hole. Cut or sand the edges to a clean shape — circle, square, or rectangle.
- Step 2: Cut a drywall scrap 1 to 1.5 inches larger than the hole on all sides.
- Step 3: Flip the scrap face-down. Score the back paper around the patch outline, cutting through the paper and gypsum but not through the front paper face.
- Step 4: Snap and peel away the outer gypsum. Leave the front paper flap extending past the core on all sides. You now have a gypsum plug with a paper border.
- Step 5: Apply joint compound to the back of the paper flap.
- Step 6: Press the patch into the hole. The gypsum core fills the opening. The paper flap bonds to the ceiling surface around the hole.
- Step 7: Smooth the paper flap flat. Let dry.
- Step 8: Apply 2 to 3 thin coats of joint compound over the patch, feathering 3 to 4 inches past the edges each time. Sand between coats with 120-grit.
- Step 9: Final sand with 220-grit. Prime. Paint.
A well-done California patch is invisible under paint. It lasts as long as the original ceiling.
How to Patch a Large Hole in the Ceiling (6 Inches and Up)
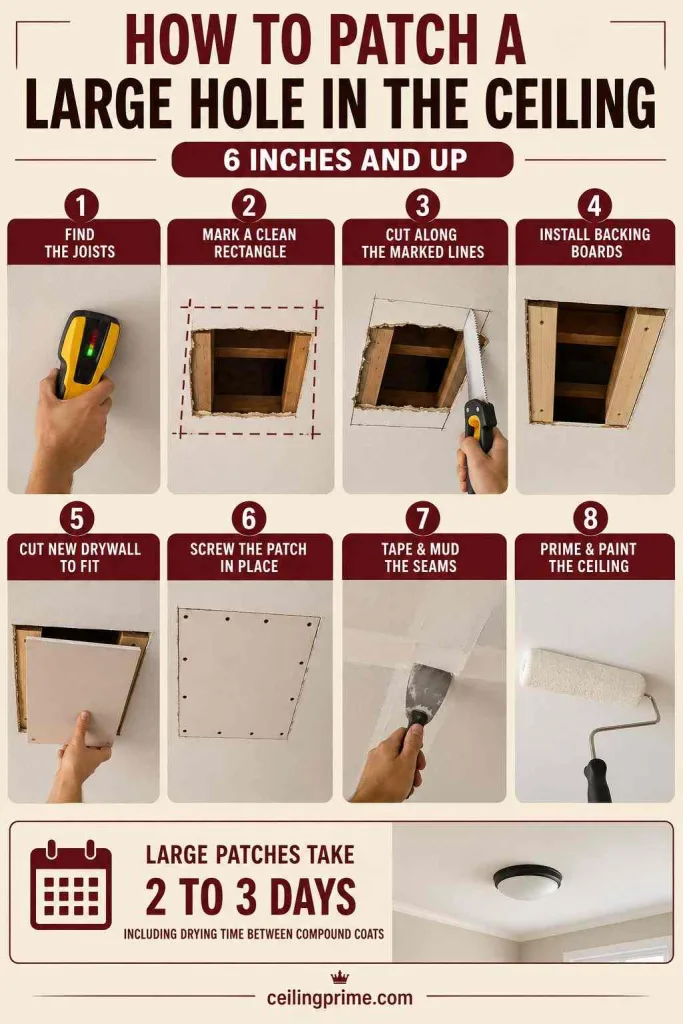
Large holes need a joist-to-joist replacement. The new drywall section screws into the ceiling joists for permanent support. Here is how to patch a hole in the ceiling when the damage is too large for a California patch.
- Step 1: Find the joists. Use a stud finder to locate the nearest joist on each side of the hole.
- Step 2: Mark a clean rectangle around the hole. Extend each side to the center of the nearest joist. The patch screws into those joists.
- Step 3: Cut along the marked lines with a keyhole saw or utility knife. Remove the damaged section.
- Step 4: If the rectangle edges do not land on joists on all 4 sides, install backing boards (1×3 or 2×4 wood strips) above the opening. Screw them to the drywall on each side with half the board extending into the opening. These give you something to screw the patch into.
- Step 5: Cut new drywall to match the opening. Use the same thickness as the existing ceiling (typically 1/2 inch).
- Step 6: Screw the patch into the joists and backing boards with drywall screws every 8 inches. Set each screw just below the surface.
- Step 7: Apply paper drywall tape over all seams. Cover with joint compound. Let dry. Apply a second coat, feathering wider. Let dry. Apply a third coat, feathering 6 to 8 inches past the seam. Sand smooth between coats.
- Step 8: Final sand with 220-grit. Prime the entire patched area. Paint with two coats of flat ceiling paint.
Large patches take 2 to 3 days including drying time between compound coats.
How to Patch a Hole in the Ceiling and Match Texture?
- Smooth ceiling: No texture matching needed. Sand the compound flat. Prime and paint.
- Orange peel: Spray a light coat of orange peel texture from a spray can (Homax) onto the primed patch. Let dry. Paint.
- Knockdown: Spray texture from a can. Wait 10 minutes. Flatten the peaks with a knockdown knife. Let dry. Paint.
- Popcorn: Apply Homax or Zinsser popcorn ceiling patch product to the primed surface. Let dry. Paint. Matching popcorn texture perfectly is difficult — the patch may look slightly different under raking light. Knowing how to patch a hole in the ceiling with popcorn texture requires testing the spray pattern on cardboard first.
How to Patch a Ceiling Hole From a Light Fixture?
Removing a light fixture can leave an open hole in the ceiling. You can repair it with a small piece of drywall, a wood support, and joint compound. The key is to make the opening neat and secure the new patch properly.
Materials You’ll Need
- Drywall scrap or a piece of matching ceiling drywall
- Scrap wood, such as a 1 × 3 or 2 × 4
- Drywall screws
- Drill
- Drywall joint compound
- Fiberglass mesh tape
- 6-inch and 10-inch taping knives
- 120-grit sanding block
- Drywall primer
- Ceiling paint
- Wire nuts for safely capping disconnected wires
Steps to Patch the Ceiling Hole
- Turn Off the Power: Switch off the breaker that supplies power to the light fixture. Do not work around the wiring while the circuit is live. Disconnect the fixture and cap the wires with wire nuts. Keep them accessible if you plan to install another light.
- Make the Hole Square: A clean square or rectangle is easier to repair than a round opening. Use a utility knife or drywall saw to trim away uneven edges. Make the opening neat and straight.
- Add a Wood Backer: Cut a piece of scrap wood several inches longer than the opening. Slide it through the hole and hold it against the back of the ceiling drywall. Drive drywall screws through the existing ceiling and into the wood to hold the backer firmly in place.
- Cut the Drywall Patch: Measure the opening and cut a matching piece of drywall. The patch should fit neatly into the hole without forcing it into place.
- Secure the Patch: Set the drywall piece into the opening. Make sure it rests against the wood backer. Drive drywall screws through the patch and into the wood to hold it securely.
- Cover the Seams With Tape: Apply self-adhesive fiberglass mesh tape over each seam around the patch. Cover the joints completely. The tape helps reduce the chance of cracks forming where the new drywall meets the old ceiling.
- Apply the First Coat of Joint Compound: Use a 6-inch taping knife to spread a thin layer of joint compound over the mesh tape and screw heads. Remove excess compound and leave the surface as smooth as possible. Allow it to dry fully. Drying time can vary from about 4 to 24 hours.
- Add a Wider Second Coat: Lightly sand away rough spots after the first coat dries. Use a 10-inch or wider taping knife to spread another thin layer of compound. Extend it beyond the first coat and feather the edges into the surrounding ceiling. Let it dry completely.
- Sand and Prime the Repair: Sand the area gently with 120-grit sandpaper until the patch feels smooth and level with the ceiling. Remove the dust with a slightly damp cloth. Apply drywall primer over the repaired area. Primer helps the new paint dry evenly.
- Paint the Ceiling: Once the primer has dried, apply ceiling paint that matches the existing surface. Blend the paint beyond the repaired area if needed for a more even finish.
How to Patch a Water-Damaged Ceiling?
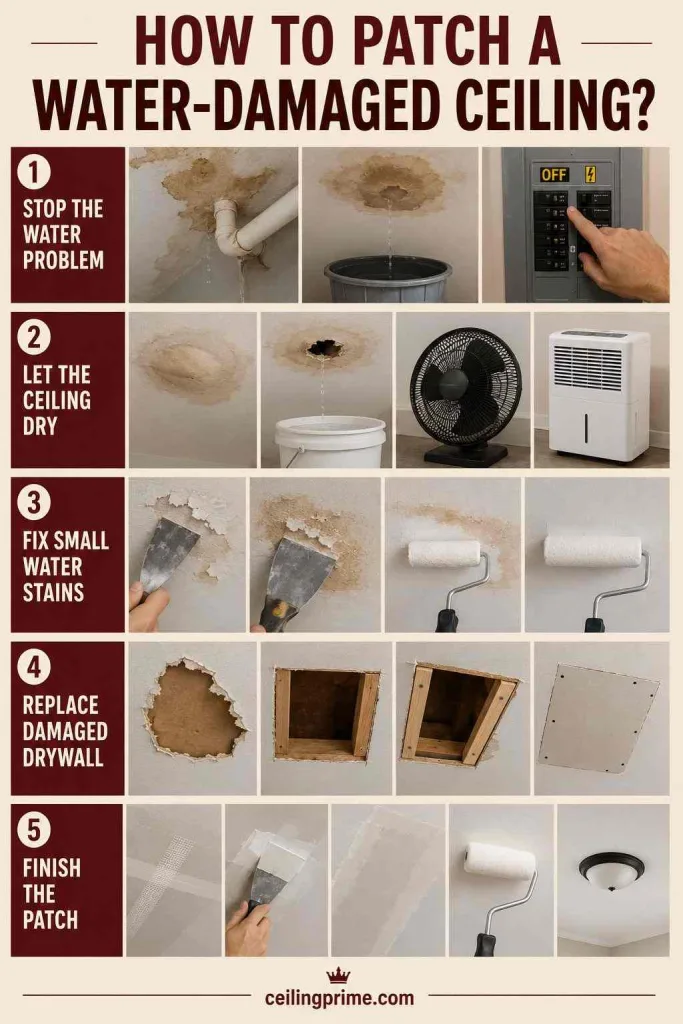
A leaking ceiling should not be patched until the water problem is fixed. Once the leak is stopped, dry the ceiling completely. Small stains may only need cleaning, primer, and paint. Larger damage may require replacing part of the drywall.
1. Stop the Water Problem
- Find where the water is coming from.
- Repair the leaking pipe, roof, or other source first.
- If water has reached a light or wiring, shut off the power to that area.
- Never cover wet drywall and leave it untreated.
2. Let the Ceiling Dry
- Check for areas that are swollen or holding water.
- If water is trapped behind a bulge, make a small opening to let it out.
- Place a bucket underneath if needed.
- Run fans to improve airflow.
- Use a dehumidifier to remove moisture from the room.
- Check the ceiling, insulation, and wood for dampness.
- Wait until everything is fully dry before starting the repair.
3. Fix Small Water Stains
- Use a putty knife to remove peeling or loose paint.
- Scrape away any surface that feels weak or damaged.
- Apply a stain-covering primer over the water mark.
- Let the primer dry according to the product instructions.
- Finish with ceiling paint that matches the surrounding area.
- Blend the new paint into the old finish for a more even look.
4. Replace Damaged Drywall
- Press the damaged area gently to check for soft spots.
- Cut out drywall that is weak, crumbly, or badly swollen.
- Make the opening neat and easy to patch.
- Add small pieces of wood behind the opening for support.
- Screw the wood firmly to the ceiling framing.
- Cut a new piece of drywall to fit the hole.
- Attach the new piece with drywall screws.
5. Finish the Patch
- Cover the joints around the new drywall with drywall tape.
- Spread joint compound over the taped seams.
- Keep each coat thin and smooth.
- Allow the compound to dry before adding another coat.
- Sand the surface gently until it is level with the ceiling.
- Apply primer over the repaired section.
- Paint the area to match the rest of the ceiling.
California Patch vs. Standard Drywall Patch
Both methods can repair drywall holes, but they work best in different situations. A California patch is simple and does not need separate tape. A standard drywall patch is better for larger holes or repairs that need extra support.
| Feature | California Patch | Standard Drywall Patch |
| Best For | Small to medium holes, up to about 6 inches | Larger holes that need stronger support |
| Common Uses | Doorknob holes, fist-sized holes, and similar damage | Large holes or areas that need added backing |
| Patch Design | A larger drywall piece with the gypsum removed around the edges | A drywall piece cut to match a squared-off opening |
| Tape Needed | No separate tape is needed. The patch paper covers the seams. | Yes. Paper or mesh tape is used over the joints. |
| Hole Preparation | Remove loose and rough edges around the hole | Cut the damaged area into a clean, square shape |
| Extra Support | Usually does not need wood backing | Often needs a wood backer for support |
| Skill Level | Beginner to intermediate | Intermediate to advanced |
| Main Advantage | Quick to make and easy to finish | Provides a solid repair for larger or more complex holes |
Ceiling Patch Repair Costs in 2026
| Repair Size | 2026 Cost |
| Small hole DIY (under 2 inches) | $5–$15 |
| Medium hole DIY (California patch) | $10–$30 |
| Large hole DIY (joist-to-joist) | $20–$60 |
| Professional patch (small to medium) | $75–$200 |
| Professional patch (large, with texture) | $150–$400 |
| Water damage repair + patch | $200–$800 |
DIY ceiling patching costs under $60 in materials for any size hole. Professional patching costs $75 to $400 depending on size, height, and texture matching. Ceiling patching costs vary by location and damage. DIY materials may cost relatively little, while professional repairs cost more when texture matching, painting, high ceilings, or water damage are involved.”
When to Call a Professional?
- The hole is from water damage and the drywall around it is soft or sagging.
- You see mold inside the ceiling cavity.
- The hole is on a high or vaulted ceiling you cannot safely reach.
- The patch keeps cracking after you repair it — this may indicate joist movement.
- The ceiling is plaster, not drywall — plaster patching requires different techniques.
- You need a texture match on a popcorn ceiling that may contain asbestos.
Fix the Hole Right the First Time
Now you know how to patch a hole in the ceiling at every size. Small holes take filler and paint. Medium holes take a California patch. Large holes take a joist-to-joist drywall section. Match the texture. Prime before painting. And fix the cause of the hole before you fix the hole itself.
Frequently Asked Questions
Can I use mesh tape instead of paper tape?
Yes for small and medium patches. Mesh tape is easier to apply. But paper tape is stronger for large patches and produces a flatter finish under raking light.
Why does my patch keep cracking?
Three common causes: (1) you used filler instead of joint compound on a medium hole, (2) you applied compound too thick in one coat instead of multiple thin coats, (3) the ceiling joist above the patch is moving from truss uplift or settlement.
Do I need to prime before painting the patch?
Yes. Joint compound absorbs paint differently than drywall. Without primer, the patch shows as a dull spot surrounded by the sheen of the original paint. Primer evens the absorption.
How do I match old ceiling paint color?
Bring a small chip of the existing paint to a paint store for color matching. Even matched paint may look slightly different due to age and UV exposure. For the best result, repaint the entire ceiling after patching.
Can I patch a popcorn ceiling?
Yes. Use a popcorn ceiling spray texture (Homax) over the primed patch. Test the spray pattern on cardboard first. Matching old popcorn perfectly is difficult. Test for asbestos in pre-1986 homes before touching the texture.





One Comment