How to Make Popcorn Ceiling Look Better — 7 Ways That Actually Work
There are several ways to make a popcorn ceiling look better, ranging from a fresh coat of flat paint to full removal and skim coat. Which approach makes sense depends on your ceiling’s condition, whether it contains asbestos, your budget, and whether you are keeping the home or preparing it for sale. This guide covers every practical option — honestly — so you can choose the one that fits your situation.
Start Here: Check for Asbestos on Pre-1980 Ceilings
Before doing anything that disturbs a pre-1980 popcorn ceiling — painting, scraping, sanding, drilling, or installing — have it tested for asbestos by a licensed inspector. The Environmental Protection Agency (EPA) threshold is 1% asbestos by weight. Above that level, the ceiling is regulated asbestos-containing material (ACM) and must be managed accordingly.
Some of the options below — particularly painting, covering with tiles, and covering with wood panels — can be done without disturbing the texture in a way that releases fibers, making them viable approaches for confirmed asbestos ceilings. Others (skim coating, removal) require abatement first if the ceiling is positive. Knowing the asbestos status before choosing an approach keeps you from starting a project that turns into a more expensive problem.
In Austin, homes in Hyde Park, Allandale, Crestview, North Loop, and South Austin’s 78704 and 78745 zip codes were built primarily in the 1950s through 1970s — peak asbestos era. Test first on any pre-1980 ceiling.
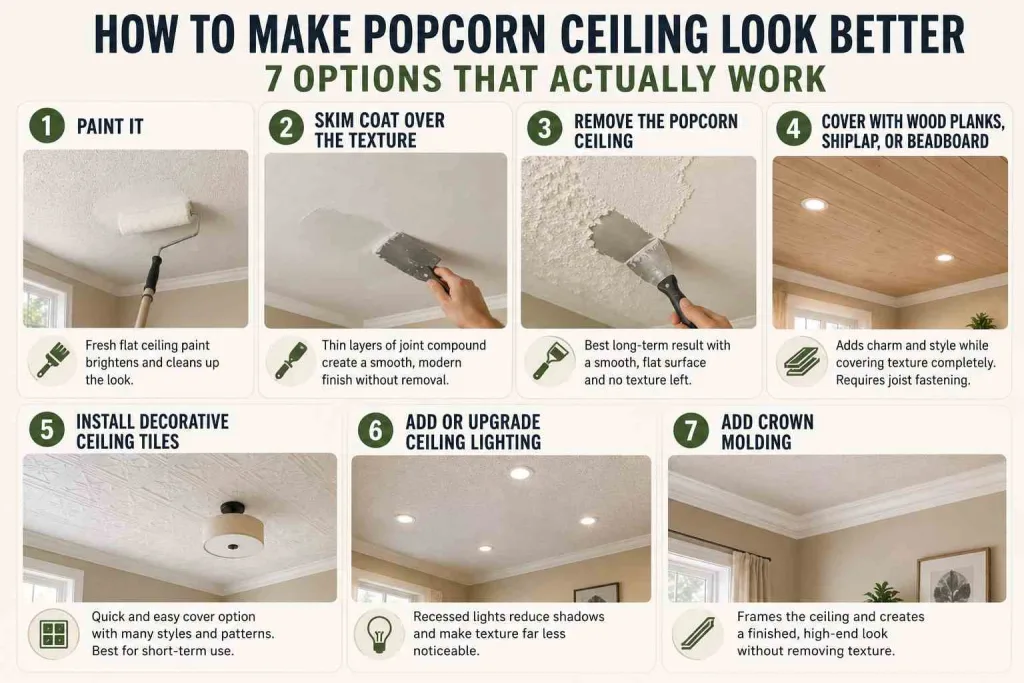
At a Glance: 7 Ways to Make a Popcorn Ceiling Look Better
⚠️ Always test for asbestos before disturbing old popcorn ceilings.
Option 1: Paint It — The Quickest Visible Improvement
A fresh coat of flat or matte ceiling paint is the fastest way to make a popcorn ceiling look better. Yellowed, dingy texture looks dramatically different after a fresh white or off-white coat — particularly in rooms where the ceiling color has shifted significantly from the original white over decades.
The key choices: use flat sheen only (eggshell or satin amplify texture shadows and make the ceiling look worse), apply with a slit foam acoustical roller or a 3/4″ thick nap roller (thin nap rollers do not reach the texture valleys), and stain-block any water stains with an oil-based or shellac primer before painting (KILZ Original or Zinsser BIN — water-based stain blockers do not reliably stop water stains on porous popcorn texture).
Honest limitation: Painting does not change the texture profile. Buyers still see a popcorn ceiling. On a pre-1980 Austin home, buyers and their agents will still raise the asbestos question. Painting is a short-term improvement, not a long-term solution.
Option 2: Skim Coat Over the Texture — Smooth Without Removing
Skim coating applies two to three thin layers of joint compound directly over the existing popcorn texture to create a smooth, flat surface. This is the right approach for painted popcorn ceilings that will not scrape cleanly, where the texture is firmly bonded and asbestos-free.
The process: water down all-purpose joint compound to a thick, creamy consistency; apply with a 14-inch skimming blade in two to three coats with 24-hour drying between each; sand the final coat smooth; prime and paint. The result is a smooth ceiling without the mess of scraping.
The limitation: skim coat over existing texture rarely achieves quite the same flatness as skim coat over bare drywall after removal — deep texture peaks require more coats and produce slightly more surface variation.
Cost in Austin: Professionally applied skim coat over existing texture (without removal) runs $1.50–$2.50 per square foot.
Option 3: Remove the Popcorn Ceiling — The Best Long-Term Result
Popcorn ceiling removal and smooth skim coat finish is what most Austin homeowners who are updating their homes or preparing for sale choose. It eliminates the texture entirely, addresses the asbestos question permanently (abatement if positive, unrestricted work if negative), and delivers a flat surface that accepts any finish treatment.
CeilingPrime’s standard process: coordinate asbestos testing first on pre-1980 ceilings, wet-scrape with vacuum capture (dust-controlled removal), skim coat the bare drywall in two coats, sand smooth, and prime. The ceiling is paint-ready when CeilingPrime finishes. This approach is the most common choice in Austin’s active renovation and pre-sale market.
Cost in Austin: $2.30–$4.05 per square foot for removal and skim coat combined. A 1,500 sq ft home runs $3,450–$6,075 — and typically returns up to 80% of that in resale value improvement.
Option 4: Cover With Wood Planks, Shiplap, or Beadboard
Installing tongue-and-groove wood planks, shiplap, or beadboard panels directly over the popcorn ceiling covers the texture without disturbing it — making this viable for asbestos-positive ceilings where full removal is not in the immediate budget. It also delivers a visual style that flat paint and skim coat cannot match: a farmhouse, craftsman, or mid-century modern character depending on the plank profile and finish.
The practical requirements: locate ceiling joists with a stud finder (planks must be nailed or screwed into joists, not just into the existing drywall and texture), account for the ceiling height reduction (1/4″ plywood panels or thin tongue-and-groove adds approximately 1/2″ to 3/4″ of height loss), adjust all electrical boxes and light fixtures to account for the new ceiling plane, and install crown molding at the wall junction to cover the panel edges cleanly.
Material cost: $2–$5 per square foot for shiplap or beadboard at Home Depot or Lowe’s. Installation labor adds significantly — ceiling work is slow and physical. Budget $5–$10 per square foot fully installed.
Honest limitation: On a home selling in Austin’s market, buyers see a wood plank ceiling as a style choice — some love it, some do not. It does not eliminate the underlying asbestos question the way abatement and removal does.
Option 5: Install Decorative Ceiling Tiles
Lightweight styrofoam or PVC peel-and-stick ceiling tiles are the easiest short-term cover option. They install directly over the existing texture with adhesive, require no tools or joist location, and are available in multiple patterns and finishes. This is a practical option for renters who cannot remove or significantly alter the ceiling, or for homeowners who want a quick visual change without construction.
The limitation is equally direct: these tiles move, sag, and peel in high-humidity conditions. Austin’s summer humidity is hard on adhesive-only installations on overhead surfaces. The tiles are lightweight and will not cause structural problems, but they are a cosmetic fix with limited longevity in Austin’s climate. They are not a solution that improves resale value.
Cost: $1–$3 per square foot in materials. DIY installation. Available at Home Depot, Lowe’s, and through online suppliers.
Option 6: Add or Upgrade Ceiling Lighting
Lighting placement dramatically affects how visible a popcorn ceiling texture is. A single central fixture creates oblique light that rakes across the texture surface, casting micro-shadows from every bump and making the texture look more pronounced. Multiple recessed lights (pot lights) positioned on a grid distribute light downward and outward without raking across the ceiling surface — which makes the texture significantly less visible.
Recessed lighting does not change the ceiling surface, but it changes how the ceiling reads in the room. In Austin homes where full removal is not immediately feasible but the texture is a daily visual irritation, recessed lighting is one of the highest-impact changes for the money. A licensed electrician typically charges $100–$200 per fixture installed in Austin.
Important: On pre-1980 ceilings, cutting holes for recessed lighting disturbs the texture — which means asbestos testing is required before any electrical work. Use a licensed electrician and get the ceiling tested first.
Option 7: Add Crown Molding
Crown molding does not change the ceiling surface but it frames it in a way that draws the eye to the wall-ceiling junction rather than to the ceiling plane. The architectural detail creates a visual transition that makes the room feel more finished, and in combination with a fresh coat of paint, can improve the overall impression significantly without touching the ceiling itself.
Crown molding is also the standard finishing step after wood plank installation or after drywall overlay — it covers the panel edges at the wall and creates a clean transition regardless of any slight ceiling irregularity. The main limitation for popcorn ceilings is that the textured surface makes it harder to create a tight joint between the molding and the ceiling without caulking and careful finishing work.
Cost: $3–$8 per linear foot installed by a carpenter, depending on profile complexity. A 12×15 room has approximately 54 linear feet of ceiling perimeter.
What Actually Makes the Biggest Difference?
From CeilingPrime’s experience on Austin homes, the single change that most dramatically improves a room with a popcorn ceiling — in terms of visual impact, buyer perception, and long-term value — is removal and smooth skim coat. Painting freshens it. Wood planks style it. Recessed lighting de-emphasizes it. But a flat, smooth ceiling changes how the room reads fundamentally: taller, brighter, cleaner.
For homeowners who are staying in the home and want the visual improvement without the cost: paint is the most cost-effective short-term answer. For homeowners approaching a sale or renovation: removal is the investment that pays back the most reliably in Austin’s market.
Frequently Asked Questions
Q. How do you make a popcorn ceiling look better without removing it?
Fresh flat paint is the fastest and cheapest improvement. For a bigger change without removal: skim coat over the texture to smooth it, install wood planks or beadboard over the ceiling, or switch from a single center fixture to recessed lighting. Crown molding at the wall-ceiling junction adds polish without touching the ceiling surface.
Q. Can you make a popcorn ceiling look modern?
Yes. The most effective modern transformations are: (1) removal and skim coat to flat smooth finish — the standard in updated Austin homes; (2) wood plank installation for a modern-rustic or farmhouse character; or (3) recessed lighting to eliminate the raking-light shadows that make the texture look dated. Paint alone freshens the appearance but does not change the modern vs. dated read.
Q. What is the cheapest way to cover a popcorn ceiling?
Paint is cheapest — $50–$200 in materials for a DIY job. Peel-and-stick decorative tiles are the next tier at $1–$3 per square foot in materials. For a more permanent improvement, skim coating over the existing texture runs $1.50–$2.50 per square foot professionally in Austin — cheaper than full removal but more effective than painting.
Q. Does painting a popcorn ceiling make it look better?
Yes, meaningfully — especially if the ceiling is yellowed from age. Fresh flat white paint on a cleaned, stain-blocked surface looks dramatically better than a dirty, aged original. The texture profile does not change, but the color does, and the room reads as fresher and brighter. The improvement is real but temporary — yellowing returns over years, and the ceiling is still recognizably popcorn.
Q. Is it worth fixing a popcorn ceiling before selling a house in Austin?
In most cases, yes. Austin buyers in neighborhoods like Hyde Park, Allandale, and South Austin expect smooth ceilings in updated homes. A popcorn ceiling gives buyers a negotiating point. Removal typically returns up to 80% of its cost in reduced buyer negotiation and faster sale timelines.
At minimum, a freshly painted popcorn ceiling is better than a yellowed one — but removal and skim coat is the option that consistently performs best in Austin’s pre-sale renovation market.