What Is a Tray Ceiling? Types, Ideas, Costs & Design Guide
A tray ceiling is a recessed center section that sits higher than the surrounding flat perimeter. The outer edge stays at the standard ceiling height. The inner section rises 2 to 12 inches higher. The step between the two levels creates a tray-like shape — like an inverted serving tray pressed into the ceiling.
Also called a recessed ceiling or inverted ceiling, the tray ceiling adds architectural depth and visual interest to rooms that would otherwise have a flat, featureless overhead surface. It is one of the most popular ceiling upgrades in new construction and high-end renovations. This guide covers What Is a Tray Ceiling, 6 types, 8 design ideas, lighting options, paint and color techniques, pros and cons, 2026 costs, and how to build one.
6 Types of Tray Ceiling
1. Single-step tray: The most common type. One flat step separates the outer perimeter from the raised center. The step is usually 2 to 6 inches. Clean, simple, and works with any design style.
2. Multi-step tray: Two or three graduated steps lead from the perimeter to the raised center. Each step adds 2 to 3 inches of height. Creates a layered, tiered effect. Popular in formal dining rooms.
3. Angled tray: The transition from the perimeter to the raised center is a sloped surface instead of a vertical step. The angle creates a softer, more dramatic visual. This tray ceiling type suits bedrooms and living rooms.
4. Coved tray: The transition between the perimeter and the center is a curved, concave shape. The smooth curve adds elegance and softens the geometric edge. Rope lighting inside the cove creates a signature glow.
5. Coffered tray: A grid of beams frames the raised center. The beam grid creates a coffered effect inside the tray. This is the most architectural and expensive option.
6. Double tray: Two nested trays, one inside the other. The outer tray steps up from the perimeter. The inner tray steps up again to a higher center. Creates the most visual depth.

Tray Ceiling vs Other Ceiling Types
| Ceiling Type | Shape | Cost/sq ft | Best For |
| Tray ceiling | Flat perimeter + raised center | $3–$8 | Bedrooms, dining rooms, entryways |
| Coffered ceiling | Grid of recessed panels | $10–$20 | Formal rooms, libraries |
| Vaulted ceiling | Angled slopes following roof pitch | $15K–$35K+ | Great rooms, living rooms |
| Cathedral ceiling | Two equal slopes meeting at ridge | $15K–$35K+ | Great rooms, chapels |
| Flat ceiling | No variation | $2–$5 | Every room (default) |
A tray ceiling costs less than coffered or vaulted options. It adds architectural presence without structural changes to the roof. The framing stays within the existing ceiling joist cavity.
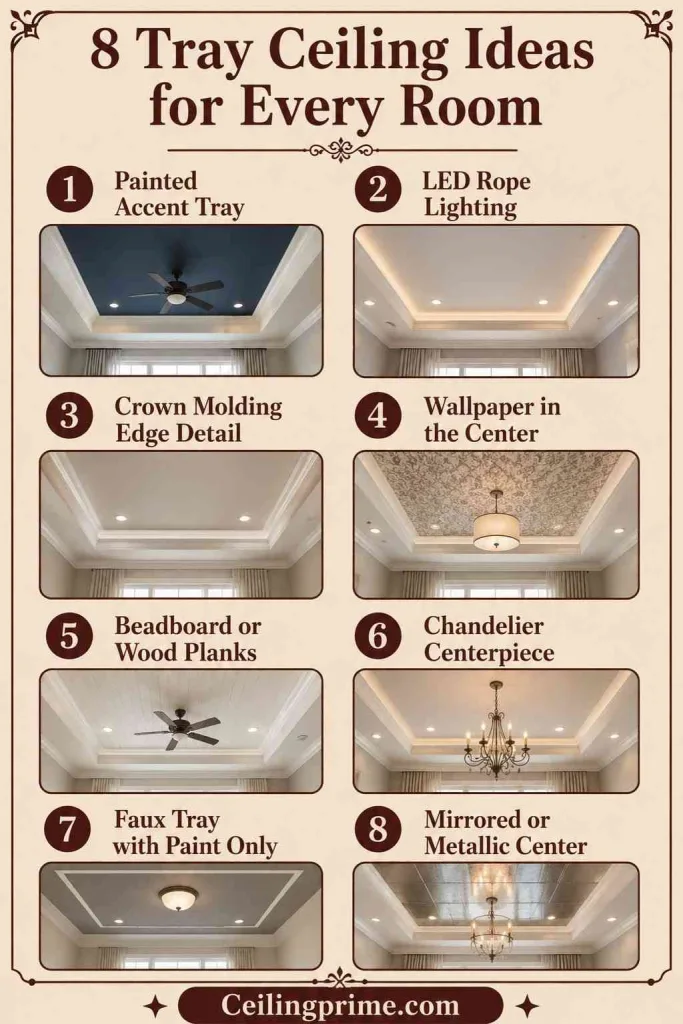
8 Tray Ceiling Ideas for Every Room
1. Painted Accent Tray
Paint the raised center a different color than the perimeter. A deep navy center with white perimeter creates a bold focal point. A soft gray center with white edges adds subtle depth. This is the easiest and cheapest tray ceiling customization.
2. LED Rope Lighting in the Step
Install LED strip lights along the inside edge of the step between the perimeter and the raised center. The light washes upward and creates a warm ambient glow. Dimmable LED strips let you control the mood. This is the most popular lighting technique for tray ceilings in 2026.
3. Crown Molding Edge Detail
Add crown molding along the step where the perimeter meets the raised center. The molding adds a traditional, elegant finish. Paint the molding white for contrast with a painted center.
4. Wallpaper in the Raised Center
Apply patterned wallpaper to the raised center section. Geometric patterns, metallic finishes, and subtle textures add personality without overwhelming the room. The perimeter stays painted for contrast.
5. Beadboard or Wood Planks in the Center
Install white beadboard or natural wood planks inside the raised center. The wood texture adds farmhouse or coastal character. The flat perimeter frames the textured center.
6. Chandelier Centerpiece
Hang a chandelier or oversized pendant from the center of the tray. The recessed frame draws attention to the fixture. The tray creates a natural spotlight effect around the light.
7. Faux Tray with Paint Only
No construction needed. Paint a rectangle on a flat ceiling using painter’s tape. Use a darker shade inside the taped border. The color difference creates the illusion of a recessed tray without any framing or drywall work. Cost: paint only.
8. Mirrored or Metallic Center
Apply a metallic paint finish or mirror panels to the raised center section. The reflective surface bounces light downward and makes the room feel larger. This technique works best in dining rooms and formal entryways.
Best Rooms for a Tray Ceiling
- Master bedroom: The most popular room for a tray ceiling. The raised center sits directly above the bed and creates a focal point that replaces a headboard wall. LED rope lighting adds a soft nighttime glow.
- Dining room: A tray ceiling defines the dining area. It frames the chandelier and separates the dining space from an open-concept kitchen or living room.
- Living room: A wide tray ceiling adds volume to the main gathering space. A coved or multi-step tray adds formality. LED lighting adds ambient warmth for evening entertaining.
- Entryway or foyer: A tray ceiling in the entryway creates a grand first impression. The raised center adds height and drama to a space that is often small.
- Kitchen: A tray ceiling over a kitchen island separates the cooking area from the rest of an open floor plan. Recessed can lights in the perimeter provide task lighting below.
- Bathroom: A small tray ceiling in a master bathroom adds a luxury spa feel. Keep the step shallow (2–3 inches) in rooms with 8-foot ceilings.

Pros and Cons of a Tray Ceiling
| Pros | Cons |
| Adds architectural depth and character | Costs $500–$3,000+ per room |
| Makes rooms feel taller and more spacious | Not practical for rooms with 8-foot ceilings or lower |
| Creates a natural frame for chandeliers and pendants | Collects dust in the step and cove edges |
| Increases home value — buyers see it as premium | Harder to paint than a flat ceiling |
| Defines spaces in open-concept floor plans | Requires a minimum 9-foot ceiling to look proportional |
A tray ceiling works best in rooms with 9-foot or taller ceilings. At 8 feet, the raised center has too little room to create a visible step without making the perimeter feel low.
Tray Ceiling Cost in 2026
| Component | Cost Range |
| New construction (framed during build) | $500–$1,500 per room |
| Retrofit into existing flat ceiling | $1,500–$3,000+ per room |
| Crown molding for tray edge | $3–$8 per linear foot |
| LED rope lighting installation | $200–$600 |
| Painting (two-tone ceiling) | $200–$500 |
| Faux tray (paint only, no construction) | $50–$150 |
Building a tray ceiling during new construction is 50–70% cheaper than retrofitting one into an existing home. The framing goes in before drywall, which saves labor.
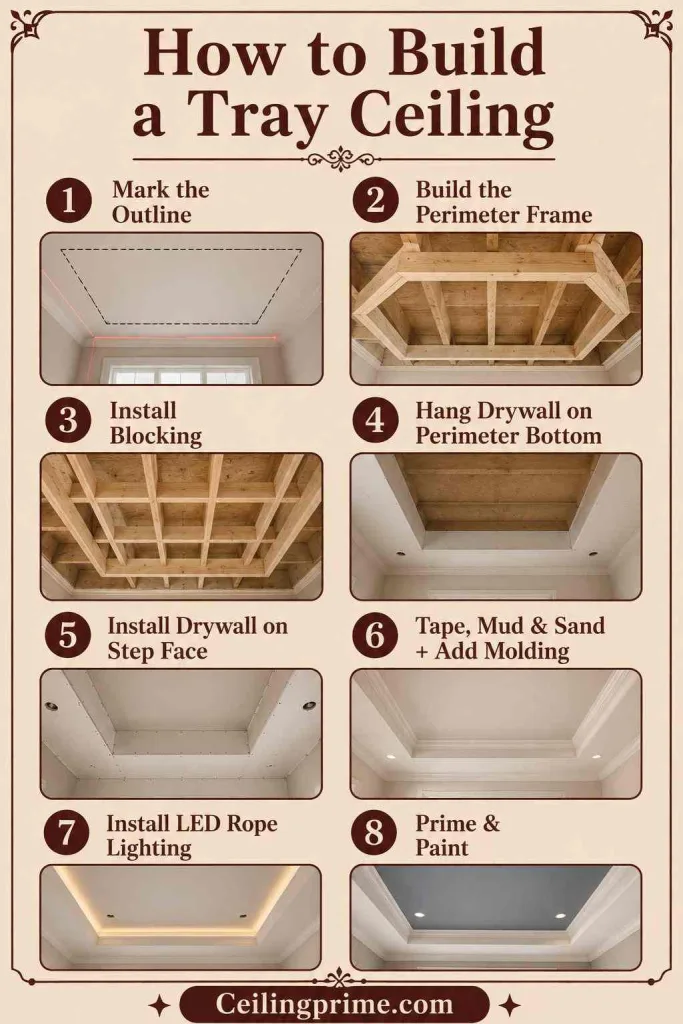
How to Build a Tray Ceiling?
Building a tray ceiling involves lowering the perimeter while keeping the center at the original height. The perimeter frame hangs from the existing joists. Here is the process.
- Step 1: Mark the tray outline on the ceiling. Measure inward 12 to 24 inches from each wall to define the perimeter border width.
- Step 2: Build a frame of 2x4s or 2x6s around the perimeter. Attach the frame to the existing ceiling joists with hangers or screws. The frame depth determines the step height (2 to 6 inches for a single-step tray).
- Step 3: Install blocking between the frame members for drywall attachment points.
- Step 4: Hang drywall on the bottom of the perimeter frame. This creates the lower flat section around the edges.
- Step 5: Install drywall on the vertical step face between the lower perimeter and the higher center. This is the visible step.
- Step 6: Tape, mud, and sand all seams. Add crown molding to the step edge for a finished look.
- Step 7: Install LED rope lighting in the step cove if desired. Run wiring before closing the drywall.
- Step 8: Prime and paint. Use two colors for a two-tone effect, or one color for a subtle, monochromatic tray.
A tray ceiling retrofit takes 2 to 4 days for a professional crew. DIY is possible for experienced homeowners with framing and drywall skills.
Add Depth to Any Room Without Structural Changes
A tray ceiling adds architectural presence to bedrooms, dining rooms, and living rooms for a fraction of what vaulted or coffered ceilings cost. The raised center creates depth. LED lighting adds ambient warmth. Crown molding adds elegance. And the entire upgrade fits within the existing ceiling joist cavity — no roof modifications required.
Frequently Asked Questions
What is the minimum ceiling height for a tray ceiling?
9 feet. At 8 feet, the perimeter drop and raised center do not have enough separation to look proportional. The perimeter feels too low. A 9-foot ceiling allows a 3-to-6 inch step with comfortable head clearance.
Does a tray ceiling add home value?
Yes. Buyers see tray ceilings as a premium architectural detail. They add perceived quality and craftsmanship. Homes with tray ceilings in the master bedroom and dining room sell faster in most markets.
Can I add a tray ceiling to an existing room?
Yes. A retrofit involves building a perimeter frame below the existing flat ceiling. The center stays at the original height. The perimeter drops down to create the step. Cost: $1,500 to $3,000 per room.
What lighting works best in a tray ceiling?
LED rope lights in the step cove are the most popular choice. Recessed can lights in the perimeter provide task lighting. A chandelier in the center adds a formal focal point. Dimmable lights on all circuits give you full control.
Can I create a faux tray ceiling without construction?
Yes. Tape a rectangle on a flat ceiling with painter’s tape. Paint the inside a darker shade. The color contrast creates the illusion of depth. It costs under $150 in paint and tape.
What is the difference between a tray ceiling and a coffered ceiling?
A tray ceiling has one raised center section. A coffered ceiling has a grid of recessed panels framed by beams. Coffered is more complex and costs 2 to 3 times more. Both add architectural character.